A walkthrough for making your own operating system in Rust, inspired by Philipp Oppermann's blog "Writing an OS in Rust".
View the book
The tutorial uses mdBook. The latest version of this tutorial, deployed from the main branch, is available at https://rust-os-tutorial.netlify.app.
Version
You are viewing v2.
🚧 In Construction 🚧
Feel free to follow this tutorial. New parts will be added! New parts might also come as a new tutorial version, in which case you might have to make some adjustments to your OS first before following the tutorial for new parts.
Contribution Welcome
This is a tutorial and meant to be a community project. Contributions are welcome. Some examples are:
- Fixing typos in tutorial or code
- Making improvements to tutorial or code
- Adding translations
- Making a nice website for this tutorial
- Adding new parts (but make an issue first so we can plan it first)
Git branches
main is where all of the tutorials go (the "production" branch for tutorials). The tutorial uses mdBook. You can read about its installation and the commands to generate the book. dev is similar to main, but it is a development / preview branch.
code is the branch which contains the code that goes along with the tutorial. Each commit is 1 part of the tutorial. To edit main and code at the same time, you can use git worktree add code --guess-remote, and the code branch will be in the code folder.
ming part number. code-dev is the corresponding development branch.
next is an OS that is very similar to the tutorial OS where I try out implementing new things. It is kind of a preview of what will come to this tutorial. It is kind of messy because I might rebase next based on the tutorial, but right now it's based on an old tutorial version.
Git and contributing
Adding a new part (in the end)
Pretty simple:
- Add a commit to the
mainbranch- Create
Part ## - <Title>/README.md, plus you can add additional files such as images.
- Create
- Create a commit on
code. Here you can make changes to the OS code.
Changing existing parts
If you are changing existing old part, or inserting a part before the latest part:
- Update the
mainbranch- Modify the part that you are changing
- If you are inserting a part before the last part, renumber all of the next parts
- If code in the next tutorials changes, update those too
- Update the
codebranch- Use
git rebaseto edit the commit for the part you are modifying
- Use
Since this is full of rebasing, to save time, talk with me first before making a significant change, even if you are adding a new part (because someone else could also be adding a new part at the same time.)
Viewing the old version
If you started viewing the v1 version and want to continue it, you can view the v1 git tag. You can view the parts at v1p<n> where n is the part number. Still, I would recommend starting over from v2.
Introduction
Do you want to write your own operating system, from hello world to automatic updates? Do you like Linux and Redox OS, but want to make your own operating system from the ground up, the way you want? Do you want to write your OS in Rust? Then this tutorial is for you!
Who this is for
You don't need to know Rust but you need to be able to learn. This tutorial will not teach you Rust, but it will provide links to learn if you don't know.
Setting up the Development Environment
If you are using NixOS, then most of this will be very easy for you.
You will need...
- Rust installed.
- A code editor. This is entirely your preference. I would recommend Vscodium with rust-analyzer, or Zed.
- Git
If you are using NixOS, you can just run nix develop in the directory containing flake.nix. I recommend using direnv and nix-direnv so you can simply run direnv allow once and then your development environment will be set up automatically every time you enter the folder. If you're using Vscodium I would also recommend using the direnv extension.
Boot Loaders
The first thing we need to do is give our operating system control of the computer.
The entry-point of an operating system is an executable file. When a computer turns on, the first thing it runs is the firmware. Modern computers have UEFI firmware, and very old computers have BIOS. The firmware looks for operating system executable files in various locations, including internal SSDs and HDDs, as well as external locations such as USB disks or servers on the network.
The protocol for giving control of the computer to an operating system is different for BIOS and UEFI. Working with BIOS and UEFI can be very complicated. Operating systems have boot loaders which go between the firmware and the actual operating system's entry point. The firmware gives control to the boot loader. Then the bootloader can do its own stuff, and eventually looks for the operating system entry point and gives control to it.
There are many boot loaders and boot loader protocols. A boot loader protocol basically states "this bootloader will boot operating systems in this way", and specific boot loader implementations can implement common boot protocols. Some examples of boot loader protocols are:
- GRUB
- Multiboot
- The Linux Boot Protocol
- Limine
- The Rust OSDev Bootloader, written for https://os.phil-opp.com/
In this tutorial, we will use Limine, because it is modern, simple, and makes writing an OS easy for us.
Limine
By default, Limine simply calls an entry function in our operating system. We can ask Limine to do more things for us, such as setting up other CPUs to run our operating system's code on. Before calling our entry function, Limine goes through our executable file, checking for special data which are called Limine requests. Limine then does the set-up that the request asked it to do, and fills that area in the executable's memory with its response.
It's important to know that Limine requests and responses are not like HTTP requests and responses, where the client's code and server's code is running at the same time. All Limine requests get processed before our OS starts, and once our OS starts, Limine is not running anymore, and all Limine responses are loaded in memory, which our OS can access.
Our initial code will be based off of limine-rust-template. We will only be targeting x86_64.
Get Limine
We need two types of compiled files from Limine:
- Files that are needed to boot Limine (including
BOOTX64.EFI) - The actual
limineexecutable, which we run on our host operating system (the operating system that you are writing the Rust code in)
If you're on NixOS, you will already have Limine from flake.nix. If you're not on NixOS, you can download / install it with Limine's instructions. Once you have the files, make sure that the environmental variable LIMINE_PATH is set to the folder containing BOOTX64.EFI, and the limine executable is in your PATH.
The rust-toolchain.toml file
Writing an operating system in Rust requires using nightly features, so we will specify a nightly toolchain. So create a rust-toolchain.toml file:
[toolchain]
channel = "nightly-2025-05-31"
components = ["rust-src"]
Configuring Limine
Create a file kernel/limine.conf. Leave it empty for now. We will use it to configure Limine later.
The Cargo workspace
We will have two Rust projects: the kernel, which is our actual operating system, and the runner, which will have programs that run our operating system in a virtual machine. For now, we'll just have the runner, and make the kernel in the next part.
Create a file Cargo.toml:
[workspace]
resolver = "3"
members = ["runner"]
Then create runner/Cargo.toml:
[package]
name = "runner"
version = "0.1.0"
edition = "2024"
publish = false
build.rs
Our runner will have two Rust programs. main.rs, which launches the virtual machine, and build.rs, which builds the .iso file which can be used to run our OS (in a virtual machine or on a real computer). Create runner/build.rs:
fn main() { }
Cargo will run this file before running main.rs.
We start by reading some env vars:
// This is the folder where a build script (this file) should place its output
let out_dir = PathBuf::from(env::var("OUT_DIR").unwrap());
// This is the `runner` folder
let runner_dir = PathBuf::from(env::var("CARGO_MANIFEST_DIR").unwrap());
// This folder contains Limine files such as `BOOTX64.EFI`
let limine_dir = PathBuf::from(env::var("LIMINE_PATH").unwrap());
To create the ISO, we will first create a folder which we want to be the root of the ISO, and then use xorriso to create the ISO (make sure you have xorriso installed).
We want this folder structure:
iso_root/
├── limine.conf
├── boot
│   └── limine
│       ├── limine-bios-cd.bin
│       ├── limine-bios.sys
│       └── limine-uefi-cd.bin
└── EFI
    └── BOOT
        ├── BOOTIA32.EFI
        └── BOOTX64.EFI
The following code copies files to achieve this:
// We will create an ISO file for our OS
// First we create a folder which will be used to generate the ISO
// We will use symlinks instead of copying to avoid unnecessary disk space used
let iso_dir = out_dir.join("iso_root");
create_dir_all(&iso_dir).unwrap();

// Limine config will be in `limine.conf`
let limine_conf = iso_dir.join("limine.conf");
ensure_symlink(runner_dir.join("limine.conf"), limine_conf).unwrap();

let boot_dir = iso_dir.join("boot");
create_dir_all(&boot_dir).unwrap();

// Copy files from the Limine packaeg into `boot/limine`
let out_limine_dir = boot_dir.join("limine");
create_dir_all(&out_limine_dir).unwrap();
for path in [
    "limine-bios.sys",
    "limine-bios-cd.bin",
    "limine-uefi-cd.bin",
] {
    let from = limine_dir.join(path);
    let to = out_limine_dir.join(path);
    ensure_symlink(from, to).unwrap();
}

// EFI/BOOT/BOOTX64.EFI is the executable loaded by UEFI firmware
// We will also copy BOOTIA32.EFI because xorisso will complain if it's not there
let efi_boot_dir = iso_dir.join("EFI/BOOT");
create_dir_all(&efi_boot_dir).unwrap();
for efi_file in ["BOOTX64.EFI", "BOOTIA32.EFI"] {
    ensure_symlink(limine_dir.join(efi_file), efi_boot_dir.join(efi_file)).unwrap();
}
With the helper function:
pub fn ensure_symlink<P: AsRef<Path>, Q: AsRef<Path>>(original: P, link: Q) -> io::Result<()> {
    match remove_file(&link) {
        Ok(()) => Ok(()),
        Err(error) => match error.kind() {
            ErrorKind::NotFound => Ok(()),
            _ => Err(error),
        },
    }?;
    symlink(original, link)?;
    Ok(())
}
Next, we use xorriso to create an ISO:
// We'll call the output iso `os.iso`
let output_iso = out_dir.join("os.iso");
// This command creates an ISO file from our `iso_root` folder.
// Symlinks will be read (the contents will be copied into the ISO file)
let status = std::process::Command::new("xorriso")
    .arg("-as")
    .arg("mkisofs")
    .arg("--follow-links")
    .arg("-b")
    .arg(
        out_limine_dir
            .join("limine-bios-cd.bin")
            .strip_prefix(&iso_dir)
            .unwrap(),
    )
    .arg("-no-emul-boot")
    .arg("-boot-load-size")
    .arg("4")
    .arg("-boot-info-table")
    .arg("--efi-boot")
    .arg(
        out_limine_dir
            .join("limine-uefi-cd.bin")
            .strip_prefix(&iso_dir)
            .unwrap(),
    )
    .arg("-efi-boot-part")
    .arg("--efi-boot-image")
    .arg("--protective-msdos-label")
    .arg(iso_dir)
    .arg("-o")
    .arg(&output_iso)
    .stderr(Stdio::inherit())
    .stdout(Stdio::inherit())
    .status()
    .unwrap();
assert!(status.success());
Then we use the limine program to modify the ISO to work as a a hybrid ISO that boots on both BIOS and UEFI:
// This is needed to create a hybrid ISO that boots on both BIOS and UEFI. See https://github.com/limine-bootloader/limine/blob/v9.x/USAGE.md#biosuefi-hybrid-iso-creation
let status = std::process::Command::new("limine")
    .arg("bios-install")
    .arg(&output_iso)
    .stderr(Stdio::inherit())
    .stdout(Stdio::inherit())
    .status()
    .unwrap();
assert!(status.success());
Now our build.rs will create a os.iso file! The location of this file is not fixed, and is decided by Cargo. To pass the ISO's path to main.rs, we add:
let output_iso = output_iso.display();
println!("cargo:rustc-env=ISO={output_iso}");
main.rs
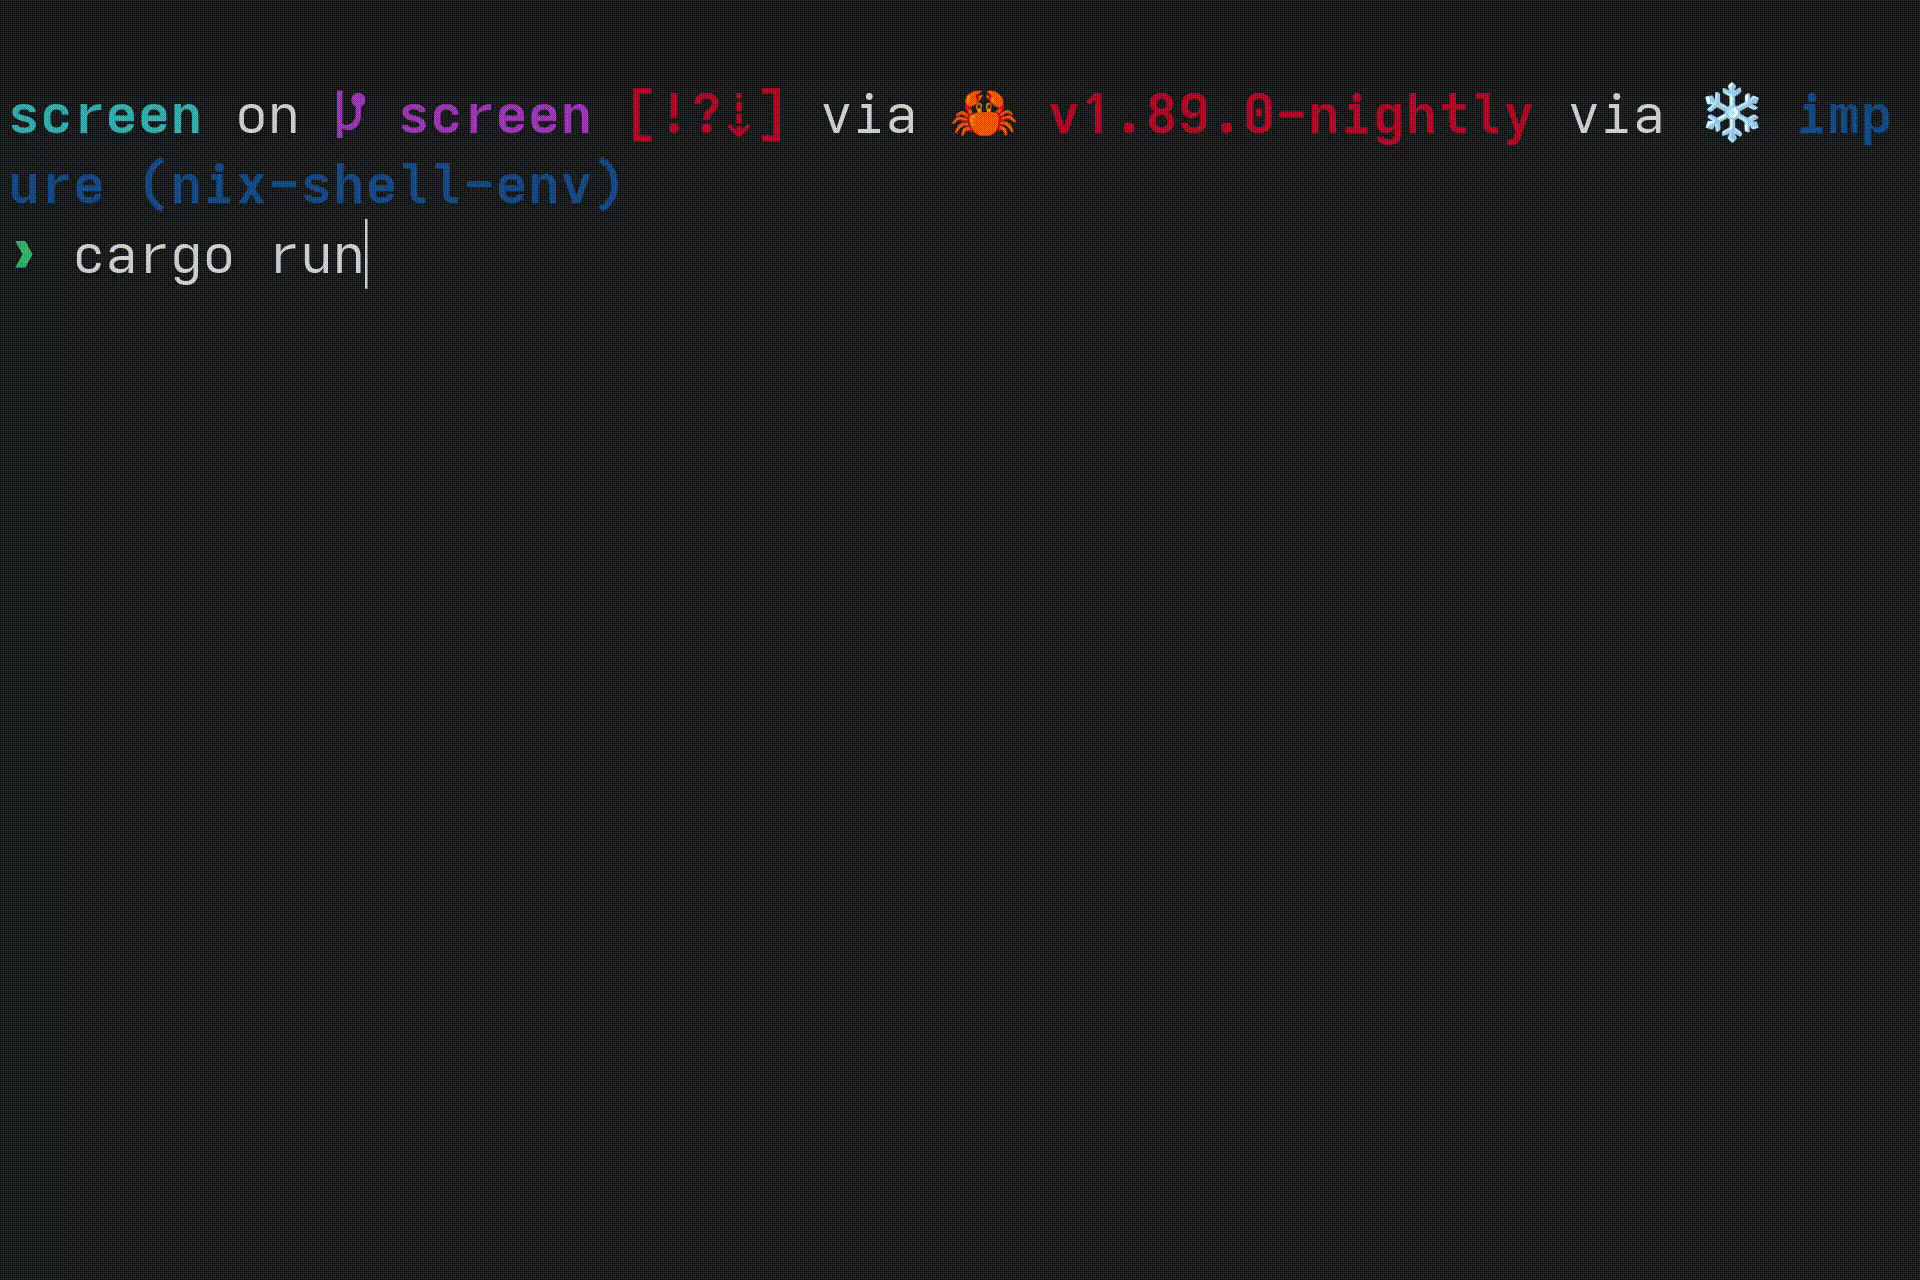
Let's start out with checking that ISO gets set:
let iso = env::var("ISO").unwrap();
println!("ISO path: {iso:?}");
Then run
cargo run
Example output:
ISO path: "/home/rajas/Documents/rust-os-tutorial/part-0/target/debug/build/runner-d62dee2feeec9cbb/out/os.iso"
Let's run qemu!
let ovmf = env::var("OVMF_PATH").unwrap();

// Qemu runs our OS in a virtual
let mut qemu = Command::new("qemu-system-x86_64");

// Specify the path to the ISO
qemu.arg("-cdrom");
qemu.arg(env!("ISO"));
// For UEFI on qemu, the path to OVMF.fd is needed
qemu.arg("-bios").arg(ovmf);

// Pass any args to qemu
env::args().skip(1).for_each(|arg| {
    qemu.arg(arg);
});
let exit_status = qemu.status().unwrap();
process::exit(exit_status.code().unwrap_or(1));
Make sure that OVMF_PATH points to OVMF.fd. It's needed for UEFI on qemu.
Now you should see the Limine menu!
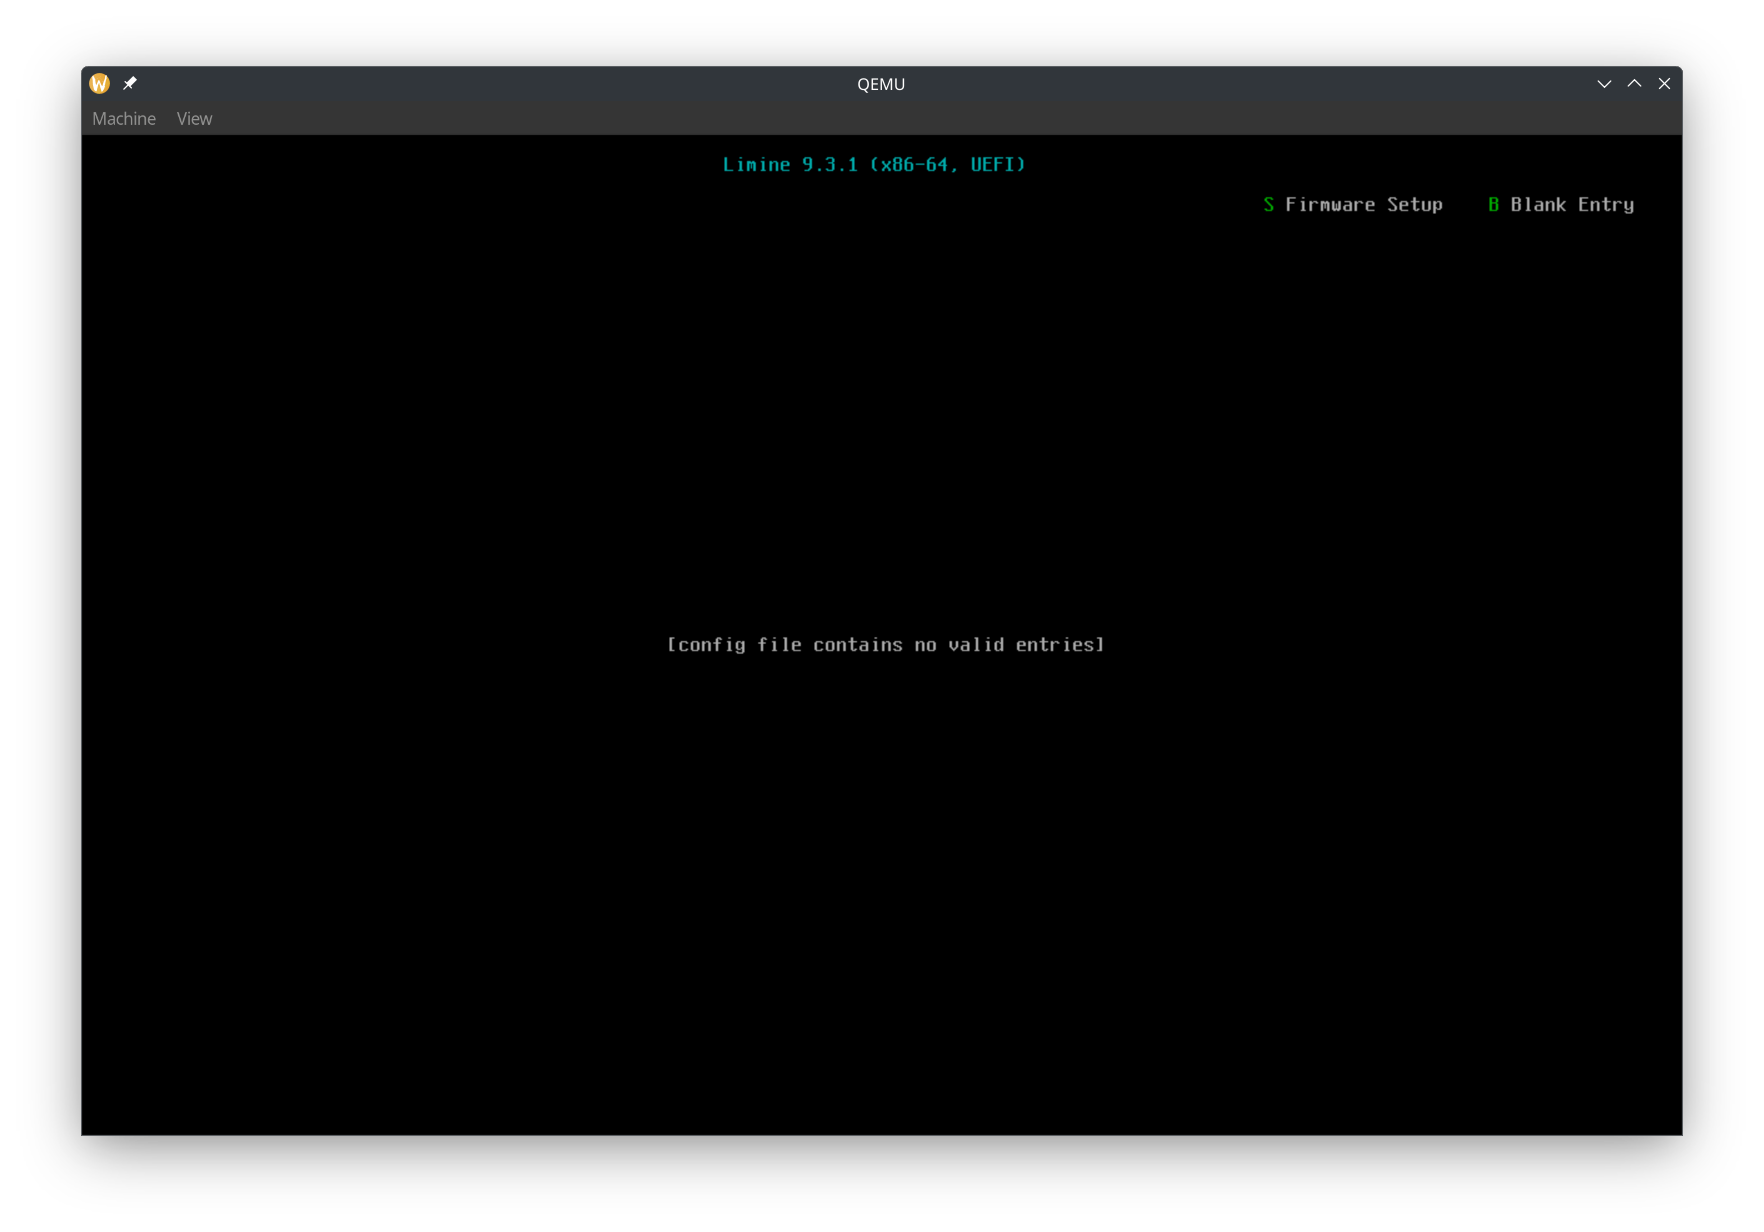
Booting our kernel with Limine
We now have a runner which launches Limine in a VM. Now let's write the kernel that will get booted by Limine.
The x86_64-unknown-none target
In Rust, targets basically are what we are compiling for. Are we compiling it as a program that can run in Linux? A program that can run in Windows? A program to run in the web with WebAssembly? For our kernel, we are targeting bare metal on x86_64, so we need the x86_64-unknown-none target. In rust-toolchain.toml, add
targets = ["x86_64-unknown-none"]
Creating package kernel
Let's set the following properties in Cargo.toml
members = ["runner", "kernel"]
default-members = ["runner"]
default-members = ["runner"]
tells cargo that when we run cargo run, we want to run the binary in the runner project.
Create a file kernel/Cargo.toml:
[package]
name = "kernel"
version = "0.1.0"
edition = "2024"
publish = false

[dependencies]
limine = "0.4"
x86_64 = "0.15.2"

[[bin]]
name = "kernel"
test = false
bench = false
Here we have two dependencies. limine is the Rust library to declare Limine requests and read responses. x86_64 contains many useful functions for bare metal x86_64 programming.
main.rs
Now it's time to actually write the operating system's code! Create a file kernel/src/main.rs. In the top, add
#![no_std]
#![no_main]
This tells rust to not use the std part of the standard library and to not have a normal main function.
Next it's time for the special data to be read by Limine, as mentioned earlier:
/// Sets the base revision to the latest revision supported by the crate.
/// See specification for further info.
/// Be sure to mark all limine requests with #[used], otherwise they may be removed by the compiler.
#[used]
// The .requests section allows limine to find the requests faster and more safely.
#[unsafe(link_section = ".requests")]
static BASE_REVISION: BaseRevision = BaseRevision::new();

/// Define the stand and end markers for Limine requests.
#[used]
#[unsafe(link_section = ".requests_start_marker")]
static _START_MARKER: RequestsStartMarker = RequestsStartMarker::new();
#[used]
#[unsafe(link_section = ".requests_end_marker")]
static _END_MARKER: RequestsEndMarker = RequestsEndMarker::new();
Don't worry about understanding the details of the code. What you need to know is that the link_sections place the static variables in a location that Limine reads, and the above code has 1 request, which is the base revision request. This request is to tell Limine what version of the Limine protocol we want.
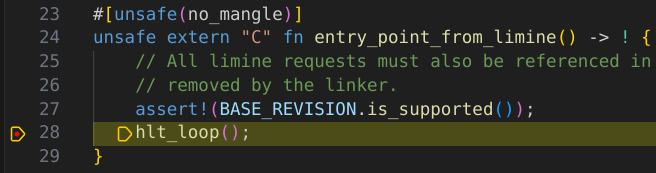
Next we write our entry point function
#[unsafe(no_mangle)]
unsafe extern "C" fn entry_point_from_limine() -> ! {
    // All limine requests must also be referenced in a called function, otherwise they may be
    // removed by the linker.
    assert!(BASE_REVISION.is_supported());
    hlt_loop();
}
The #[unsafe(no_mangle)] makes sure that the compiler doesn't rename the entry_point_from_limine function to something else, since we need the entry point function to have a consistent name.
We mark the function as unsafe to reduce the chance of accidentally calling our main function from our own code.
We use extern "C" because Limine will call our function using the C calling convention.
First we check BASE_REVISION and make sure that it was set to 0 using the is_supported function. This way, we know that Limine booted our kernel using the protocol version that we expect. Also, if we do not reference the BASE_REVISION variable, the compiler might remove the Limine request, causing Limine to not boot our OS correctly.
Next, we do nothing. Instead of using loop {} to do nothing, we use call hlt_loop:
fn hlt_loop() -> ! {
    loop {
        x86_64::instructions::hlt();
    }
}
We do the hlt instruction to tell the CPU to stop. The CPU isn't guaranteed to stop forever, and it might resume doing stuff and execute the next instruction. That's why we have a forever loop in which we call hlt.
But we also have to add a panic handler:
#[panic_handler]
fn rust_panic(_info: &core::panic::PanicInfo) -> ! {
    hlt_loop();
}
When using std, Rust already includes a panic handler which prints a nice message. However, since we are writing Rust for bare metal, we need to specify a function which gets called if our kernel panics. Later, we can also print a pretty message with the panic error, but for now, we just call hlt_loop.
Linker File
To make our kernel's executable file compatible with Limine, we need to add a linker file (kernel/linker-x86_64.ld). An important part to note is ENTRY(entry_point_from_limine), where entry_point_from_limine is referencing the entry_point_from_limine function in our code. If you want, you can call the entry point function something else, such as kernel_main or kmain, as long as you update the function in main.rs as well as the linker file.
To tell Cargo to use our linker file, create kernel/build.rs:
use std::path::PathBuf;

fn main() {
    let arch = std::env::var("CARGO_CFG_TARGET_ARCH").unwrap();
    let dir = std::env::var("CARGO_MANIFEST_DIR").unwrap();
    let linker_file = PathBuf::from(dir).join(format!("linker-{arch}.ld"));
    let linker_file = linker_file.to_str().unwrap();

    // Tell cargo to pass the linker script to the linker..
    println!("cargo:rustc-link-arg=-T{linker_file}");
    // ..and to re-run if it changes.
    println!("cargo:rerun-if-changed={linker_file}");
}
.cargo/config.toml
We also need to pass an option to rustc. Create .cargo/config.toml:
[target.x86_64-unknown-none]
rustflags = ["-C", "relocation-model=static"]
Without a static ELF relocation model, Limine will not boot our kernel.
Building
At this point, we should be able to build the kernel:
cargo build --package kernel --target x86_64-unknown-none
Putting the kernel in our ISO
We want the build process to be like this:
- Build the kernel
- Create the ISO
- Run the ISO in qemu
We need the runner/build.rs to have the output binary from the kernel package. Cargo has a (experimental) feature that lets us do that. First, let's enable the feature by adding this to the top of .cargo/config.toml:
[unstable]
# enable the unstable artifact-dependencies feature, see
# https://doc.rust-lang.org/nightly/cargo/reference/unstable.html#artifact-dependencies
bindeps = true
Next, let's tell Rust that the runner/build.rs depends on the output binary from the kernel package. Add this to runner/Cargo.toml:
[build-dependencies]
kernel = { path = "../kernel", artifact = "bin", target = "x86_64-unknown-none" }
Now we can add this to runner/build.rs:
// Cargo passes us the path the to kernel executable because it is an artifact dep
let kernel_executable_file = env::var("CARGO_BIN_FILE_KERNEL").unwrap();
Cargo will build the kernel first before building the runner.
Let's put our kernel as kernel:
// Symlink the kernel binary to `kernel`
let kernel_dest = iso_dir.join("kernel");
ensure_symlink(&kernel_executable_file, &kernel_dest).unwrap();
Updating Limine config
We put our kernel in kernel, now we need to tell Limine to add a boot option to boot it. Update runner/limine.conf:
# The entry name that will be displayed in the boot menu.
/OS From Rust OS Tutorial
    protocol: limine
    kernel_path: boot():/kernel
Note that we specify the limine protocol. The Limine bootloader can also boot with other protocols, but we want the Limine protocol.
In action
Now let's run it again! Now QEMU will show our boot option, and you can boot our kernel!

Debugging with GDB
We now made it so that there is a black screen after Limine boots our kernel. But... is our kernel working? Did it check the Limine version and enter the hlt_loop?
Let's debug our kernel to find out!
cargo r -- -s -S
The -s tells QEMU to start a GDB debug server at port 1234. The -S tells QEMU to immediately pause the VM (so that we can attach the debugger before our code runs).
Now, we need to find the path to the kernel binary. Looking at the output from the runner, our iso is at <something>/out/os.iso. We can get the path to the kernel at <something>/out/iso_root/kernel.
Make sure you have gdb installed. Run gdb <kernel_file_path>. In my case, it is:
gdb /home/rajas/Documents/rust-os-tutorial/part-1/target/debug/build/runner-f2245a6f9dda311c/out/iso_root/kernel
Then inside GDB, run target remote :1234. It should look something like this:
Remote debugging using :1234
0x000000000000fff0 in ?? ()
Now we can set a breakpoint at hlt_loop like this:
(gdb) break main.rs:36
Breakpoint 1 at 0xffffffff80000051: file kernel/src/main.rs, line 37.
Now let's unpause the VM with the continue GDB command.
(gdb) continue
Continuing.

Breakpoint 1, kernel::hlt_loop () at kernel/src/main.rs:37
37          loop {
The Limine menu should appear, and when Limine boots our kernel, we'll reach the breakpoint. So we know it's working!
Debugging with Vscodium
With Vscodium (or Vscode), you can easily debug our OS. No need to manually run GDB commands.
Extension Required
Get the "CodeLLDB" extension.
launch.json
Then create the file .vscode/launch.json:
{
    // Use IntelliSense to learn about possible attributes.
    // Hover to view descriptions of existing attributes.
    // For more information, visit: https://go.microsoft.com/fwlink/?linkid=830387
    "version": "0.2.0",
    "configurations": [
        {
            "name": "Debug kernel in QEMU",
            "type": "lldb",
            "request": "launch",
            "targetCreateCommands": [
                "target create ${workspaceFolder}/target/debug/build/runner-f2245a6f9dda311c/out/iso_root/kernel",
            ],
            "processCreateCommands": [
                "gdb-remote localhost:1234",
            ],
        },
    ],
}
Replace the path to the kernel with your own.
Now let's try it. Run
cargo run -- -s -S
And then in Vscodium, do "Run and Debug". It should be paused, since we passed the -S flag to QEMU. At this point, try setting a breakpoint. I will set a breakpoint in the hlt_loop(); line in entry_point_from_limine. Then click continue in the debug tools. Once Limine boots the kernel, it should reach the breakpoint.
 Much easier than using the
 gdb command manually!
We can also nicely view the values of variables. We don't have any local variables, but you can add some to try it. We can also see the values of global variables.
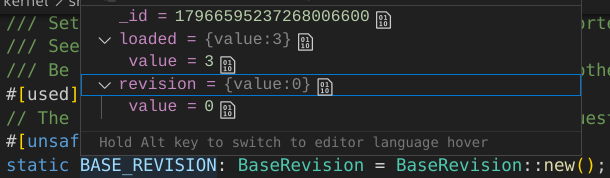 You can verify that
 BASE_REVISION has a loaded value of 3 and revision value of 0. The revision being 0 indicates that Limine successfully processed our base revision request. The loaded value of 3 indicates that our kernel was loaded with version 3 of the Limine protocol (which is the version we want).
Out dir symlink
One inconvenient thing is that the kernel path is not constant (it could change whenever Cargo feels like it). We can workaround that by creating a symlink in build.rs which makes runner/out_dir point to the out_dir, where we create the iso_root folder and os.iso:
// Symlink the out dir so we get a constant path to it
ensure_symlink(&out_dir, runner_dir.join("out_dir")).unwrap();
Also add runner/out_dir to .gitignore. Then change the target create command to target create ${workspaceFolder}/runner/out_dir/iso_root/kernel.
Automating cargo run
Create a .vscode/tasks.json file:
{
	"version": "2.0.0",
	"tasks": [
		{
			"type": "cargo",
			"command": "run",
			"args": [
				"--",
				"-s",
				"-S",
			],
			"problemMatcher": [
				"$rustc",
			],
			"label": "Start QEMU with GDB Debugging",
			"isBackground": true,
			"runOptions": {
				// You can't have multiple processes listening on port 1234 at the same time
				"instanceLimit": 1,
			},
		},
	],
}
And in our debugging config in launch.json, add
"preLaunchTask": "Start QEMU with GDB Debugging",
Now we can just click / use a keyboard shortcut, and QEMU and the debugger will start.
Speeding up the debugging process
Add
timeout: 0
to the top of limine.conf. We don't need to interact with Limine. We just want it to boot our kernel.
Also, add
"continue",
to the processCreateCommands in launch.json. That way as soon as the debugger connects the VM will continue executing.
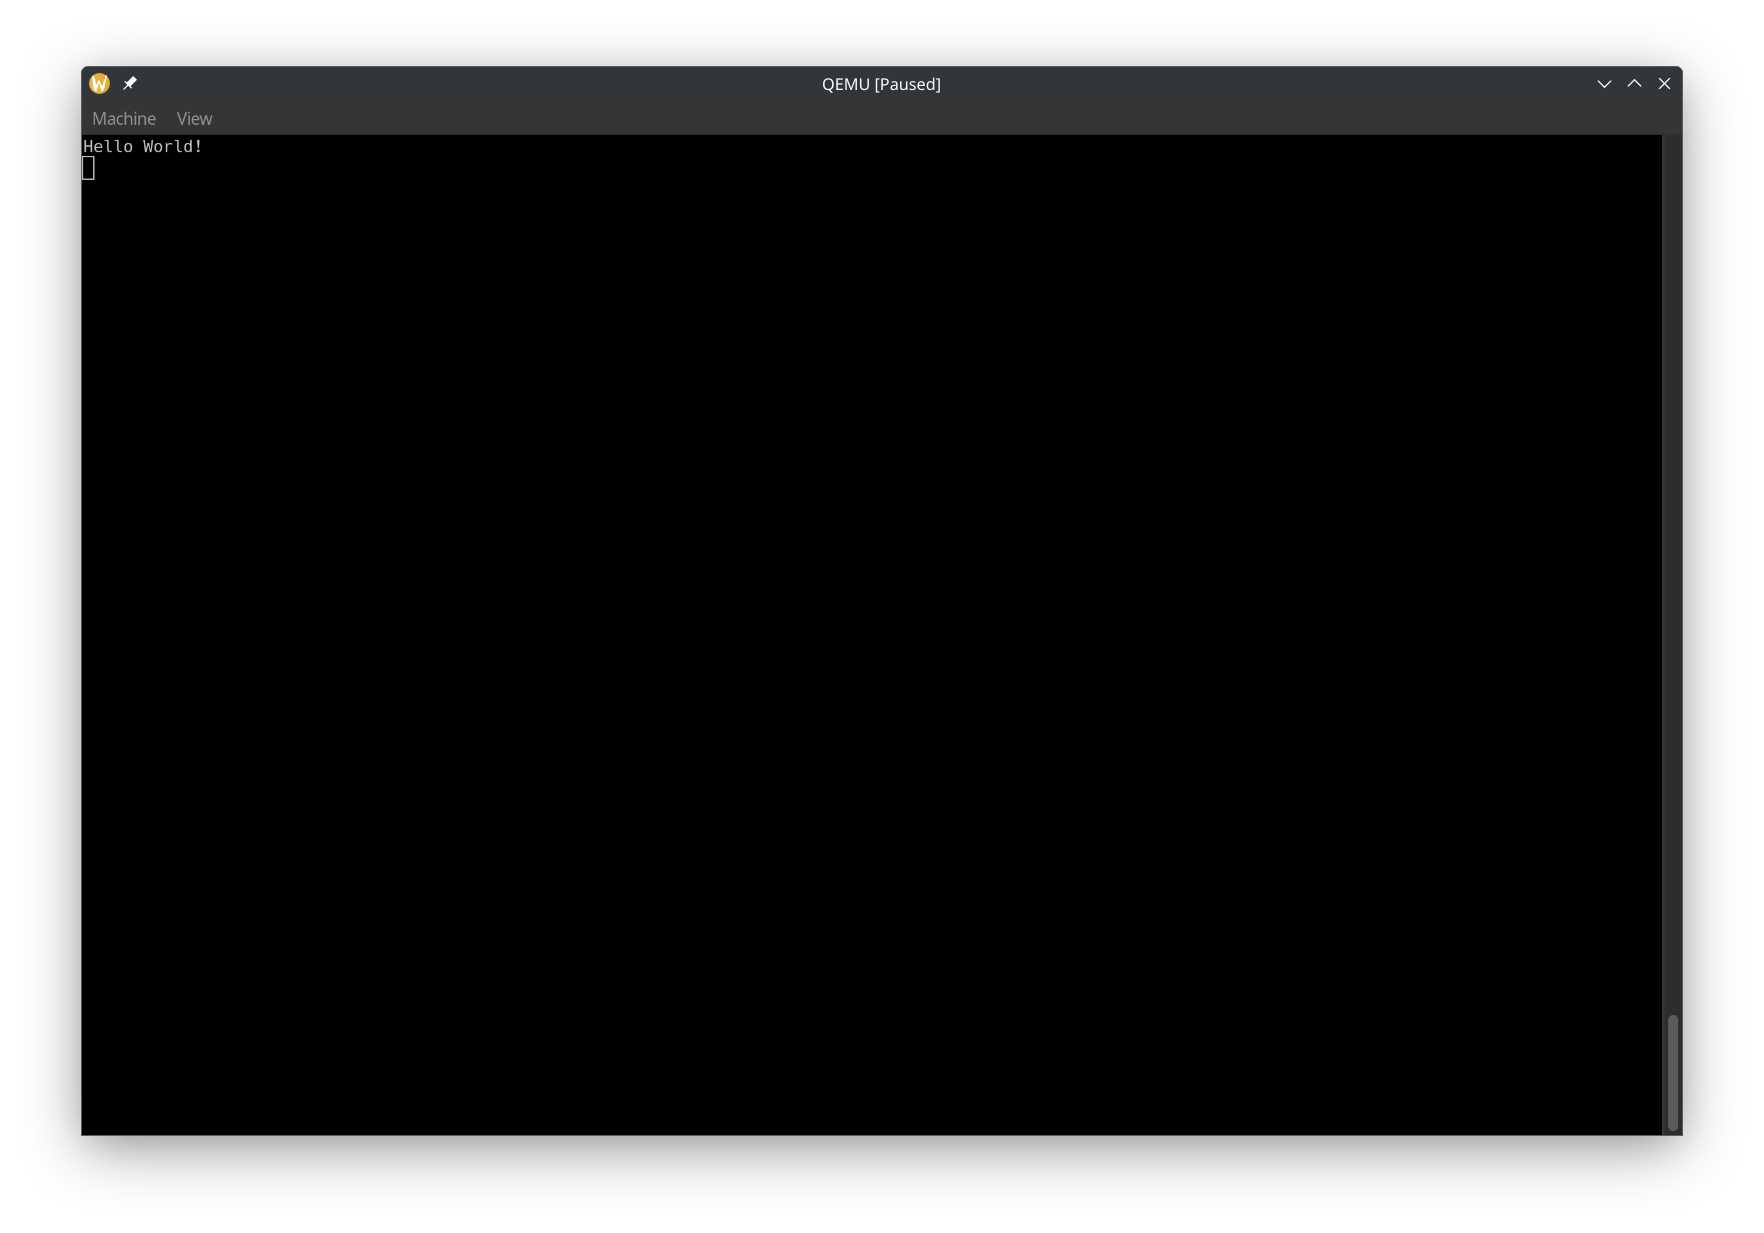
Hello World!
Now it's time to print "Hello World!" in our kernel. Normally, we would use the println macro. But since we are in no_std, there is no println macro. We can print to the COM1 serial port instead. More info: https://os.phil-opp.com/testing/#serial-port. Serial ports let us read and write data. Most modern computers don't have serial ports, but QEMU does. We can access COM1 through x86 I/O ports (also see https://wiki.osdev.org/Port_IO). We can read and write to I/O ports using in and out instructions.
Let's use the uart_16550 crate. In kernel/Cargo.toml dependencies, add
uart_16550 = "0.3.2"
In kernel/main.rs, add
use uart_16550::SerialPort;
and
use core::fmt::Write;
Then we can write to COM1 using
let mut serial_port = unsafe { SerialPort::new(0x3F8) };
serial_port.init();
writeln!(serial_port, "Hello World!\r").unwrap();
Now run it, and in the QEMU window, select View -> serial0. It should look like this:
We can make QEMU not create a window and print COM1 to the terminal by using --nographic. Let's also update tasks.json. Note that when you specify --nographic, you can't close QEMU with Ctrl + C and instead have to use Ctrl + A and then press X.
Drawing to the Screen
Most likely, you will not be able to read from COM1 on if you run the OS on a real computer, or use a debugger on it. So let's draw to the screen to make sure that our OS works on real machines!
To draw to the screen, we will be writing to a region of memory which is memory mapped to a frame buffer. A frame buffer basically represents the pixels on the screen. You typically put a dot on the screen by writing the pixel's RGB values to the region in the frame buffer corresponding to that pixel. Limine makes it easy for us to get a frame buffer. Let's add the Limine request. Before we add the request, let's move all of the Limine-related stuff to it's own module, limine_requests.rs. Then let's create the request:
#[used]
#[unsafe(link_section = ".requests")]
pub static FRAME_BUFFER_REQUEST: FramebufferRequest = FramebufferRequest::new();
To draw shapes, text, and more, we'll use the embedded-graphics crate. Add it to kernel/Cargo.toml:
embedded-graphics = "0.8.1"
Next, let's make a struct for drawing a pixel using the Limine-provided pixel info. Create rgb_pixel_info.rs:
use embedded_graphics::{pixelcolor::Rgb888, prelude::RgbColor};

#[derive(Debug, Clone, Copy)]
pub struct RgbPixelInfo {
    pub red_mask_size: u8,
    pub red_mask_shift: u8,
    pub green_mask_size: u8,
    pub green_mask_shift: u8,
    pub blue_mask_size: u8,
    pub blue_mask_shift: u8,
}

impl RgbPixelInfo {
    /// Technically, Limine and this struct could have a pixel size other than u32, in which case you shouldn't use this method
    pub fn build_pixel(&self, color: Rgb888) -> u32 {
        let mut n = 0;
        n |= ((color.r() as u32) & ((1 << self.red_mask_size) - 1)) << self.red_mask_shift;
        n |= ((color.g() as u32) & ((1 << self.green_mask_size) - 1)) << self.green_mask_shift;
        n |= ((color.b() as u32) & ((1 << self.blue_mask_size) - 1)) << self.blue_mask_shift;
        n
    }
}
And also a struct that contains the information from Limine. frame_buffer_info.rs:
use crate::RgbPixelInfo;

#[derive(Debug, Clone, Copy)]
#[non_exhaustive]
pub struct FrameBufferInfo {
    pub width: u64,
    pub height: u64,
    pub pitch: u64,
    pub bits_per_pixel: u16,
    pub pixel_info: RgbPixelInfo,
}

impl From<&limine::framebuffer::Framebuffer<'_>> for FrameBufferInfo {
    fn from(framebuffer: &limine::framebuffer::Framebuffer) -> Self {
        FrameBufferInfo {
            width: framebuffer.width(),
            height: framebuffer.height(),
            pitch: framebuffer.pitch(),
            bits_per_pixel: framebuffer.bpp(),
            pixel_info: RgbPixelInfo {
                red_mask_size: framebuffer.red_mask_size(),
                red_mask_shift: framebuffer.red_mask_shift(),
                green_mask_size: framebuffer.green_mask_size(),
                green_mask_shift: framebuffer.green_mask_shift(),
                blue_mask_size: framebuffer.blue_mask_size(),
                blue_mask_shift: framebuffer.blue_mask_shift(),
            },
        }
    }
}
Then create a new file, frame_buffer_embedded_graphics.rs. Let's create a wrapper struct that will implement DrawTarget, which let's us draw to it with embedded-graphics.
pub struct FrameBufferEmbeddedGraphics<'a> {
    buffer: &'a mut [u32],
    info: FrameBufferInfo,
    pixel_pitch: usize,
    bounding_box: Rectangle,
}

impl FrameBufferEmbeddedGraphics<'_> {
    /// # Safety
    /// The frame buffer must be mapped at `addr`
    pub unsafe fn new(addr: NonZero<usize>, info: FrameBufferInfo) -> Self {
        if info.bits_per_pixel as u32 == u32::BITS {
            Self {
                buffer: {
                    let mut ptr = NonNull::new(slice_from_raw_parts_mut(
                        addr.get() as *mut u32,
                        (info.pitch * info.height) as usize / size_of::<u32>(),
                    ))
                    .unwrap();
                    // Safety: This memory is mapped
                    unsafe { ptr.as_mut() }
                },
                info,
                pixel_pitch: info.pitch as usize / size_of::<u32>(),
                bounding_box: Rectangle {
                    top_left: Point::zero(),
                    size: Size {
                        width: info.width.try_into().unwrap(),
                        height: info.height.try_into().unwrap(),
                    },
                },
            }
        } else {
            panic!("DrawTarget implemented for RGB888, but bpp doesn't match RGB888");
        }
    }
}
In the new function, we make sure that the bytes per pixel is 4 (R, G, B, and an unused byte). This is because in our drawing logic, we will store each pixel as a u32.
Now let's implement the Dimensions trait, which is needed for DrawTarget:
impl Dimensions for FrameBufferEmbeddedGraphics<'_> {
    fn bounding_box(&self) -> embedded_graphics::primitives::Rectangle {
        self.bounding_box
    }
}
Now let's implement the DrawTarget trait:
impl DrawTarget for FrameBufferEmbeddedGraphics<'_> {
    type Color = Rgb888;

    type Error = Infallible;

    fn draw_iter<I>(&mut self, pixels: I) -> Result<(), Self::Error>
    where
        I: IntoIterator<Item = embedded_graphics::Pixel<Self::Color>>,
    {
        let bounding_box = self.bounding_box();
        pixels
            .into_iter()
            .filter(|Pixel(point, _)| bounding_box.contains(*point))
            .for_each(|Pixel(point, color)| {
                let pixel_index = point.y as usize * self.pixel_pitch + point.x as usize;
                self.buffer[pixel_index] = self.info.pixel_info.build_pixel(color);
            });
        Ok(())
    }
}
Now in main.rs, let's use embedded graphics to draw to the screen:
let frame_buffer = FRAME_BUFFER_REQUEST.get_response().unwrap();
if let Some(frame_buffer) = frame_buffer.framebuffers().next() {
    let mut frame_buffer = {
        let addr = frame_buffer.addr().addr().try_into().unwrap();
        let info = (&frame_buffer).into();
        unsafe { FrameBufferEmbeddedGraphics::new(addr, info) }
    };
    frame_buffer.clear(Rgb888::MAGENTA).unwrap();
}
Limine gives us a slice of frame buffers, but here we only draw to the first frame buffer, if it exists.
Depending on your host computer, you might notice that this is pretty slow. Let's implement fill_solid so that embedded_graphics can draw certain shapes, such as rectangles, much faster:
fn fill_solid(&mut self, area: &Rectangle, color: Self::Color) -> Result<(), Self::Error> {
    let area = area.intersection(&self.bounding_box);
    let pixel = self.info.pixel_info.build_pixel(color);
    let width = area.size.width as usize;
    let top_left_x = area.top_left.x as usize;
    for y in area.top_left.y as usize..area.top_left.y as usize + area.size.height as usize {
        let pixel_index = y * self.pixel_pitch + top_left_x;
        let pixels = &mut self.buffer[pixel_index..pixel_index + width];
        pixels.fill(pixel);
    }
    Ok(())
}
Now when we fill the screen, it should draw much faster.

Learn more
Running on real hardware
Now that we draw something on the screen, we can see our OS in action on real computers. It should work on any x86_64 computer with UEFI or legacy BIOS.
Writing the ISO to a disk
We can write our file at runner/out_dir/iso_root/os.iso to a disk in any way we want. Some tools are:
If you know what you are doing, you can use dd instead. You can also use Ventoy, but it might not work on really old computers.
Booting the OS
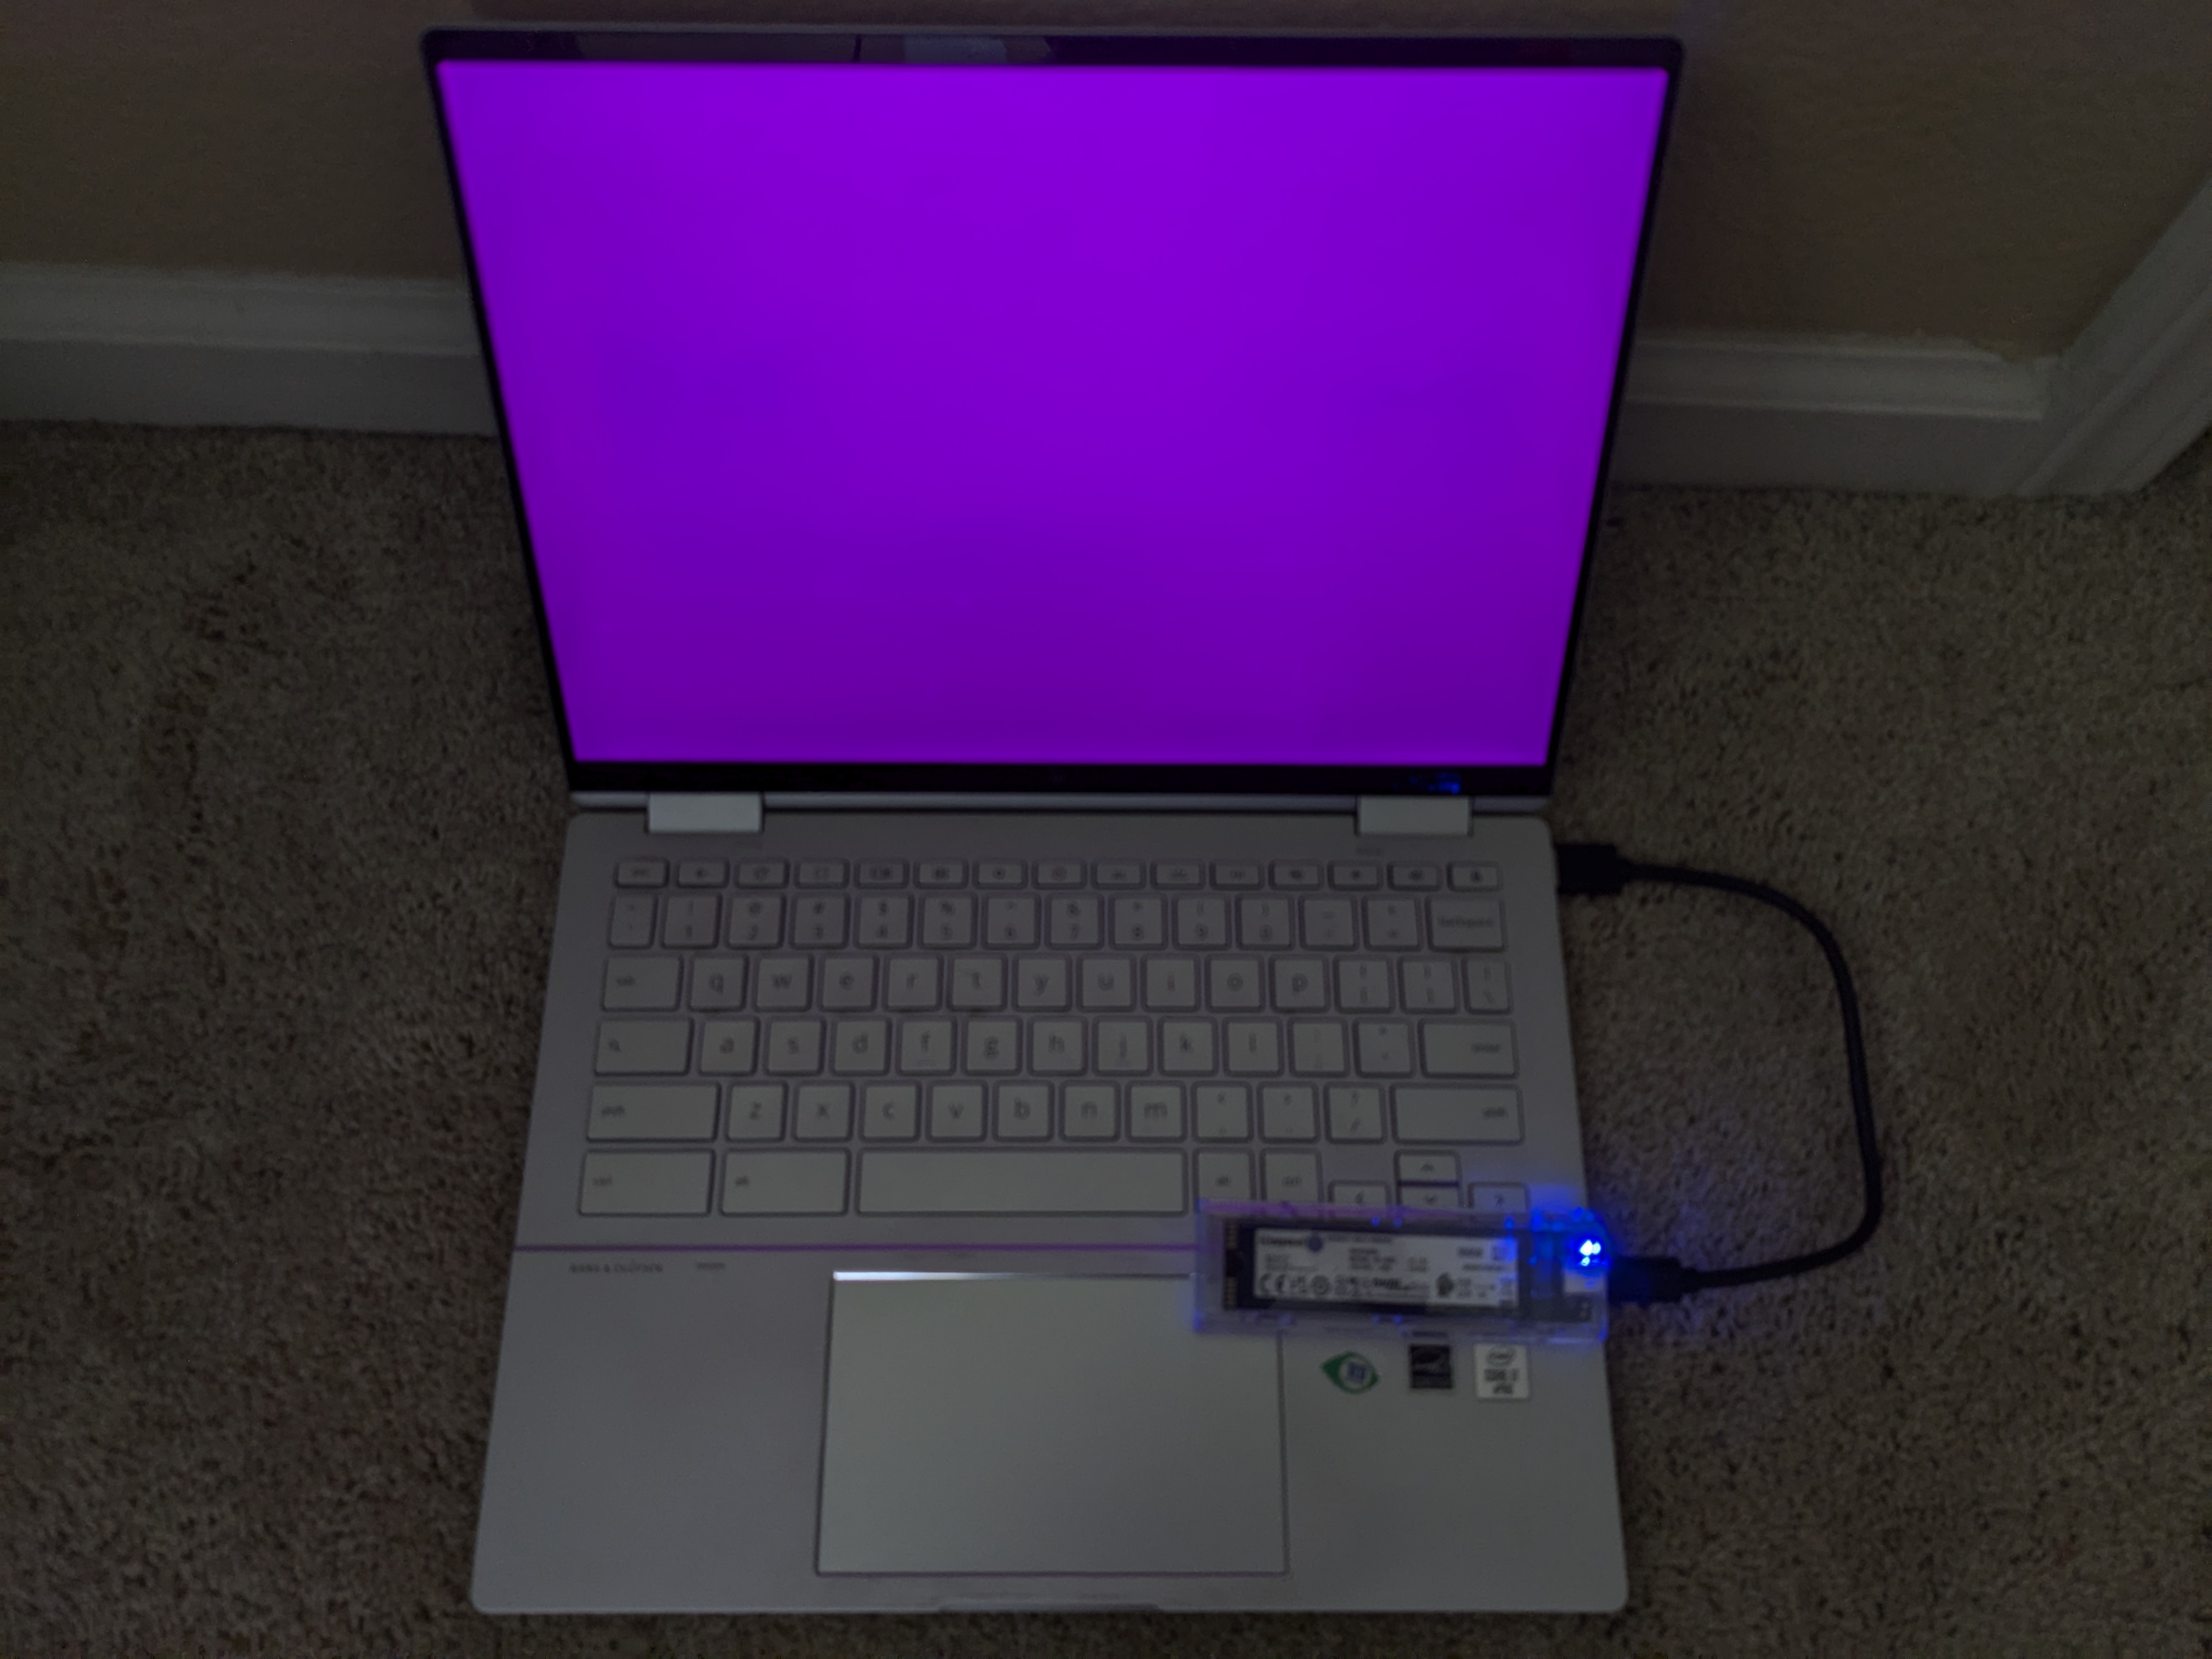
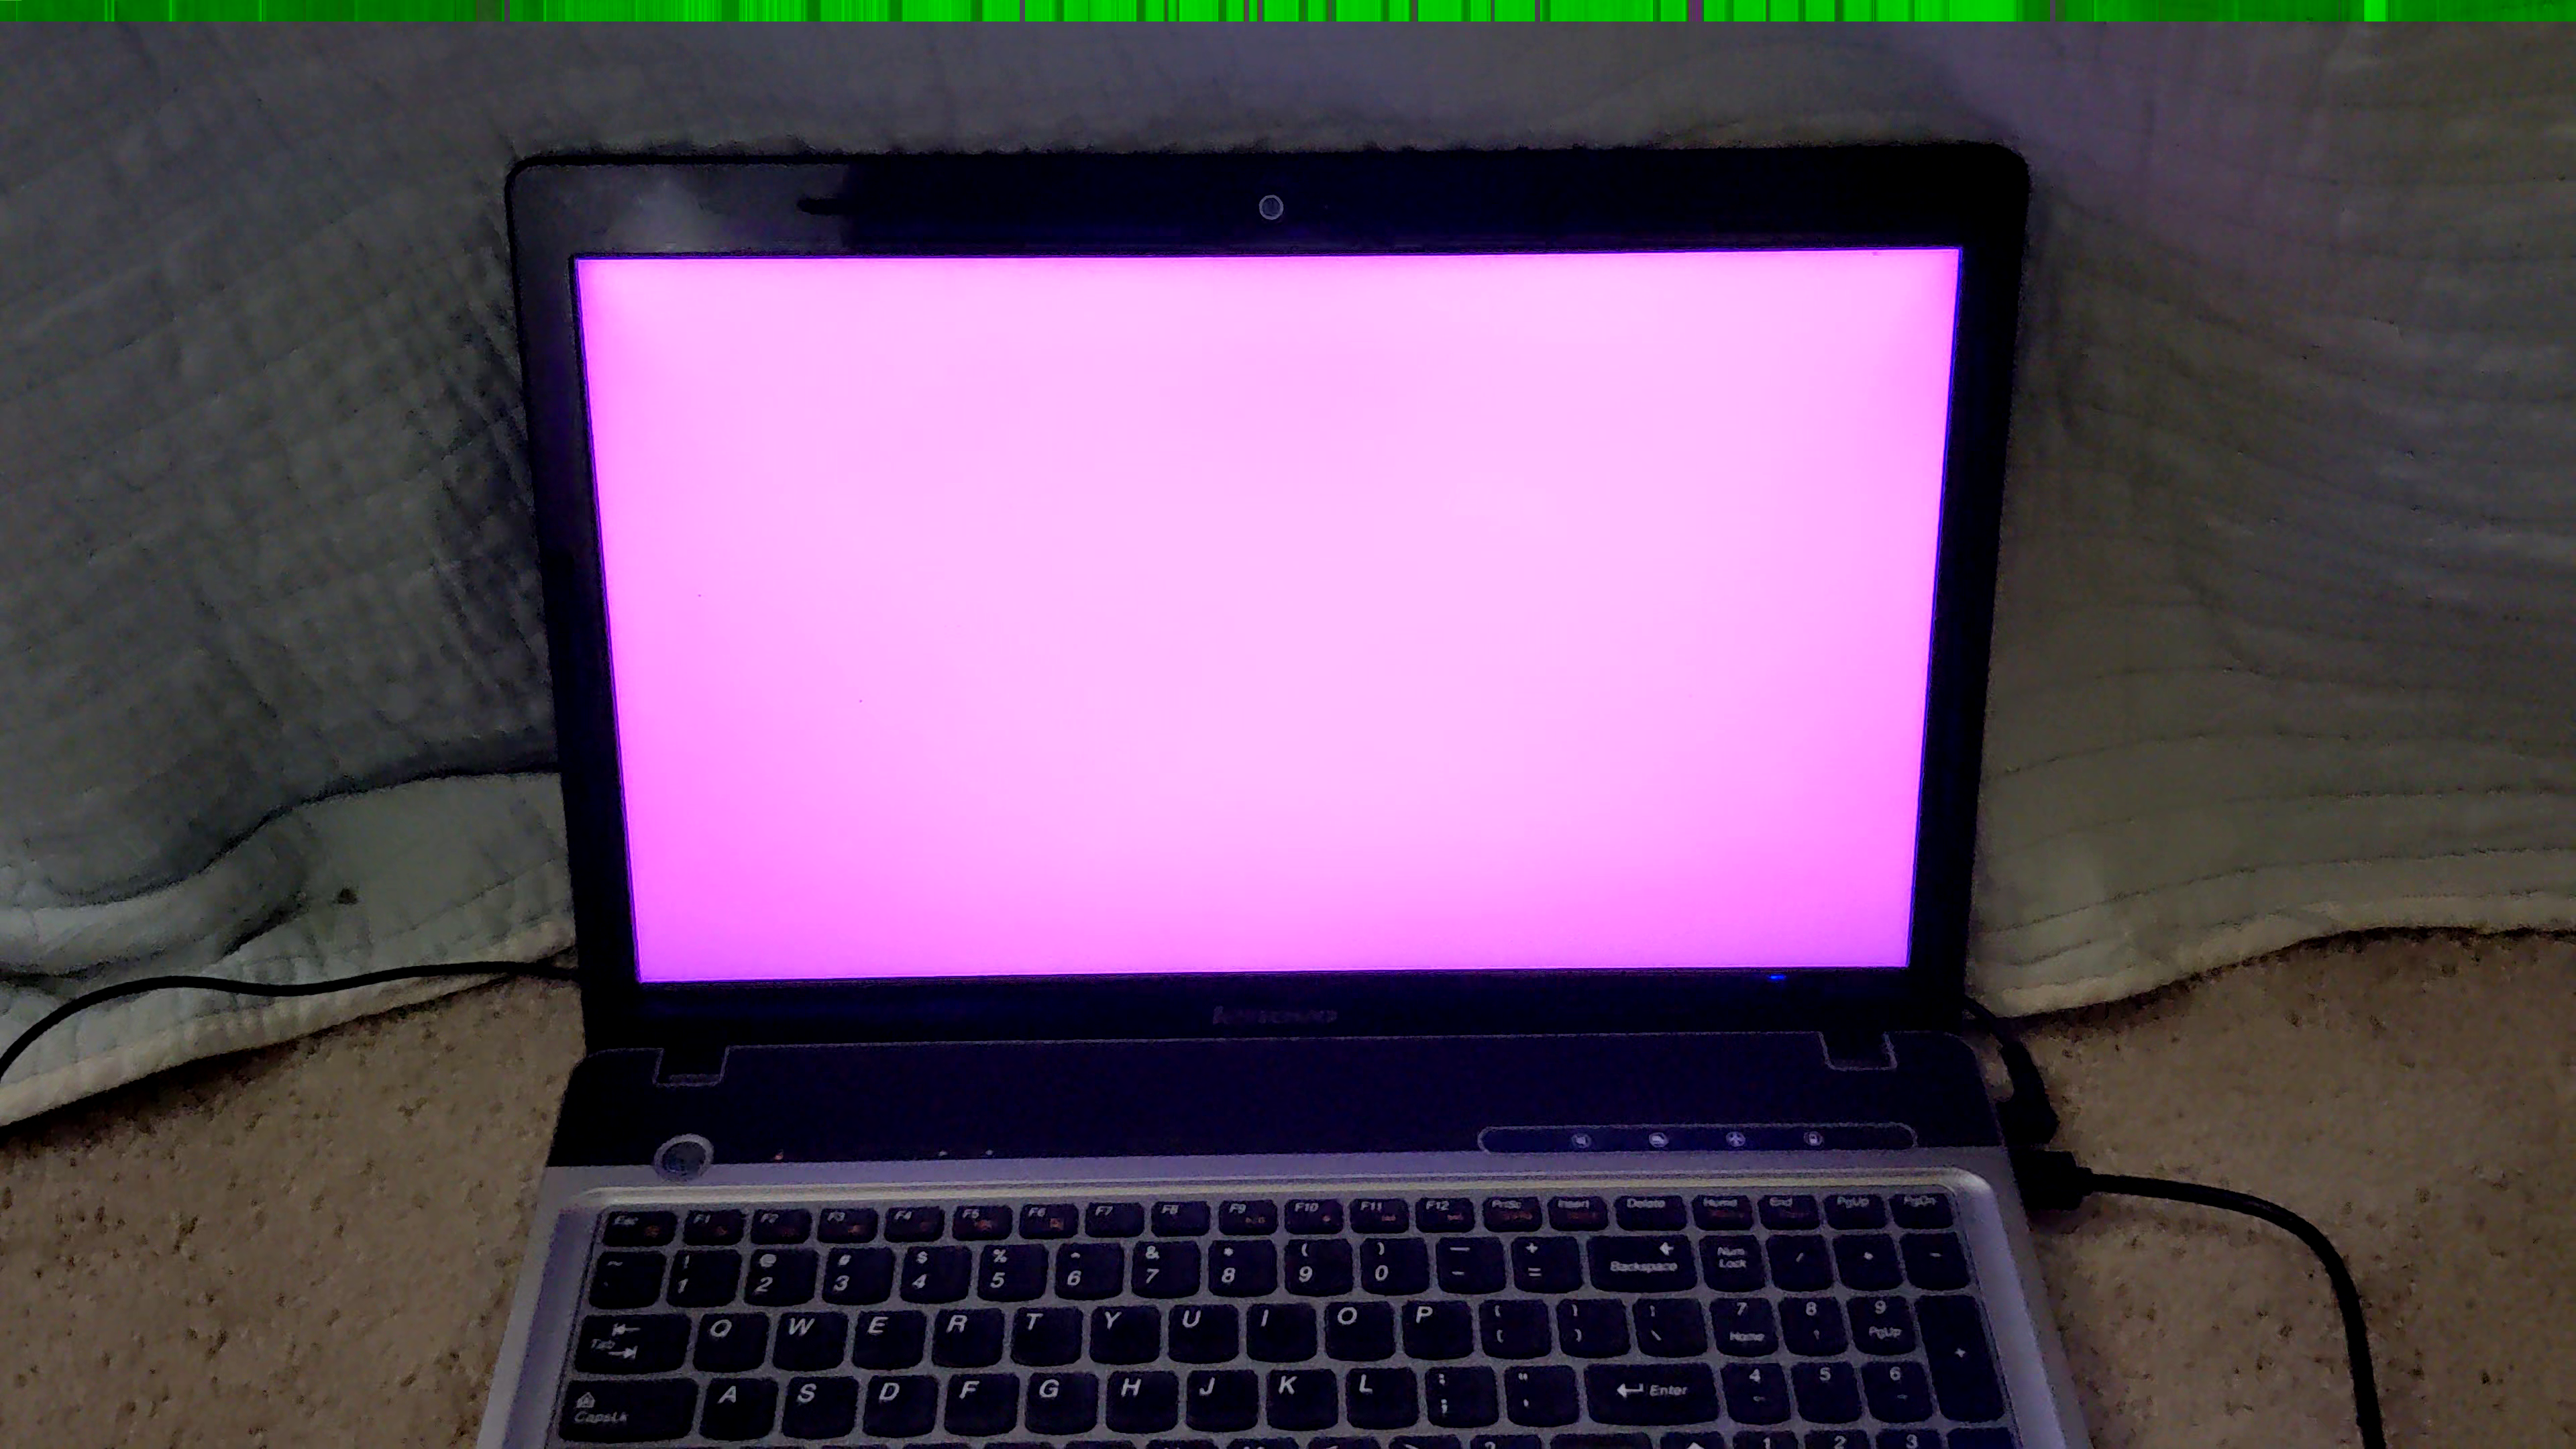
Plug in your disk (most likely you are using a USB disk, so just plug it in). When turning on your computer, you have to press a certain key to enter the boot device selection menu. On the old Lenovo computer with Legacy BIOS that I'm using, this key is F12. On Chromebooks running MrChromebox firmware (UEFI), you can press Esc or Arrow Down. Then choose the USB disk containing your OS. If you don't know what this key is, you can usually just look it up online and you'll find the key based on the computer's brand.
You should see the entire screen turn magenta!
Here is a picture of it on a Jinlon, a Chromebook with UEFI.
And here is a picture of it on an old Lenovo computer with Legacy BIOS.
Limine makes it easy to draw to the screen regardless of the firmware type. Limine handles the process of getting the frame buffer, which is different on UEFI than on legacy BIOS.
Logging
The log crate
As we expand our kernel, it will be very useful to be able to log messages. The log crate provides macros similar to println, and works on no_std because you have to write your own log function implementation. Add this to the kernel deps:
log = "0.4.27"
Then create a new file called logger.rs. We will be logging to two places: the serial port (COM1), and the screen (if available). Let's start with creating an empty struct which will implement the Log trait:
use log::Log;
use uart_16550::SerialPort;

struct KernelLogger {}

impl Log for KernelLogger {
    fn enabled(&self, _metadata: &log::Metadata) -> bool {
        todo!()
    }

    fn log(&self, record: &log::Record) {
        todo!()
    }

    fn flush(&self) {
        todo!()
    }
}
Spin lock
We have to implement the log function, but we are only given an &self function. We need to put SerialPort in something which has interior mutability. We can use a mutex to achieve this. Normally, we would use the Mutex from std. In no_std, we can use the spin crate for a simple mutex. It works by continuously checking in a loop if the mutex is available.
spin = "0.10.0"
We can create a struct Inner which will store the mutable data, and put it in a spin lock:
struct Inner {}

struct KernelLogger {
    inner: spin::Mutex<Inner>,
}
Colors
Now let's start writing the actual logging functions. We will be making our logger colorful. The way you print colored text is different on the serial port vs the screen. On the serial port we will use ANSI escape codes, which involve an escape code before and after the string we want to color. On the screen, we specify the color when drawing text using embedded-graphics. Let's create an enum for the colors we will be using:
/// Represents a color in a terminal or screen. The default color may depend on if the theme is light or dark.
enum Color {
    Default,
    BrightRed,
    BrightYellow,
    BrightBlue,
    BrightCyan,
    BrightMagenta,
}
Now let's create a function that let's us write colored text on both log outputs:
impl Inner {
    fn write_with_color(&mut self, color: Color, string: impl Display) {}
}
And then we can call the function in the Log implementation:
fn log(&self, record: &log::Record) {
    let mut inner = self.inner.try_lock().unwrap();
    let level = record.level();
    inner.write_with_color(
        match level {
            Level::Error => Color::BrightRed,
            Level::Warn => Color::BrightYellow,
            Level::Info => Color::BrightBlue,
            Level::Debug => Color::BrightCyan,
            Level::Trace => Color::BrightMagenta,
        },
        format_args!("{level:5} "),
    );
    inner.write_with_color(Color::Default, record.args());
    inner.write_with_color(Color::Default, "\n");
}
Mutexes can feel like an easy way to safety get a &mut to a global variable, but whenever we use mutexes we have to keep in mind the possibility of a deadlock. This is why we use .try_lock().unwrap() instead of .lock(), so that we panic by default if the lock is busy, so we know for sure there won't be a deadlock.
Writing to serial
Now let's implement the actual writing to serial inside write_with_color. To Inner, add:
serial_port: SerialPort
We'll use owo_colors to handle the ANSI escape codes for us.
owo-colors = "4.2.1"
We also need to convert LF to CRLF, so that the serial output looks as expected inside QEMU's serial0 view. Doing this is simple with the core::fmt::Write trait. Create writer_with_cr.rs:
use core::fmt::Write;

use unicode_segmentation::UnicodeSegmentation;

/// A writer that writes to a writer, replacing `\n` with `\r\n`
pub struct WriterWithCr<T> {
    writer: T,
}

impl<T> WriterWithCr<T> {
    pub const fn new(writer: T) -> Self {
        Self { writer }
    }
}

impl<T: Write> Write for WriterWithCr<T> {
    fn write_str(&mut self, s: &str) -> core::fmt::Result {
        for c in s.graphemes(true) {
            match c {
                "\n" => self.writer.write_str("\r\n")?,
                s => self.writer.write_str(s)?,
            }
        }
        Ok(())
    }
}
And then in write_with_color:
// Write to serial
{
    let string: &dyn Display = match color {
        Color::Default => &string,
        Color::BrightRed => &string.bright_red(),
        Color::BrightYellow => &string.bright_yellow(),
        Color::BrightBlue => &string.bright_blue(),
        Color::BrightCyan => &string.bright_cyan(),
        Color::BrightMagenta => &string.bright_magenta(),
    };
    let mut writer = WriterWithCr::new(&mut self.serial_port);
    write!(writer, "{string}").unwrap();
}
Writing to the screen
We'll need a FrameBufferEmbeddedGraphics, and we'll also need to keep track of the cursor position. Create a struct:
struct DisplayData {
    display: FrameBufferEmbeddedGraphics<'static>,
    position: Point,
}
and then add it to Inner:
display: Option<DisplayData>,
We use Option because there will not always be a screen.
Then, inside write_with_color, add
// Write to screen
if let Some(display_data) = &mut self.display { }
Now there is a slightly tricky part. We are given an impl Display, but we need to process the text character by character. The only way to do that is to implement the Write trait. So let's create a temporary struct that implements the Write trait:
struct Writer<'a> {
    display: &'a mut FrameBufferEmbeddedGraphics<'static>,
    position: &'a mut Point,
    text_color: <FrameBufferEmbeddedGraphics<'a> as DrawTarget>::Color,
}
When we run out of vertical space on the screen, we'll shift everything that's on the screen up, so that we can see the new text as well as part of the old text. To do this, let's implement a shift_up method:
impl FrameBufferEmbeddedGraphics<'_> {
    /// Moves everything on the screen up, leaving the bottom the same as it was before
    pub fn shift_up(&mut self, amount: usize) {
        self.buffer.copy_within(amount * self.pixel_pitch.., 0);
    }
}
To process the string character by character, we will use the unicode-segmentation crate's graphemes method.
unicode-segmentation = "1.12.0"
And then we can implement Write:
use embedded_graphics::mono_font::iso_8859_16::FONT_10X20;

impl Write for Writer<'_> {
    fn write_str(&mut self, s: &str) -> core::fmt::Result {
        let font = FONT_10X20;
        let background_color = Rgb888::BLACK;
        for c in s.graphemes(true) {
            let height_not_seen = self.position.y + font.character_size.height as i32
                - self.display.bounding_box().size.height as i32;
            if height_not_seen > 0 {
                self.display.shift_up(height_not_seen as usize);
                self.position.y -= height_not_seen;
            }
            match c {
                "\r" => {
                    // We do not handle special cursor movements
                }
                "\n" | "\r\n" => {
                    // Fill the remaining space with background color
                    Rectangle::new(
                        *self.position,
                        Size::new(
                            self.display.bounding_box().size.width
                                - self.position.x as u32,
                            font.character_size.height,
                        ),
                    )
                    .into_styled(
                        PrimitiveStyleBuilder::new()
                            .fill_color(background_color)
                            .build(),
                    )
                    .draw(self.display)
                    .map_err(|_| core::fmt::Error)?;
                    self.position.y += font.character_size.height as i32;
                    self.position.x = 0;
                }
                c => {
                    let style = MonoTextStyleBuilder::new()
                        .font(&font)
                        .text_color(self.text_color)
                        .background_color(background_color)
                        .build();
                    *self.position =
                        Text::with_baseline(c, *self.position, style, Baseline::Top)
                            .draw(self.display)
                            .map_err(|_| core::fmt::Error)?;
                    if self.position.x as u32 + font.character_size.width
                        > self.display.bounding_box().size.width
                    {
                        self.position.y += font.character_size.height as i32;
                        self.position.x = 0;
                    }
                }
            }
        }
        Ok(())
    }
}
And let's use our Writer:
let mut writer = Writer {
    display: &mut display_data.display,
    position: &mut display_data.position,
    text_color: match color {
        Color::Default => Rgb888::WHITE,
        // Mimick the ANSI escape colors
        Color::BrightRed => Rgb888::new(255, 85, 85),
        Color::BrightYellow => Rgb888::new(255, 255, 85),
        Color::BrightBlue => Rgb888::new(85, 85, 255),
        Color::BrightCyan => Rgb888::new(85, 255, 255),
        Color::BrightMagenta => Rgb888::new(255, 85, 255),
    },
};
write!(writer, "{}", string).unwrap();
Now we're done implementing the Log trait!
Logger global variable
Now let's have a global variable for our logger and a function to initialize our logger.
static LOGGER: KernelLogger = KernelLogger {
    inner: spin::Mutex::new(Inner {
        serial_port: unsafe { SerialPort::new(0x3F8) },
        display: None,
    }),
};

pub fn init(frame_buffer: &'static FramebufferResponse) -> Result<(), log::SetLoggerError> {
    let mut inner = LOGGER.inner.try_lock().unwrap();
    inner.serial_port.init();
    inner.display = frame_buffer
        .framebuffers()
        .next()
        .map(|frame_buffer| DisplayData {
            display: FrameBufferEmbeddedGraphics::new(frame_buffer),
            position: Point::zero(),
        });
    log::set_max_level(LevelFilter::max());
    log::set_logger(&LOGGER)
}
Note that the log crate requires us to set a level filter, which lets us choose to only log messages with a certain importance. For example, we can set the level filter to only log warn and error messages, and not log info, debug, or trace messages. You can try it out by setting the max level to LevelFilter::Warn. Then you will not see any messages from log::info.
Using the logger
Now we can log from main.rs like this:
let frame_buffer_response = FRAME_BUFFER_REQUEST.get_response().unwrap();
logger::init(frame_buffer_response).unwrap();
log::info!("Hello World!");
Remove the drawing the screen magenta code.
Logging panics
Now that we have a logger, let's update our panic handler:
#[panic_handler]
fn rust_panic(info: &core::panic::PanicInfo) -> ! {
    log::error!("{info}");
    hlt_loop();
}
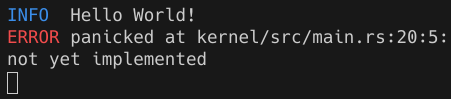
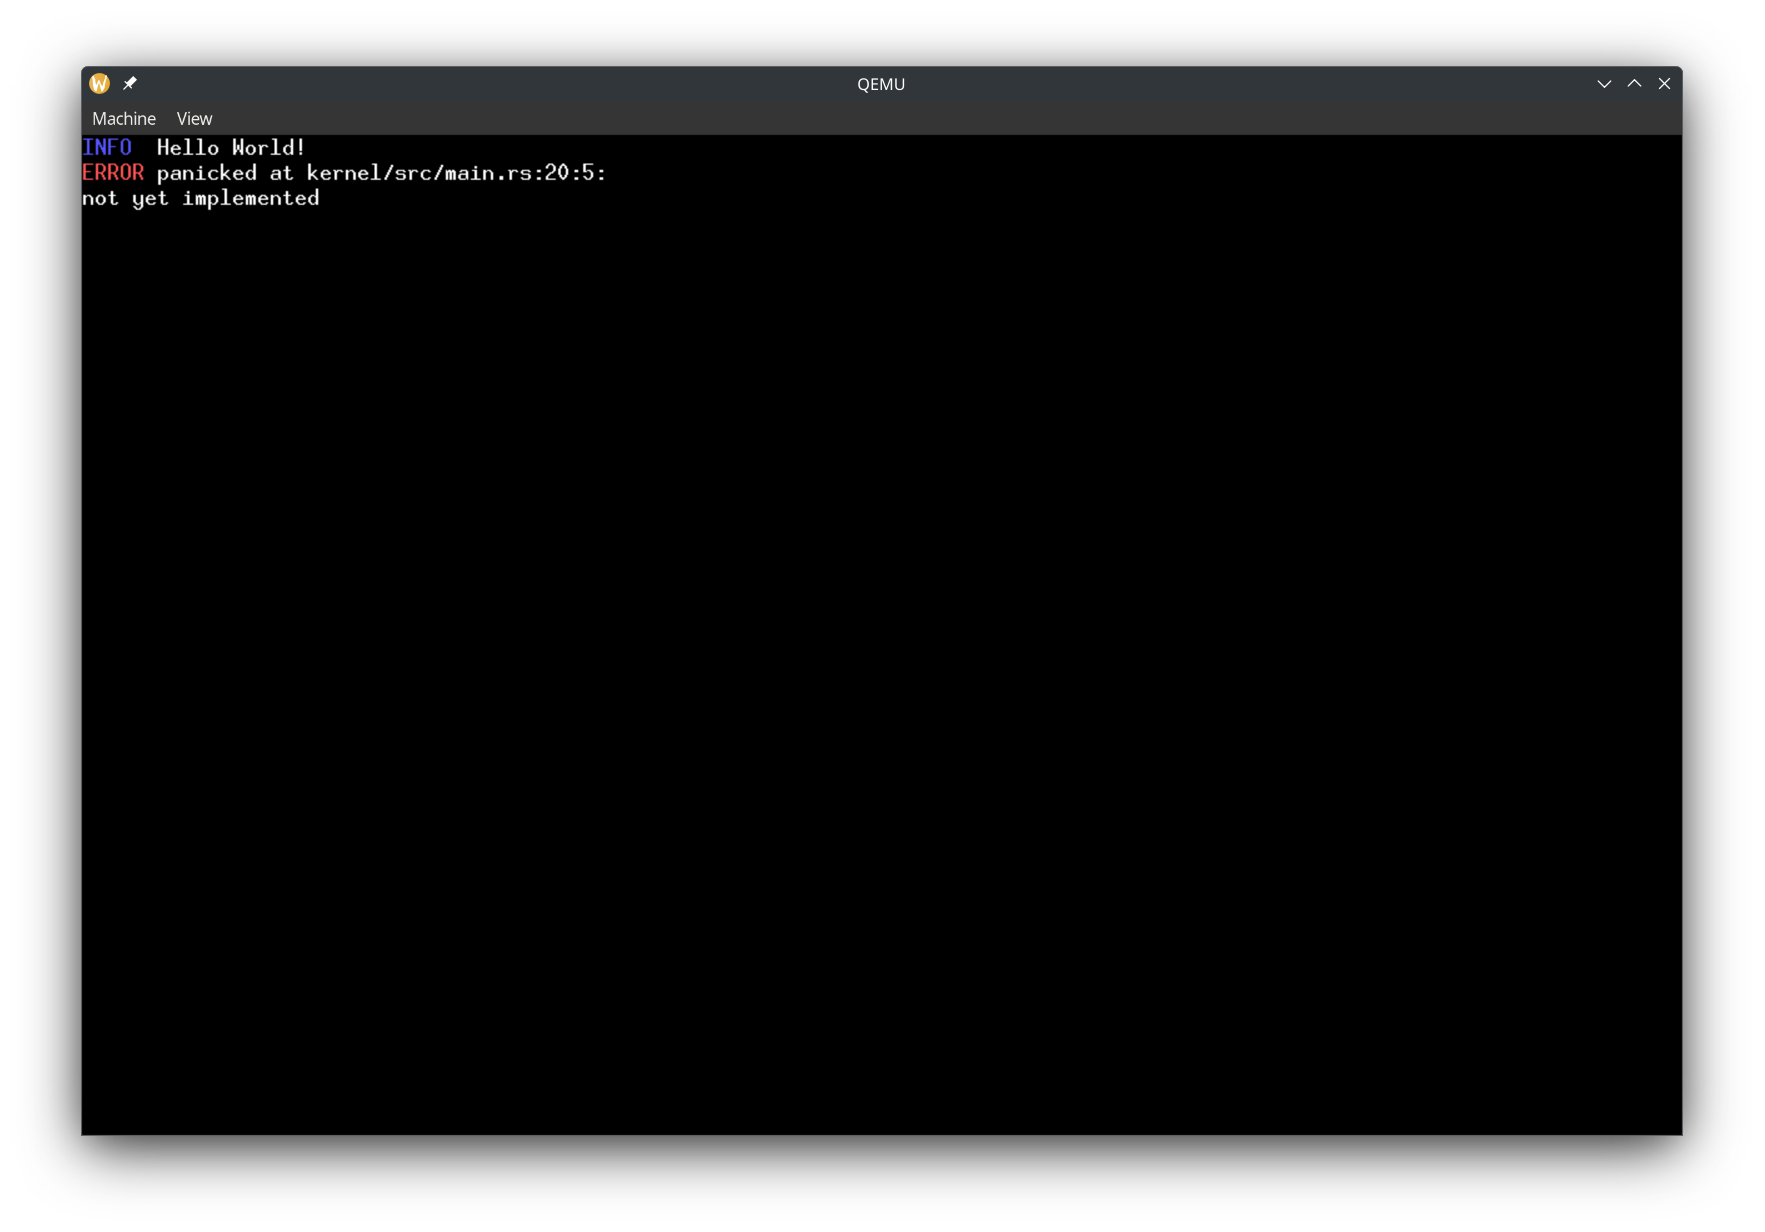
Results
To check our panic handler, let's temporarily put todo!() before hlt_loop in our entry function. Now we should see
INFO  Hello World!
ERROR panicked at kernel/src/main.rs:20:5:
not yet implemented
Which will look like this on a terminal:
And on a screen:
Using all CPUs
We are in a state where we have a function that gets executed on boot. We have a logger, and we can start doing stuff. But first, let's use 100% of our computer - and by that, I mean, all of the CPUs.
You might be thinking, don't most computers just have 1 CPU?. But from the kernel's perspective, every core in the CPU is like its own CPU. And actually, every thread in a CPU with hyper-threading cores counts as a CPU from the kernel's perspective. For example, on a laptop with the i7-10610U processor, looking at the specs, we would say it's a laptop with 1 CPU, with 4 cores and 8 threads. From the kernel's perspective, it's a computer with 8 CPUs.
Limine MP Request
Limine makes running code on all CPUs very easy. We just need to use Limine's MP request.
#[used]
#[unsafe(link_section = ".requests")]
pub static MP_REQUEST: MpRequest = MpRequest::new().with_flags(RequestFlags::X2APIC);
We use the X2APIC request flag. This tutorial will explain more about what that is in a later part. For now, you just need to know that this flag is needed for Limine to boot our kernel when there are >256 CPUs.
Up until now, our code has only been running on 1 CPU. This CPU is called the bootstrap processor (BSP). Let's change our hello world to say "Hello from BSP".
The other CPUs are called application processors (APs). Limine has already started the APs for us, and they are waiting to jump to a function.
Let's make a function for the APs:
unsafe extern "C" fn entry_point_from_limine_mp(_cpu: &limine::mp::Cpu) -> ! {
    // log::info!("Hello from AP");
    hlt_loop()
}
Using the MP request, we can run the function in all of the APs:
let mp_response = MP_REQUEST.get_response().unwrap();
for cpu in mp_response.cpus() {
    cpu.goto_address.write(entry_point_from_limine_mp);
}
By default, QEMU only gives the VM 1 CPU. We can specify the number of CPUs using the --smp flag. Let's test it out by using --smp 2 and using the debugger to confirm that the other CPU does execute our function:
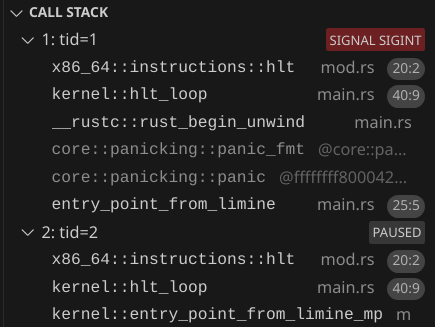
You might have to click pause on the debugger to view the call stack.
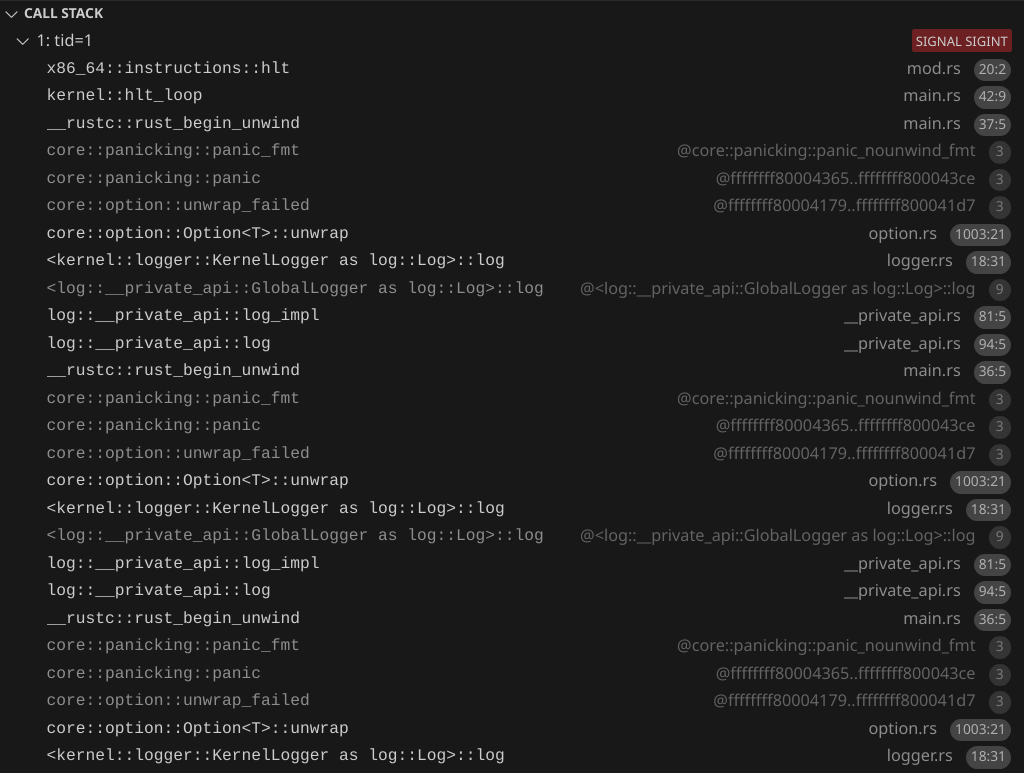
Infinite recursive panics!
But of course, we want to log something, not just look at it through the debugger. Notice how now we could have a situation where we try to access the serial port for logging from two or more different places at once. Our .try_lock().unwrap() could panic, since the logger could be locked by one CPU while a different CPU tries to access it.
And in the way our kernel is right now, we could cause a panic inside of our panic handler!
log::error!("{}", info);
And in fact, that does happen. Uncomment the "Hello from AP" and run it. The first CPU will be printing its panic message while the second CPU also tries to print at the same time, causing a panic because we .try_lock().unwrap(). We can see the recursive panic with the debugger:
Preventing recursive panics
We're going to change our logger so it doesn't panic, but before that, let's change our panic handler to avoid infinite recursive panics:
static DID_PANIC: AtomicBool = AtomicBool::new(false);
#[panic_handler]
fn rust_panic(info: &core::panic::PanicInfo) -> ! {
    if !DID_PANIC.swap(true, Ordering::Relaxed) {
        log::error!("{info}");
        hlt_loop();
    } else {
        hlt_loop();
    }
}
Let's also move our panic handler to a separate file, panic_handler.rs, and move hlt_loop to hlt_loop.rs. Now at most, we can have two panics. And the second panic is guaranteed not to cause further panics because the hlt_loop function cannot cause panics. This way, if we have another bug in the logger, we don't have recursive panics again.
Spinning to wait
Now let's replace self.inner.try_lock().unwrap() with self.inner.lock(). Now instead of panicking if the lock is held by something else, it will continuously check if the lock is free, until it becomes free. This will solve our problem, but again, be aware that if a deadlock happens, the CPU will just spin forever and it will be harder to debug than a panic.
Now we should see this (the order can vary depending on which CPU gets the lock first):
INFO  Hello from BSP
INFO  Hello from AP
And when running with --smp 8:
INFO  Hello from BSP
INFO  Hello from AP
INFO  Hello from AP
INFO  Hello from AP
INFO  Hello from AP
INFO  Hello from AP
INFO  Hello from AP
INFO  Hello from AP
Global Allocator
In x86_64 (and pretty much every architecture), there is physical memory and virtual memory. Physical memory is the actual RAM, and also memory-mapped I/O (one example is the HPET, which we will program later). Virtual memory is what our code references. Virtual memory is mapped to physical memory, and the mappings are programmed using page tables. See https://os.phil-opp.com/paging-introduction/ for a more in-depth explanation.
When we write Rust code in std, we have data types such as Box, Vec, Rc, and Arc. However, in no_std, we need an allocator to use those types. In no_std, there is no allocator included, and we need to provide our own. See https://os.phil-opp.com/allocator-designs/ for more detailed information about what allocators are.
An allocator basically has a pool of memory (think of it as a &mut [MaybeUninit<u8>]) which it allocates towards any data type used by any code. The allocator has to keep track of which parts of memory are allocated, and be able to allocate, deallocate, and (optional, but useful for performance) grow / shrink already allocated memory regions. We don't have to implement an allocator because there are many existing crates that do it for us. We will use the talc crate:
talc = "4.4.3"
To enable using alloc, we need to add in main.rs:
extern crate alloc;
Create a file memory.rs:
// This tells Rust that global allocations will use this static variable's allocation functions
// Talck is talc's allocator, but behind a lock, so that it can implement `GlobalAlloc`
// We tell talc to use a `spin::Mutex` as the locking method
// If talc runs out of memory, it runs an OOM (out of memory) handler.
// For now, we do not implement a method of allocating more memory for the global allocator, so we just error on OOM
#[global_allocator]
static GLOBAL_ALLOCATOR: Talck<spin::Mutex<()>, ErrOnOom> = Talck::new({
    // Initially, there is no memory backing `Talc`. We will add memory at run time
    Talc::new(ErrOnOom)
});
Finding physical memory
We need to find physical memory to use for our global allocator at run time. For this, we will use Limine's Memory Map feature:
#[used]
#[unsafe(link_section = ".requests")]
pub static MEMORY_MAP_REQUEST: MemoryMapRequest = MemoryMapRequest::new();
Let's create an init function in memory.rs:
/// Finds unused physical memory for the global allocator and initializes the global allocator.
/// Returns the start address of the physical memory used for the global allocator.
///
/// # Safety
/// This function must be called exactly once, and no page tables should be modified before calling this function.
pub unsafe fn init(memory_map: &'static MemoryMapResponse) {
    let global_allocator_size = {
        // 4 MiB
        4 * 0x400 * 0x400
    };
    let global_allocator_physical_start = PhysAddr::new(
        memory_map
            .entries()
            .iter()
            .find(|entry| {
                entry.entry_type == EntryType::USABLE && entry.length >= global_allocator_size
            })
            .unwrap()
            .base,
    );
}
Getting the virtual address of the physical memory
Now we found physical memory, but to access it, we need to access it through virtual memory. Limine offset maps all EntryType::USABLE memory. We just need to know the offset, and then add the offset to the physical memory. To get the offset, we use Limine's HHDM (Higher Half Direct Map) feature:
#[used]
#[unsafe(link_section = ".requests")]
pub static HHDM_REQUEST: HhdmRequest = HhdmRequest::new();
HHDM offset wrapper type
Our init function will need the two Limine requests mentioned earlier. The HHDM response is basically just a u64, but let's create a wrapper type so that we don't accidentally treat a diffeent u64 as the HHDM offset. Create a file hhdm_offset.rs:
/// A wrapper around u64 that represents the actual HHDM offset, and cannot be accidentally made.
/// Remember though that even though this wraps unsafeness in safeness, it is only safe if the assumption that all available memory is mapped in the current Cr3 value according to the HHDM offset (and cache is not invalid)
#[derive(Clone, Copy)]
pub struct HhdmOffset(u64);
Now let's implement the Debug trait, printing it as hex:
impl Debug for HhdmOffset {
    fn fmt(&self, f: &mut core::fmt::Formatter<'_>) -> core::fmt::Result {
        write!(f, "HhdmOffset(0x{:X})", self.0)
    }
}
To construct a HhdmOffset, we can require having a HHDM response from Limine directly:
impl From<&'static HhdmResponse> for HhdmOffset {
    fn from(value: &'static HhdmResponse) -> Self {
        Self(value.offset())
    }
}
Now let's create a function to quickly get a HhdmOffset:
pub fn hhdm_offset() -> HhdmOffset {
    HHDM_REQUEST.get_response().unwrap().into()
}
Address translation
Create translate_addr.rs:
use x86_64::{PhysAddr, VirtAddr};
use crate::hhdm_offset;
pub trait OffsetMappedPhysAddr {
    fn offset_mapped(self) -> VirtAddr;
}
impl OffsetMappedPhysAddr for PhysAddr {
    fn offset_mapped(self) -> VirtAddr {
        VirtAddr::new(self.as_u64() + u64::from(hhdm_offset()))
    }
}
Getting the offset mapped virtual address is as simple as adding the HHDM offset to the physical address.
Initializing the global allocator
Back in our memory init function, we create a slice for our memory:
let global_allocator_mem = {
    let mut ptr = NonNull::new(slice_from_raw_parts_mut(
        global_allocator_physical_start
            .offset_mapped()
            .as_mut_ptr::<MaybeUninit<u8>>(),
        global_allocator_size as usize,
    ))
    .unwrap();
    // Safety: We've reserved the physical memory and it is already offset mapped
    unsafe { ptr.as_mut() }
};
Then, we can give this slice to talc to use:
let mut talc = GLOBAL_ALLOCATOR.lock();
let span = global_allocator_mem.into();
// Safety: We got the span from valid memory
unsafe { talc.claim(span) }.unwrap();
Now in main.rs, after initializing the logger:
let memory_map = MEMORY_MAP_REQUEST.get_response().unwrap();
// Safety: no page tables were modified before this
unsafe { memory::init(memory_map) };
Trying it out
After memory::init, we can now use data types that need the global allocator. Try adding this:
let v = (0..5)
    .map(|i| alloc::boxed::Box::new(i))
    .collect::<alloc::vec::Vec<_>>();
let v_ptr_range = v.as_ptr_range();
let contents = v
    .iter()
    .map(|b| {
        let b_ptr = &**b;
        alloc::format!("Box pointer: {b_ptr:p}. Contents: {b}")
    })
    .collect::<alloc::vec::Vec<_>>();
log::info!("Vec: {v_ptr_range:?}. Contents: {contents:#?}");
Here we use Vec, Box, and String (which format! allocates). The output should look like this:
INFO  Vec: 0xffff800000100410..0xffff800000100438. Contents: [
    "Box pointer: 0xffff800000100440. Contents: 0",
    "Box pointer: 0xffff800000100458. Contents: 1",
    "Box pointer: 0xffff800000100470. Contents: 2",
    "Box pointer: 0xffff800000100488. Contents: 3",
    "Box pointer: 0xffff8000001004a0. Contents: 4",
]
We can see the pointers the talc assigned to our Vec and Boxes.
Learn More
- https://os.phil-opp.com/paging-introduction/
- https://os.phil-opp.com/paging-implementation
- https://os.phil-opp.com/heap-allocation/
- https://os.phil-opp.com/allocator-designs/
CPU Local Data
So far, we've used global variables, which are shared with all code running on every CPU, and variables inside functions (on the stack). In our kernel, we will need global variables that are unique to each CPU.
We don't know how many CPUs our kernel will run on at compile time, so we will need to allocate and initialize our CPU-specific global variables at run time. Create a file cpu_local_data.rs. Let's make a struct for keeping CPU-specific global data:
pub struct CpuLocalData {
    /// Similar to [Linux](https://elixir.bootlin.com/linux/v5.6.3/source/arch/x86/kernel/apic/apic.c#L2469), the we assign the BSP id `0`.
    /// For the APs, they will have an id based on their position in the CPUs array given from Limine.
    pub kernel_assigned_id: u32,
    #[allow(unused)]
    pub local_apic_id: u32,
}
We can keep the CpuLocalDatas in an array. In Rust, we will use a boxed slice, which is basically an array allocated in run time. One question we have to answer is which CPU will have which index in the array? We can all this index in the array an ID. Limine gives us a list of CPUs, with a ACPI id and a local APIC id. However, we cannot use either of these ids as an index in an array, because these ids are not guaranteed to start with 0 and could have gaps. So we can make our own ids, which we will assign to CPUs. We can call this id kernel_assigned_id. In this tutorial, we will always give the BSP id 0, to easily recognize the BSP. We will give the other CPUs an id based on their index in the array of CPUs that Limine gives us.
Create a file cpu_local_data.rs. Let's make a struct for keeping CPU-specific global data:
pub struct CpuLocalData {
    /// Similar to [Linux](https://elixir.bootlin.com/linux/v5.6.3/source/arch/x86/kernel/apic/apic.c#L2469), the we assign the BSP id `0`.
    /// For the APs, they will have an id based on their position in the CPUs array given from Limine.
    pub kernel_assigned_id: u32,
    #[allow(unused)]
    pub local_apic_id: u32,
}
For our convenience, create this helper function:
fn mp_response() -> &'static MpResponse {
    MP_REQUEST.get_response().expect("expected MP response")
}
Because we only know the number of CPUs at runtime, we cay use lazy initialization to initialize an array of CPU local data:
static CPU_LOCAL_DATA: Lazy<Box<[Once<CpuLocalData>]>> =
    Lazy::new(|| mp_response().cpus().iter().map(|_| Once::new()).collect());
We also need a way to store the kernel assigned id of the current CPU. For this, we need to store it somewhere that is unique to a CPU. We will use the GS.Base register for this. GS.Base is supposed to store a pointer, and this register is not shared between CPUs. We can store a pointer to CpuLocalData in GS.Base:
/// This function makes sure that we are writing a valid pointer to CPU local data to GsBase
fn write_gs_base(ptr: &'static CpuLocalData) {
    GsBase::write(VirtAddr::from_ptr(ptr));
}
Next let's create functions to initialize CPU local data for the current CPU, and store the pointer in GS.Base:
/// Initializes the item in [`CPU_LOCAL_DATA`] and GS.Base
fn init_cpu(kernel_assigned_id: u32, local_apic_id: u32) {
    write_gs_base(
        CPU_LOCAL_DATA[kernel_assigned_id as usize].call_once(|| CpuLocalData {
            kernel_assigned_id,
            local_apic_id,
        }),
    );
}

/// Initialize CPU local data for the BSP
///
/// # Safety
/// Must be called on the AP
pub unsafe fn init_bsp() {
    init_cpu(
        // We always assign id 0 to the BSP
        0,
        mp_response().bsp_lapic_id(),
    );
}

/// # Safety
/// The CPU must match the actual CPU that this function is called on
pub unsafe fn init_ap(cpu: &Cpu) {
    let local_apic_id = cpu.lapic_id;
    init_cpu(
        // We get use the position of the CPU in the array, not counting the BSP and adding 1 because id `0` is the BSP.
        mp_response()
            .cpus()
            .iter()
            .filter(|cpu| cpu.lapic_id != mp_response().bsp_lapic_id())
            .position(|cpu| cpu.lapic_id == local_apic_id)
            .expect("CPUs array should contain this AP") as u32
            + 1,
        local_apic_id,
    );
}
In entry_point_from_limine, after memory::init, add:
// Safety: We are calling this function on the BSP
unsafe {
    cpu_local_data::init_bsp();
}
And in entry_point_from_limine_mp add:
// Safety: We're actually calling the function on this CPU
unsafe { cpu_local_data::init_ap(cpu) };
Now, let's create two helper functions in cpu_local_data.rs:
pub fn cpus_count() -> usize {
    mp_response().cpus().len()
}

pub fn try_get_local() -> Option<&'static CpuLocalData> {
    let ptr = NonNull::new(GsBase::read().as_mut_ptr::<CpuLocalData>())?;
    // Safety: we only wrote to GsBase using `write_gs_base`, which ensures that the pointer is `&'static CpuLocalData`
    unsafe { Some(ptr.as_ref()) }
}
Showing the CPU in our logger
It is useful to know which CPU logged what message. Let's prefix all of our log messages with the CPU id. Let's add Color::Gray, with
Color::Gray => &string.dimmed()
for the serial logger and
Color::Gray => Rgb888::new(128, 128, 128)
for the screen. Then in the log method, add this before printing the log level:
let cpu_id = try_get_local().map_or(0, |data| data.kernel_assigned_id);
let width = match cpus_count() {
    1 => 1,
    n => (n - 1).ilog(16) as usize + 1,
};
inner.write_with_color(Color::Gray, format_args!("[{cpu_id:0width$X}] "));
Here we print the id (in hex) of the CPU that logged the message. We adjust the number of digits in the CPU id to be the maximum number of digits needed.
We can even try running our CPU with a ton of CPUs now. Add the following QEMU flags:
For 300 CPUs:
--smp 300
To use a non-default QEMU machine which can support this many CPUs:
--machine q35
To enable X2APIC, which is needed for >255 CPUs:
--cpu qemu64,+x2apic
To increase the memory to 1 GiB instead of the default 128 MiB, since we need more memory for all those extra CPUs:
-m 1G
Now the output should look similar to this:
[000] INFO  Hello from BSP
[0C1] INFO  Hello from AP
[101] INFO  Hello from AP
[0BF] INFO  Hello from AP
[059] INFO  Hello from AP
[0A0] INFO  Hello from AP
Handling interrupts and exceptions
An interrupt is when the CPU receives an external event. When the CPU receives the event, the CPU will interrupt your code and call an interrupt handler function, inputting an interrupt stack frame. The interrupt stack frame contains info about what the CPU was doing before it was interrupted, and, depending on the exception, may also contain an error code. It is the interrupt handler function's responsibility to switch back to whatever the CPU was doing before.
An exception is when the code tries to do something invalid. For example, a page fault is when code tries to access an invalid memory address. A double fault is when there is an exception that happens as the CPU tries to execute an exception handler. A triple fault happens if there is an exception as the CPU tries to execute the double fault handler. When a triple fault happens, the computer immediately reboots. Similar to interrupts, the CPU jumps to an exception handler function.
As we write an OS, there will be exceptions because of bugs in our code. We'll define exception handlers for them, because if we don't, there will be a triple fault, which is very hard to debug. We'll start by having a breakpoint exception handler. Breakpoints aren't really errors, and this "exception" is convenient to check that our exception handlers are working.
There are three things we need to set up: The GDT, TSS, and IDT. The IDT contains the handler functions that should be executed on different kinds of exceptions and interrupts. The TSS contains pointers to stacks when the CPU switches stacks before executing a handler. The GDT in modern times basically just contains a pointer to the TSS. Each CPU will have its own GDT, TSS, and IDT. Create a file gdt.rs:
pub struct Gdt {
    gdt: GlobalDescriptorTable,
    kernel_code_selector: SegmentSelector,
    kernel_data_selector: SegmentSelector,
    tss_selector: SegmentSelector,
}
We create a struct Gdt which contains the actual GDT along with segment selectors (don't worry about them).
Let's add the TSS, GDT, and IDT to the CpuLocalData:
pub tss: Once<TaskStateSegment>,
pub gdt: Once<Gdt>,
pub idt: Once<InterruptDescriptorTable>,
And make them initially Once::new().
Now we create an init function in gdt.rs:
pub fn init() { }
In cpu_local_data.rs, let's add a helper function to get the CPU's local data, panicking if it was not initialized:
pub fn get_local() -> &'static CpuLocalData {
    try_get_local().unwrap()
}
Now, back in the GDT init function. Because the GDT requires a pointer to the TSS, we first initialize the TSS:
let local = get_local();
let tss = local.tss.call_once(TaskStateSegment::new);
For now, we won't put anything in the TSS, and we'll have an empty TSS. Next, we create the GDT:
let gdt = local.gdt.call_once(|| {
    let mut gdt = GlobalDescriptorTable::new();
    let kernel_code_selector = gdt.append(Descriptor::kernel_code_segment());
    let kernel_data_selector = gdt.append(Descriptor::kernel_data_segment());
    let tss_selector = gdt.append(Descriptor::tss_segment(tss));
    Gdt {
        gdt,
        kernel_code_selector,
        kernel_data_selector,
        tss_selector,
    }
});
Next, we load the GDT:
gdt.gdt.load();
We have to set some registers to specific values:
unsafe { CS::set_reg(gdt.kernel_code_selector) };
unsafe { SS::set_reg(gdt.kernel_data_selector) };
And we load the tss:
unsafe { load_tss(gdt.tss_selector) };
Note that we don't input the pointer to the TSS directly when loading the TSS. Instead, we input the TSS's segment selector in the now loaded GDT.
Next let's set up the IDT. Create idt.rs. First let's create our breakpoint handler function:
extern "x86-interrupt" fn breakpoint_handler(stack_frame: InterruptStackFrame) {
    log::info!("Breakpoint! Stack frame: {stack_frame:#?}");
}
When we specify extern "x86-interrupt", Rust will handle restoring what the CPU was previously doing for us. It will also restore any registers that it changed. We need to add
#![feature(abi_x86_interrupt)]
to main.rs in order to use the x86-interrupt calling convention.
Next, we create a function to create and load the idt:
pub fn init() {
    let idt = get_local().idt.call_once(|| {
        let mut idt = InterruptDescriptorTable::new();
        idt.breakpoint.set_handler_fn(breakpoint_handler);
        idt
    });
    idt.load();
}
For now, we're only doing
idt.breakpoint.set_handler_fn(breakpoint_handler);
But later, we will add handlers for other exceptions and for interrupts.
Finally, let's call the function in entry_point_bsp after cpu_local_data::init_bsp, and in entry_point_ap after saying "Hello from AP":
gdt::init();
idt::init();
To test it out, also add
x86_64::instructions::interrupts::int3();
The int3 instruction triggers a breakpoint.
Now when we run the OS, we'll see:
[0] INFO  Hello from BSP
[1] INFO  Hello from AP
[0] INFO  Breakpoint! Stack frame: InterruptStackFrame {
    instruction_pointer: VirtAddr(
        0xffffffff80013c01,
    ),
    code_segment: SegmentSelector {
        index: 1,
        rpl: Ring0,
    },
    cpu_flags: RFlags(
        SIGN_FLAG | 0x2,
    ),
    stack_pointer: VirtAddr(
        0xffff800003ba4ee8,
    ),
    stack_segment: SegmentSelector {
        index: 2,
        rpl: Ring0,
    },
}
[1] INFO  Breakpoint! Stack frame: InterruptStackFrame {
    instruction_pointer: VirtAddr(
        0xffffffff80013c01,
    ),
    code_segment: SegmentSelector {
        index: 1,
        rpl: Ring0,
    },
    cpu_flags: RFlags(
        SIGN_FLAG | 0x2,
    ),
    stack_pointer: VirtAddr(
        0xffff800002634f78,
    ),
    stack_segment: SegmentSelector {
        index: 2,
        rpl: Ring0,
    },
}
Now that we know breakpoint handling works, let's remove the x86_64::instructions::interrupts::int3();.
Learn more
- https://os.phil-opp.com/cpu-exceptions/
- https://os.phil-opp.com/double-fault-exceptions/
- https://os.phil-opp.com/hardware-interrupts/
- https://wiki.osdev.org/Exceptions
- https://wiki.osdev.org/Global_Descriptor_Table
- https://wiki.osdev.org/Task_State_Segment
- https://wiki.osdev.org/Interrupt_Descriptor_Table
Handling page faults
Like I mentioned before, we will have exceptions, and if we can panic, log debug info, and use the debugger, we will have a much better debugging experience than if we let it triple fault.
Triggering a page fault
Let's try purposely creating a page fault:
unsafe {
    (0xABCDEF as *mut u8).read_volatile();
}
here we are purposely triggering a page fault. The address 0xABCDEF is invalid, and we are reading from it. If you run QEMU now, it will triple fault, and QEMU will reboot the VM, causing an endless loop of rebooting and triple faulting. Let's do two things to make this easier to debug. Let's pass --no-reboot, which makes QEMU exit without rebooting in the event of a triple fault. And also, -d int, which makes QEMU print all interrupts and exceptions that happen. Let's add -d int to our tasks.json for convenience. Now, when we run the VM again, we should see:
check_exception old: 0xffffffff new 0xe
   285: v=0e e=0000 i=0 cpl=0 IP=0008:ffffffff80007d43 pc=ffffffff80007d43 SP=0000:ffff800003be8e60 CR2=0000000000abcdef
RAX=0000000000abcdef RBX=0000000000000000 RCX=0000000000000000 RDX=3333333333333333
RSI=0000000000000001 RDI=0000000000abcdef RBP=0000000000000000 RSP=ffff800003be8e60
R8 =ffffffff80014800 R9 =8000000000000001 R10=ffffffff80016400 R11=00000000000010e0
R12=0000000000000000 R13=0000000000000000 R14=0000000000000000 R15=0000000000000000
RIP=ffffffff80007d43 RFL=00000082 [--S----] CPL=0 II=0 A20=1 SMM=0 HLT=0
ES =0000 0000000000000000 00000000 00000000
CS =0008 0000000000000000 ffffffff 00af9b00 DPL=0 CS64 [-RA]
SS =0000 0000000000000000 ffffffff 00c09300 DPL=0 DS   [-WA]
DS =0000 0000000000000000 00000000 00000000
FS =0030 0000000000000000 00000000 00009300 DPL=0 DS   [-WA]
GS =0030 ffffffff80019320 00000000 00009300 DPL=0 DS   [-WA]
LDT=0000 0000000000000000 00000000 00008200 DPL=0 LDT
TR =0010 ffffffff80019328 00000067 00008900 DPL=0 TSS64-avl
GDT=     ffffffff8001a3a0 0000001f
IDT=     ffffffff80019390 00000fff
CR0=80010011 CR2=0000000000abcdef CR3=0000000003bd8000 CR4=00000020
DR0=0000000000000000 DR1=0000000000000000 DR2=0000000000000000 DR3=0000000000000000
DR6=00000000ffff0ff0 DR7=0000000000000400
CCS=0000000000000078 CCD=ffff800003be8e58 CCO=ADDQ
EFER=0000000000000d00
That's a lot of information! Here are some key details:
check_exception old: 0xffffffff new 0xe
The 0xe means that a page fault happened. You can reference this table to check the exception based on the code.
IP=0008:ffffffff80007d43 means that 0xffffffff80007d43 is the pointer to the instruction that caused the page fault.
CR2=0000000000abcdef means that the address 0x0000000000abcdef was accessed, which caused the page fault. This matches what we wrote in the Rust code.
Scrolling down, we can see check_exception old: 0xe new 0xb. 0xb means a "Segment Not Present" fault occurred. Next, check_exception old: 0x8 new 0xb. The 0x8 indicates a double fault. It seems like the double fault caused another "segment not present" fault, which caused a triple fault.
A page fault handler
Let's define a page fault handler in our IDT. Let's create the page fault handler function in idt.rs. In a page fault, we can read the Cr2 register to get the accessed address that caused the page fault.
extern "x86-interrupt" fn page_fault_handler(
    stack_frame: InterruptStackFrame,
    error_code: PageFaultErrorCode,
) {
    let accessed_address = Cr2::read().unwrap();
    panic!(
        "Page fault! Stack frame: {stack_frame:#?}. Error code: {error_code:#?}. Accessed address: {accessed_address:?}."
    )
}
Then let's add the function to the IDT:
idt.page_fault.set_handler_fn(page_fault_handler);
Now we should see this:
[0] ERROR panicked at kernel/src/idt.rs:17:5:
Page fault! Stack frame: InterruptStackFrame {
    instruction_pointer: VirtAddr(
        0xffffffff8000e220,
    ),
    code_segment: SegmentSelector {
        index: 1,
        rpl: Ring0,
    },
    cpu_flags: RFlags(
        RESUME_FLAG | SIGN_FLAG | PARITY_FLAG | 0x2,
    ),
    stack_pointer: VirtAddr(
        0xffff800003ba4ec0,
    ),
    stack_segment: SegmentSelector {
        index: 2,
        rpl: Ring0,
    },
}. Error code: PageFaultErrorCode(
    0x0,
). Accessed address: VirtAddr(0xabcdef).
Stack Overflows
Our kernel now catches and prints errors caused by accessing an invalid address. However, there is a common type of error that our kernel does not "catch" - a stack overflow. A stack overflow is when we run out of stack memory, causing the CPU to access memory that is outside of the stack. Often, what's called a "guard page" is placed at the end of the stack. A guard page is purposely unmapped memory, so that a page fault will be triggered when a stack overflow happens. However, Limine does not set up guard pages for our stacks. This means that if a stack overflow happens, the stack could overwrite other memory, causing all sorts of unexpected behavior, exceptions, and triple faults - all very annoying to debug. For this reason, we will set up a stack with a guard page in future parts.
Learn More
Managing Physical and Virtual Memory
I will assume that you already know about physical and virtual memory, and how paging works on x86_64 to map virtual memory to physical memory. You can read the following to learn these things:
- https://os.phil-opp.com/paging-introduction/
- https://os.phil-opp.com/paging-implementation/
- https://wiki.osdev.org/Paging
So, what is the state of virtual and physical memory so far? Limine has given us a list of physical memory regions, which lets us know which ones are available for us to use. We've already used a region of physical memory for our global allocator heap. Limine set up page tables, and we have not modified them yet.
Re-organizing memory.rs
First, let's change memory.rs to be memory/mod.rs (creating a folder called memory). Then create a file memory/global_allocator.rs. Basically, move everything that used to be in memory.rs to memory/global_allocator.rs. And change the init function to return a PhysAddr. In the end of the function, return global_allocator_physical_start. In memory/mod.rs, create this fn:
/// Initializes global allocator, creates new page tables, and switches to new page tables.
/// This function must be called before mapping pages or running our kernel's code on APs.
///
/// # Safety
/// This function must be called exactly once, and no page tables should be modified before calling this function.
pub unsafe fn init_bsp(memory_map: &'static MemoryMapResponse) {
    let global_allocator_start = unsafe { global_allocator::init(memory_map) };
}
Managing physical memory
Create a file memory/physical_memory.rs. Then, add the nodit crate:
nodit = { version = "0.9.2", default-features = false }
We will create the following structs:
#[derive(Debug, PartialEq, Eq, Clone, Copy)]
pub enum KernelMemoryUsageType {
    PageTables,
    GlobalAllocatorHeap,
}

/// Note that there are other memory types (such as ACPI memory) that are not included here
#[derive(Debug, PartialEq, Eq, Clone, Copy)]
pub enum MemoryType {
    Usable,
    UsedByLimine,
    UsedByKernel(KernelMemoryUsageType),
}

#[derive(Debug)]
pub struct PhysicalMemory {
    map: NoditMap<u64, Interval<u64>, MemoryType>,
}
This way, we can not only keep track of which memory we have used, but also what we used it for (roughly).
Next, let's create a function to create PhysicalMemory:
impl PhysicalMemory {
    pub(super) fn new(
        memory_map: &'static MemoryMapResponse,
        global_allocator_start: PhysAddr,
    ) -> Self {
        Self {
            map: {
                let mut map = NoditMap::default();
                // We start with the state when Limine booted our kernel
                for entry in memory_map.entries() {
                    let should_insert = match entry.entry_type {
                        EntryType::USABLE => Some(MemoryType::Usable),
                        EntryType::BOOTLOADER_RECLAIMABLE => Some(MemoryType::UsedByLimine),
                        _ => {
                            // The entry might overlap, so let's not add it
                            None
                        }
                    };
                    if let Some(memory_type) = should_insert {
                        map
                            // Although they are guaranteed to not overlap and be ascending, Limine doesn't specify that they aren't guaranteed to not be touching even if they are the same.
                            .insert_merge_touching_if_values_equal(
                                (entry.base..entry.base + entry.length).into(),
                                memory_type,
                            )
                            .unwrap();
                    }
                }
                // We track the memory used for the global allocator
                let interval = Interval::from(
                    global_allocator_start.as_u64()
                        ..global_allocator_start.as_u64() + global_allocator::GLOBAL_ALLOCATOR_SIZE,
                );
                let _ = map.cut(interval);
                map.insert_merge_touching_if_values_equal(
                    interval,
                    MemoryType::UsedByKernel(KernelMemoryUsageType::GlobalAllocatorHeap),
                )
                .unwrap();
                map
            },
        }
    }
}
Don't forget, we have already allocated some physical memory towards the global allocator's heap. We mark that memory as used.
Back in memory::init_bsp, let's call the fn:
let mut physical_memory = PhysicalMemory::new(memory_map, global_allocator_start);
Setting up our own page tables
We're going to be mapping virtual memory to physical memory. Currently, we don't really know which parts in virtual memory are already mapped. It could cause issues if we try to map a page which is already mapped. So we'll create a new, blank L4 page table. That way, we know exactly what should and shouldn't be used. However, we need to re-create the mappings that Limine made.
To manage page tables, we will use the ez_paging crate:
ez_paging = { git = "https://github.com/ChocolateLoverRaj/ez_paging", version = "0.1.0", default-features = false }
Before we create page tables, we'll need a way of allocating physical memory towards page tables:
impl PhysicalMemory {
    pub fn allocate_frame_with_type(
        &mut self,
        page_size: PageSize,
        memory_type: MemoryType,
    ) -> Option<Frame> {
        let aligned_start = self.map.iter().find_map(|(interval, memory_type)| {
            if let MemoryType::Usable = memory_type {
                let aligned_start = interval.start().next_multiple_of(page_size.byte_len_u64());
                let required_end = aligned_start + page_size.byte_len_u64();
                if required_end <= interval.end() {
                    Some(aligned_start)
                } else {
                    None
                }
            } else {
                None
            }
        })?;
        let range = aligned_start..aligned_start + page_size.byte_len_u64();
        let _ = self.map.cut(Interval::from(range.clone()));
        self.map
            .insert_merge_touching_if_values_equal(range.into(), memory_type)
            .unwrap();
        Some(Frame::new(PhysAddr::new(aligned_start), page_size).unwrap())
    }
}
We'll also need to implement x86_64::structures::paging::FrameAllocator, and have a way of getting a ez_paging::Owned4KibFrame:
pub struct PhysicalMemoryFrameAllocator<'a> {
    physical_memory: &'a mut PhysicalMemory,
    memory_type: MemoryType,
}

impl PhysicalMemoryFrameAllocator<'_> {
    pub fn allocate_4kib_frame(&mut self) -> Option<Owned4KibFrame> {
        let frame = self
            .physical_memory
            .allocate_frame_with_type(PageSize::_4KiB, self.memory_type)?;
        let frame = PhysFrame::from_start_address(frame.start_addr()).unwrap();
        // Safety: we exclusively access the frame
        let frame = unsafe { Owned4KibFrame::new(frame) };
        Some(frame)
    }
}

unsafe impl FrameAllocator<Size4KiB> for PhysicalMemoryFrameAllocator<'_> {
    fn allocate_frame(&mut self) -> Option<PhysFrame> {
        Some(self.allocate_4kib_frame()?.into())
    }
}
And let's add a method to get a PhysicalMemoryFrameAllocator:
impl PhysicalMemory {
    pub fn get_kernel_frame_allocator(&mut self) -> PhysicalMemoryFrameAllocator<'_> {
        PhysicalMemoryFrameAllocator {
            physical_memory: self,
            memory_type: MemoryType::UsedByKernel(KernelMemoryUsageType::PageTables),
        }
    }
}
We're ready to create page tables!
Create a file memory/create_page_tables.rs:
/// Creates new page tables, but does not switch to them
pub fn create_page_tables(
    memory_map: &'static MemoryMapResponse,
    physical_memory: &mut PhysicalMemory,
) -> (PhysFrame, Cr3Flags, VirtualMemory) {
    todo!()
}
For now, ignore that VirtualMemory is not defined. Inside the function, we can start off by creating a new top level page table for the kernel:
let hhdm_offset = hhdm_offset();
let mut frame_allocator = physical_memory.get_kernel_frame_allocator();
let mut l4 = PagingConfig::new(
    // Safety: we don't touch the PAT
    unsafe { ManagedPat::new() },
    hhdm_offset.into(),
)
.new_kernel(frame_allocator.allocate_4kib_frame().unwrap());
Next, we need to re-create some mappings that Limine created for its page tables.
// Offset map everything that is currently offset mapped
let page_size = max_page_size();
let mut last_mapped_address = None::<PhysAddr>;
for entry in memory_map.entries() {
    if [
        EntryType::USABLE,
        EntryType::BOOTLOADER_RECLAIMABLE,
        EntryType::EXECUTABLE_AND_MODULES,
        EntryType::FRAMEBUFFER,
    ]
    .contains(&entry.entry_type)
    {
        let range_to_map = {
            let start = PhysAddr::new(entry.base);
            let end = start + entry.length;
            match last_mapped_address {
                Some(last_mapped_address) => {
                    if start > last_mapped_address {
                        Some(start..end)
                    } else if end > last_mapped_address {
                        Some(last_mapped_address + 1..end)
                    } else {
                        None
                    }
                }
                None => Some(start..end),
            }
        };
        if let Some(range_to_map) = range_to_map {
            let first_frame = Frame::new(
                range_to_map.start.align_down(page_size.byte_len_u64()),
                page_size,
            )
            .unwrap();
            let pages_len = range_to_map.end.as_u64().div_ceil(page_size.byte_len_u64())
                - range_to_map.start.as_u64() / page_size.byte_len_u64();

            for i in 0..pages_len {
                let frame = first_frame.offset(i).unwrap();
                let page = frame.offset_mapped();
                let flags = ConfigurableFlags {
                    writable: true,
                    executable: false,
                    pat_memory_type: PatMemoryType::WriteBack,
                };
                unsafe { l4.map_page(page, frame, flags, &mut frame_allocator) }.unwrap();
            }
            last_mapped_address = Some(range_to_map.end.align_up(page_size.byte_len_u64()) - 1);
        }
    }
}
We also need to re-map the kernel executable itself somehow. The easiest way is to just reusing Limine's kernel mappings.
// We must map the kernel, which lies in the top 2 GiB of virtual memory
// We can just reuse Limine's mappings for the top 512 GiB
let (current_l4_frame, cr3_flags) = Cr3::read();
The Cr3 register contains the physical address of the top level page table, as well as some flags. We can use the offset mapping to access the existing level 4 page table:
let current_l4_page_table = {
    let ptr = NonNull::new(
        current_l4_frame
            .start_address()
            .offset_mapped()
            .as_mut_ptr::<PageTable>(),
    )
    .unwrap();
    // Safety: we are just going to reference it immutably, and nothing is referencing it mutably
    unsafe { ptr.as_ref() }
};
Next, we can get a reference to the new level 4 page table
let new_l4_page_table = {
    let mut ptr = l4.page_table();
    // Safety: we are just going to copy the last entry, and not modify that region's mappings
    unsafe { ptr.as_mut() }
};
Finally, we copy the last entry from the current to the new page table:
new_l4_page_table[511].clone_from(¤t_l4_page_table[511]);
Then, we will return some information:
(
    *l4.frame().deref(),
    cr3_flags,
    todo!("Virtual memory")
)
Let's call this fn back in memory::init_bsp:
let (new_kernel_cr3, new_kernel_cr3_flags, virtual_memory) =
    create_page_tables(memory_map, &mut physical_memory);
And then switch to the new page tables by writing to Cr3:
// Safety: page tables are ready to be used
unsafe { Cr3::write(new_kernel_cr3, new_kernel_cr3_flags) };
Managing virtual memory
Create memory/virtual_memory.rs:
use ez_paging::ManagedL4PageTable;
use nodit::{Interval, NoditSet};

#[derive(Debug)]
pub struct VirtualMemory {
    #[allow(unused)]
    pub(super) set: NoditSet<u64, Interval<u64>>,
    #[allow(unused)]
    pub(super) l4: ManagedL4PageTable,
}
For now, VirtualMemory doesn't do much. It just uses a NoditSet to keep track of which virtual memory was used, and stores the ManagedL4PageTable from the ez_paging crate.
Back in create_page_tables, we can initialize the VirtualMemory where we have our todo!():
VirtualMemory {
    set: {
        // Now let's keep track of the used virtual memory
        let mut set = NoditSet::default();
        // Let's add all of the offset mapped regions, keeping in mind we used 1 GiB pages
        for entry in memory_map.entries() {
            if [
                EntryType::USABLE,
                EntryType::BOOTLOADER_RECLAIMABLE,
                EntryType::EXECUTABLE_AND_MODULES,
                EntryType::FRAMEBUFFER,
            ]
            .contains(&entry.entry_type)
            {
                let start = u64::from(hhdm_offset)
                    + entry.base / page_size.byte_len_u64() * page_size.byte_len_u64();
                let end = u64::from(hhdm_offset)
                    + (entry.base + (entry.length - 1)) / page_size.byte_len_u64()
                        * page_size.byte_len_u64()
                    + (page_size.byte_len_u64() - 1);
                set.insert_merge_touching_or_overlapping((start..=end).into());
            }
        }
        // Let's add the top 512 GiB
        set.insert_merge_touching(iu(0xFFFFFF8000000000)).unwrap();
        set
    },
    l4,
}
We mark all of the memory used for offset mapping as used. We also mark the top 512 GiB as used, since we are reusing the last entry from Limine's level 4 page table.
Putting it together
Back in memory/mod.rs, let's store all memory-related data:
#[non_exhaustive]
#[derive(Debug)]
pub struct Memory {
    #[allow(unused)]
    pub physical_memory: spin::Mutex<PhysicalMemory>,
    #[allow(unused)]
    pub virtual_memory: spin::Mutex<VirtualMemory>,
    pub new_kernel_cr3: PhysFrame<Size4KiB>,
    pub new_kernel_cr3_flags: Cr3Flags,
}

pub static MEMORY: Once<Memory> = Once::new();
and in memory::init_bsp, initialize it:
MEMORY.call_once(|| Memory {
    physical_memory: spin::Mutex::new(physical_memory),
    virtual_memory: spin::Mutex::new(virtual_memory),
    new_kernel_cr3,
    new_kernel_cr3_flags,
});
Now, in main.rs, remove the old memory::init, and add:
// Safety: no page tables were modified before this
unsafe { memory::init_bsp(memory_map) };
Now, the BSP will switch to the new page tables. But what about the APs? For them, we can create a simple function in memory/mod.rs:
/// # Safety
/// Must be called on all APs before modifying page tables
pub unsafe fn init_ap() {
    let memory = MEMORY.get().unwrap();
    // Safety: page tables are ready to be used
    unsafe { Cr3::write(memory.new_kernel_cr3, memory.new_kernel_cr3_flags) };
}
The page tables are shared between all CPUs. In the APs, we just need to switch to the new page tables by writing to Cr3. In the top of entry_point_ap, call it:
// Safety: we are calling this right away
unsafe { memory::init_ap() };
Now, when we run the code the log messages should be logged like before. There should not be any exceptions or crashes.
Recap
We did the following in this part:
- Kept track of which physical memory is used, and which physical memory is available to allocate
- Kept track of which virtual memory is used
- Created new page tables, with mappings for the offset mapping and the kernel executable
- Switched to the new page tables on all CPUs
Guard Page
As mentioned in the part about page fault handling, our kernel currently has no protections against stack overflows.
Let's purposely create a stack overflow:
fn stack_overflow() {
    stack_overflow();
}
stack_overflow();
Since we have no guard page, running this code could result in anything. When I ran this code, I got an "Invalid Opcode" fault. But we know that the underlying cause was not an invalid opcode.
A guard page is just a page that is purposely left unmapped. This way, if a stack overflow happens, it will result in a page fault rather than silently overwriting other data.
Allocating and mapping memory for a stack with a guarded page
Create guarded_stack.rs. In it, we will define a stack size:
pub const NORMAL_STACK_SIZE: u64 = 64 * 0x400;
This is 64 KiB, which is also Limine's default stack size.
Next, we create a struct that holds a guarded stack, which is a stack with a guard page.
/// A stack with a guard page at the bottom.
/// Dropping this does not unmap the stack.
#[derive(Debug)]
pub struct GuardedStack {
    top: VirtAddr,
}
Also create a file called x86_64_consts.rs. In it, we will define some useful numbers. For now:
pub const HIGHER_HALF_START: u64 = 0xFFFF800000000000;
We need to only use memory >= HIGHER_HALF_START for the kernel.
We need a way of allocating virtual memory. We can add a method in the VirtualMemory struct to do that:
impl VirtualMemory {
    /// Returns the start page of the allocated range of pages.
    /// Pages are guaranteed not to be mapped.
    pub fn allocate_contiguous_pages(
        &mut self,
        page_size: PageSize,
        n_pages: NonZero<u64>,
    ) -> Option<Page> {
        let interval = self
            .set
            .gaps_trimmed(iu(HIGHER_HALF_START))
            .find_map(|gap| {
                let aligned_start = gap.start().next_multiple_of(page_size.byte_len_u64());
                let interval = ii(
                    aligned_start,
                    aligned_start + (n_pages.get() * page_size.byte_len_u64() - 1),
                );
                if gap.contains_interval(&interval) {
                    Some(interval)
                } else {
                    None
                }
            })?;
        self.set
            .insert_merge_touching(interval)
            .expect("no overlap");
        Some(Page::new(VirtAddr::new(interval.start()), page_size).expect("should be aligned"))
    }
}
This function finds (aligned) contiguous pages of unused memory, mark them as used, and then return the starting page.
Next, let's add a function to create a GuardedStack:
impl GuardedStack {
    /// Locks physical and virtual memory to allocate the stack
    pub fn new(size: u64, id: StackId) -> Self {
        let memory = MEMORY.get().unwrap();
        let mut physical_memory = memory.physical_memory.lock();
        let mut virtual_memory = memory.virtual_memory.lock();
        let n_mapped_pages = size.div_ceil(STACK_PAGE_SIZE.byte_len_u64());
        let n_virtual_pages = n_mapped_pages + 1;
        let allocated_pages = virtual_memory
            .allocate_contiguous_pages(STACK_PAGE_SIZE, NonZero::new(n_virtual_pages).unwrap())
            .unwrap();
        todo!()
    }
}
Let's also keep track of the guard pages, so that we can detect which stack overflowed if a stack overflow happens:
#[derive(Debug, Clone, Copy)]
pub enum StackType {
    Normal,
    ExceptionHandler,
}

#[derive(Debug, Clone, Copy)]
pub struct StackId {
    pub _type: StackType,
    #[allow(unused)]
    pub cpu_id: u32,
}

#[derive(Debug, Clone, Copy)]
pub struct StackInfo {
    #[allow(unused)]
    id: StackId,
    #[allow(unused)]
    size: u64,
}

pub const STACK_PAGE_SIZE: PageSize = PageSize::_4KiB;
pub static STACK_GUARD_PAGES: spin::Mutex<BTreeMap<Page, StackInfo>> =
    spin::Mutex::new(BTreeMap::new());
Back in our new method, let's insert the guard page:
// We purposely don't map the bottom page
// so that it causes a page fault instead of silently overwriting data used for other purposes
let guard_page = Page::new(allocated_pages.start_addr(), STACK_PAGE_SIZE).unwrap();
STACK_GUARD_PAGES
    .lock()
    .insert(guard_page, StackInfo { id, size });
Before we can create mappings, we need a way of getting a &mut ez_paging::ManagedL4PageTable:
impl VirtualMemory {
    pub fn l4_mut(&mut self) -> &mut ManagedL4PageTable {
        &mut self.l4
    }
}
Now in GuardedStack::new, we can map the stack:
let start_page = guard_page.offset(1).unwrap();
for i in 0..n_mapped_pages {
    let page = start_page.offset(i).unwrap();
    let frame = physical_memory
        .allocate_frame_with_type(
            STACK_PAGE_SIZE,
            MemoryType::UsedByKernel(KernelMemoryUsageType::Stack),
        )
        .unwrap();
    let flags = ConfigurableFlags {
        writable: true,
        executable: false,
        pat_memory_type: PatMemoryType::WriteBack,
    };
    let mut frame_allocator = physical_memory.get_kernel_frame_allocator();
    unsafe {
        virtual_memory
            .l4_mut()
            .map_page(page, frame, flags, &mut frame_allocator)
    }
    .unwrap();
}
Create the KernelMemoryUsageType::Stack enum variant, so we can identify that physical memory as being used for a stack. Finally, we construct the GuardedPage:
Self {
    top: (start_page.start_addr() + n_mapped_pages * STACK_PAGE_SIZE.byte_len_u64()),
}
Switching stacks
We wrote the code for creating a stack, but how do we use it? We need to change the value of the rsp register. The sp in rsp stands for "stack pointer". The rsp points to the top of the stack, and the stack goes down. We need to change rsp to point to the new stack. However, this can get messy, since once we switch to the new stack, we cannot reference any data that is stored on our old stack, and we need to make sure that the code that Rust generates doesn't implicitly reference it either. The best way is to call a new function that never returns. This way, we can be sure that the contents of the old stack are never accessed. To do this, let's create call_with_rsp.rs:
use core::arch::naked_asm;

/// # Safety
/// Stack must be valid
#[unsafe(naked)]
pub unsafe extern "sysv64" fn call_with_rsp(new_rsp: u64, f: extern "sysv64" fn() -> !) -> ! {
    naked_asm!(
        "
        mov rsp, rdi
        call rsi
        "
    );
}
This function, call_with_rsp, is a naked function, which is basically a function written entirely in assembly. We use assembly, and not Rust, to make sure that the Rust code does not implicitly end up messing with the stack. This tutorial will talk more about assembly and calling conventions later. For now, just know that the first input (in this case, new_rsp) gets passed through the rdi register. When we do mov rsp, rdi, it's basically like doing rsp = rdi. We are setting the value of rsp to the value provided through new_rsp. Next, we call the function f. f is the 2nd input, which is passed through the rsi register. So call rsi in assembly is like f() in Rust. We specify extern "sysv64" for f so that we can call it with the call instruction. In the end, calling call_with_rsp will result in the execution of function f on the new stack.
Let's use our new function to write the following method:
impl GuardedStack {
        pub fn switch(self, f: extern "sysv64" fn() -> !) -> ! {
        let new_rsp = self.top.as_u64();
        // Safety: The worst that can happen is a stack overflow, since we mapped a guard page
        unsafe { call_with_rsp(new_rsp, f) }
    }
}
Switching stacks on the BSP
In main.rs, let's move some code to a new function:
extern "sysv64" fn init_bsp() -> ! {
    gdt::init();
    idt::init();

    let mp_response = MP_REQUEST.get_response().unwrap();
    for cpu in mp_response.cpus() {
        cpu.goto_address.write(entry_point_ap);
    }

    hlt_loop();
}
This function will run on a guarded stack, so if this function causes a stack overflow, we can detect it with a page fault handler.
Then we just need to call the function on a guarded stack inside entry_point_bsp:
GuardedStack::new(
    NORMAL_STACK_SIZE,
    StackId {
        _type: StackType::Normal,
        cpu_id: get_local().kernel_assigned_id,
    },
)
.switch(init_bsp)
Let's do the same for all APs:
extern "sysv64" fn init_ap() -> ! {
    gdt::init();
    idt::init();

    hlt_loop()
}
and in the bottom of entry_point_ap:
GuardedStack::new(
    NORMAL_STACK_SIZE,
    StackId {
        _type: StackType::Normal,
        cpu_id: get_local().kernel_assigned_id,
    },
)
.switch(init_ap)
We are close to nicely debugging stack overflows, but not yet. At this point, if we call stack_overflow(); before hlt_loop() in init_bsp, it will still result in a triple fault.
Interrupt Stack Table (IST)
By default, when an interrupt or exception occurs, the CPU will continue using the current stack, and execute the interrupt handler from the current value of rsp. Normally, when the stack is valid and has enough stack space for the interrupt handler to run, this is completely fine. The memory below rsp is free to be used by the interrupt handler. When the interrupt handler returns, the rsp is back to where it was before the interrupt, and the interrupted function can continue using the stack without problems. However, when a stack overflow happens, the rsp is already outside of the allocated stack. In our case, the page fault handler will try to push data to the stack, causing another page fault. This nested page fault will lead to a double fault, and then a triple fault.
The IDT provides a mechanism to make sure that the page fault handler is run on a valid stack. You can tell the CPU, "when a page fault happens, set rsp to this value when calling my page fault handler". The way this is done is kind of complicated. Remember the TSS, or TaskStateSegment, referenced in the GDT? The TSS contains an IST (Interrupt Stack Table). This "table" contains up to 7 slots where you can store the rsp of a stack. Then, in the IDT, for each entry, you can define a slot index in the IST for the stack that you want to switch to for the interrupt handler.
GDT
└── Pointer to TSS

TSS
└── IST
    ├── Slot 0 (pointer to the top of a stack)
    ├── Slot 1 (pointer to the top of a stack)
    ├── Slot 2 (pointer to the top of a stack)
    ├── Slot 3 (pointer to the top of a stack)
    ├── Slot 4 (pointer to the top of a stack)
    ├── Slot 5 (pointer to the top of a stack)
    └── Slot 6 (pointer to the top of a stack)

IDT
├── IDT Entry 0
│   ├── Stack Index
├── IDT Entry ...
The stack index in an IDT entry can have a value of 0..=7. If it's 0, it means "don't switch rsp". If it is n where n > 0, it means "set rsp to the value defined in slot n-1 of the IST.
Let's start with defining stacks in the IST. We have 7 "slots", so let's define an enum for how we will use those slots in gdt.rs:
#[derive(Debug, IntoPrimitive)]
#[repr(u8)]
pub enum IstStackIndexes {
    Exception,
}
To convert the enum value to a u8, we will use the num_enum crate:
num_enum = { version = "0.7.4", default-features = false }
Next, back in guarded_stack.rs, let's define
pub const EXCEPTION_HANDLER_STACK_SIZE: u64 = 64 * 0x400;
Again, 64 KiB. We might not need this much, but 64 KiB isn't much memory anyways.
Let's also create a StackType::ExceptionHandler enum variant.
Back in gdt.rs, we can add stuff to the TSS:
let tss = local.tss.call_once(|| {
    let mut tss = TaskStateSegment::new();
    tss.interrupt_stack_table[u8::from(IstStackIndexes::Exception) as usize] =
        GuardedStack::new(
            EXCEPTION_HANDLER_STACK_SIZE,
            StackId {
                _type: StackType::ExceptionHandler,
                cpu_id: local.kernel_assigned_id,
            },
        )
        .top();
    tss
});
When we create a dedicated stack for the page fault handler, we can use this opportunity to again create a GuardedStack, so that even if the page fault handler itself causes a stack overflow, it won't silently overwrite data. We just need to add a method to get a pointer to the top of the stack:
impl GuardedStack {
    pub fn top(&self) -> VirtAddr {
        self.top
    }
}
Now in idt.rs, we can adjust how we define our page fault handler to specify the stack index:
unsafe {
    idt.page_fault
        .set_handler_fn(page_fault_handler)
        .set_stack_index(u8::from(IstStackIndexes::Exception).into())
};
Note that the set_stack_index accepts the actual index into the IST, and adds 1 internally.
Now, finally, we can call our stack_overflow call this function in init_bsp, before hlt_loop(). This should result in a panic message saying a page fault happened. No strange other exceptions. No double faults. No triple faults. Nice.
Logging stack overflows
Logging a stack overflow with the accessed address is useful, but it would be even more useful if the page fault handler automatically identified a stack overflow for us. Let's convert our idt.rs into idt/mod.rs and move the page fault handler to idt/page_fault_handler.rs.
pub extern "x86-interrupt" fn page_fault_handler(
    stack_frame: InterruptStackFrame,
    error_code: PageFaultErrorCode,
) {
    let accessed_address = Cr2::read().unwrap();
    if let Some(stack) = STACK_GUARD_PAGES
        .lock()
        .iter()
        .find_map(|(page, stack_id)| {
            if accessed_address.align_down(page.size().byte_len_u64()) == page.start_addr() {
                Some(*stack_id)
            } else {
                None
            }
        })
    {
        panic!("Stack overflow: {stack:#X?}");
    } else {
        panic!(
            "Page fault! Stack frame: {stack_frame:#?}. Error code: {error_code:#?}. Accessed address: {accessed_address:?}."
        );
    }
}
We use the stored STACK_GUARD_PAGES to check if the accessed address which caused the page fault actually accessed the guard page. All page faults will have an accessed access within a guard page. Technically, it is possible for a non-page fault to access a guard page, resulting in the page fault handler to report that a page fault handler happened when it actually didn't happen. However, this is very unlikely, so it would be more useful to just assume that a stack overflow happened.
Trying it out
Try causing a stack overflow in one of the functions that runs on a guarded stack. You should see a message like this:
[0] ERROR panicked at kernel/src/idt/page_fault_handler.rs:24:9:
Stack overflow: StackInfo {
    id: StackId {
        _type: Normal,
        cpu_id: 0x0,
    },
    size: 0x10000,
}
There are many different exceptions that could happen if there is a bug in our code. We already have a page fault handler. We could define a handler for every single possible exception. But to keep things simple, we'll just define a double fault handler. A double fault will trigger if any of the other exception handlers are not present. Unless we use -d int, we won't know what fault led to a double fault, but that's okay.
Let's define a double fault handler:
extern "x86-interrupt" fn double_fault_handler(
    stack_frame: InterruptStackFrame,
    error_code: u64,
) -> ! {
    panic!("Double Fault! Stack frame: {stack_frame:#?}. Error code: {error_code}.")
}
And add it to our IDT:
unsafe {
    idt.double_fault
        .set_handler_fn(double_fault_handler)
        .set_stack_index(u8::from(IstStackIndexes::Exception).into())
};
Again, we will use the same stack that we use for handling page faults, in case the stack pointer was not pointing to a valid stack when the double fault happened.
Now let's purposely cause a double fault to test it:
unsafe { core::arch::asm!("ud2") };
This code does a ud2 instruction, which causes an invalid opcode exception. Since we did not define an exception handler for an invalid opcode exception, it leads to a double fault.
Parsing ACPI Tables
ACPI tables is binary data that provides information about the computer to the operating system. We'll need to parse ACPI tables to send interrupts between CPUs, access timers, and more. We'll use the acpi crate, which parses the binary data into nice Rust types.
acpi = "6.0.1"
Create a file acpi.rs. We'll be using the AcpiTables::from_rsdp method. It needs a handler, which maps the ACPI memory, and the address of the RSDP.
RSDP request
We can ask Limine for the RSDP address by adding the request:
#[used]
#[unsafe(link_section = ".requests")]
pub static RSDP_REQUEST: RsdpRequest = RsdpRequest::new();
Implementing acpi::Handler
For the handler, we'll need to make our own. In acpi.rs, add:
/// Note: this cannot be sent across CPUs because the other CPUs did not flush their cache for changes in page tables
#[derive(Debug, Clone)]
struct KernelAcpiHandler {
    phantom: PhantomData<NonNull<()>>,
}

impl acpi::Handler for KernelAcpiHandler {
    unsafe fn map_physical_region<T>(
        &self,
        physical_address: usize,
        size: usize,
    ) -> acpi::PhysicalMapping<Self, T> {
        todo!()
    }

    fn unmap_physical_region<T>(region: &acpi::PhysicalMapping<Self, T>) {
        todo!()
    }

    // We don't actually need the following functions
    fn read_u8(&self, address: usize) -> u8 {
        let _ = address;
        unimplemented!()
    }

    fn read_u16(&self, address: usize) -> u16 {
        let _ = address;
        unimplemented!()
    }

    fn read_u32(&self, address: usize) -> u32 {
        let _ = address;
        unimplemented!()
    }

    fn read_u64(&self, address: usize) -> u64 {
        let _ = address;
        unimplemented!()
    }

    fn write_u8(&self, address: usize, value: u8) {
        let _ = value;
        let _ = address;
        unimplemented!()
    }

    fn write_u16(&self, address: usize, value: u16) {
        let _ = address;
        let _ = value;
        unimplemented!()
    }

    fn write_u32(&self, address: usize, value: u32) {
        let _ = address;
        let _ = value;
        unimplemented!()
    }

    fn write_u64(&self, address: usize, value: u64) {
        let _ = address;
        let _ = value;
        unimplemented!()
    }

    fn read_io_u8(&self, port: u16) -> u8 {
        let _ = port;
        unimplemented!()
    }

    fn read_io_u16(&self, port: u16) -> u16 {
        let _ = port;
        unimplemented!()
    }

    fn read_io_u32(&self, port: u16) -> u32 {
        let _ = port;
        unimplemented!()
    }

    fn write_io_u8(&self, port: u16, value: u8) {
        let _ = port;
        let _ = value;
        unimplemented!()
    }

    fn write_io_u16(&self, port: u16, value: u16) {
        let _ = port;
        let _ = value;
        unimplemented!()
    }

    fn write_io_u32(&self, port: u16, value: u32) {
        let _ = port;
        let _ = value;
        unimplemented!()
    }

    fn read_pci_u8(&self, address: acpi::PciAddress, offset: u16) -> u8 {
        let _ = address;
        let _ = offset;
        unimplemented!()
    }

    fn read_pci_u16(&self, address: acpi::PciAddress, offset: u16) -> u16 {
        let _ = address;
        let _ = offset;
        unimplemented!()
    }

    fn read_pci_u32(&self, address: acpi::PciAddress, offset: u16) -> u32 {
        let _ = address;
        let _ = offset;
        unimplemented!()
    }

    fn write_pci_u8(&self, address: acpi::PciAddress, offset: u16, value: u8) {
        let _ = address;
        let _ = offset;
        let _ = value;
        unimplemented!()
    }

    fn write_pci_u16(&self, address: acpi::PciAddress, offset: u16, value: u16) {
        let _ = address;
        let _ = offset;
        let _ = value;
        unimplemented!()
    }

    fn write_pci_u32(&self, address: acpi::PciAddress, offset: u16, value: u32) {
        let _ = address;
        let _ = offset;
        let _ = value;
        unimplemented!()
    }

    fn nanos_since_boot(&self) -> u64 {
        unimplemented!()
    }

    fn stall(&self, microseconds: u64) {
        let _ = microseconds;
        unimplemented!()
    }

    fn sleep(&self, milliseconds: u64) {
        let _ = milliseconds;
        unimplemented!()
    }

    fn create_mutex(&self) -> acpi::Handle {
        unimplemented!()
    }

    fn acquire(&self, mutex: acpi::Handle, timeout: u16) -> Result<(), acpi::aml::AmlError> {
        let _ = mutex;
        let _ = timeout;
        unimplemented!()
    }

    fn release(&self, mutex: acpi::Handle) {
        let _ = mutex;
        unimplemented!()
    }
}
We use PhantomData<NonNull<()>> to mark KernelAcpiHandler as not being able to be sent across CPUs. This is because page mappings are not synchronized between CPUs unless we flush the changed pages from the TLB.
We will only need to implement map_physical_region and unmap_physical_region. The rest of the functions will not get called.
Implementing map_physical_region
In map_physical_region, we need to:
- Find an unused virtual memory range
- Map the physical memory to the virtual memory range
- Return the mapping information
Add the following code:
let page_size = max_page_size();
let memory = MEMORY.get().unwrap();
let mut virtual_memory = memory.virtual_memory.lock();
let n_pages = ((size + physical_address) as u64).div_ceil(page_size.byte_len_u64())
    - physical_address as u64 / page_size.byte_len_u64();
let start_page = virtual_memory
    .allocate_contiguous_pages(
        page_size,
        NonZero::new(n_pages).expect("at least 1 byte mapped"),
    )
    .unwrap();
Here we will use the largest supported page size. It's okay if we map extra bytes, and we can improve performance by using fewer, bigger mappings. Then, we use allocate_contiguous_pages to allocate virtual memory to create the mapping at.
Next, we do the actual mapping:
let start_frame = Frame::new(
    PhysAddr::new(
        physical_address as u64 / page_size.byte_len_u64() * page_size.byte_len_u64(),
    ),
    page_size,
)
.unwrap();
let mut physical_memory = memory.physical_memory.lock();
let mut frame_allocator = physical_memory.get_kernel_frame_allocator();
for i in 0..n_pages {
    let page = start_page.offset(i).unwrap();
    let frame = start_frame.offset(i).unwrap();
    let flags = ConfigurableFlags {
        executable: false,
        writable: false,
        pat_memory_type: PatMemoryType::WriteBack,
    };
    unsafe {
        virtual_memory
            .l4_mut()
            .map_page(page, frame, flags, &mut frame_allocator)
            .unwrap();
    }
}
We specify that the memory is not writable, to page fault if the code for some reason tries to write to the ACPI tables. We specify that it is not executable, since ACPI tables don't have any code that we should execute. We use PatMemoryType::WriteBack because it is the most performant memory type, and ACPI tables don't have any read or write side effects.
Finally, we return a PhysicalMapping:
PhysicalMapping {
    physical_start: physical_address,
    virtual_start: NonNull::new(
        (start_page.start_addr() + physical_address as u64 % page_size.byte_len_u64())
            .as_mut_ptr(),
    )
    .unwrap(),
    region_length: size,
    mapped_length: n_pages as usize * page_size.byte_len(),
    handler: self.clone(),
}
Note that because the physical address we mapped isn't necessarily aligned, we have to do some math to find the correct virtual_start that maps to the requested physical_start.
Implementing unmap_physical_region
let page_size = max_page_size();
let start_page = Page::new(
    VirtAddr::from_ptr(region.virtual_start.as_ptr()).align_down(page_size.byte_len_u64()),
    page_size,
)
.unwrap();
let mut virtual_memory = MEMORY.get().unwrap().virtual_memory.lock();
let n_pages = region.mapped_length as u64 / page_size.byte_len_u64();
for i in 0..n_pages {
    let page = start_page.offset(i).unwrap();
    unsafe { virtual_memory.l4_mut().unmap_page(page) }.unwrap();
}
We again get the same page size, start_page, and n_pages from the PhysicalMapping, and then unmap the pages.
Using our ACPI handler
In acpi.rs, add:
pub fn parse(rsdp: &RsdpResponse) -> AcpiTables<impl acpi::Handler> {
    let address = rsdp.address();
    unsafe {
        AcpiTables::from_rsdp(
            KernelAcpiHandler {
                phantom: PhantomData,
            },
            address,
        )
    }
    .unwrap()
}
Then, in main.rs, after calling idt::init(), add:
let rsdp = RSDP_REQUEST.get_response().unwrap();
let acpi_tables = acpi::parse(rsdp)
    .table_headers()
    .map(|(_, header)| header.signature)
    .collect::<alloc::boxed::Box<[_]>>();
log::info!("ACPI Tables: {acpi_tables:?}");
This should log:
[0] INFO ACPI Tables: ["FACP", "APIC", "HPET", "WAET", "BGRT"]
We definitely will be using information from the APIC and HPET ACPI tables in the future, so it's good that we are able to successfully parse those tables.
ACPI tables on real hardware
Jinlon
- FACP
- SSDT
- MCFG
- TPM2
- LPIT
- APIC
- SPCR
- DMAR
- DBG2
- HPET
- BGRT
Lenovo Z560
- FACP
- ASF!
- HPET
- APIC
- MCFG
- SLIC
- BOOT
- ASPT
- WDRT
- SSDT
- SSDT
- SSDT
Learn More
Serial Port Console Redirection (SPCR) Table
It can be really hard to debug when things don't work on real devices. We can log things to the screen, but we are limited to what we can see on the screen. We already log to COM1, but we can only see the it in a virtual machine. Fortunately, some computers, such as Chromebooks, do have a "serial port". There is an ACPI table, SPCR, which defines how to access a serial port.
Chromebooks
See https://docs.mrchromebox.tech/docs/support/debugging.html#suzyqable-debug-cable. Basically, you need to be running MrChromebox UEFI firmware with the coreboot flags CONSOLE_SERIAL=y and EDK2_SERIAL_SUPPORT=y, and have a SuzyQable Debug Cable. You can make a debug cable or buy one. Remember, this cable is only for certain Chromebooks, don't try to use it on other laptops.
Other computers
Since SPCR is a standard ACPI table, there is a chance that the code in this tutorial will just work. But you might have to modify it depending on whats in the SPCR table.
Parsing the SPCR
Create a file spcr.rs. Again, we will be mapping page tables, so we're going to ake a generic function that takes PageSize. We will also add the uart crate, which let's us set a custom baud rate, which is needed on Chromebooks:
uart = { git = "https://github.com/ChocolateLoverRaj/uart", branch = "send-sync" }
/// Checks for SPCR, and sets logger to log through SPCR instead of COM1 accordingly
pub fn init(acpi_tables: &AcpiTables<impl acpi::Handler>) {
    let page_size = max_page_size();
    if let Some(uart) = acpi_tables
        .find_table::<Spcr>()
        // The table might not exist
        .ok()
        .and_then(|spcr| {
            // We may not know how to handle the interface type
            match spcr.interface_type() {
                // These 3 can be handled by the uart crate
                SpcrInterfaceType::Full16550
                | SpcrInterfaceType::Full16450
                | SpcrInterfaceType::Generic16550 => spcr.base_address(),
                _ => None,
            }
        })
        // We get the base address, which is how we access the uart
        .and_then(|base_address| base_address.ok())
        // https://uefi.org/htmlspecs/ACPI_Spec_6_4_html/05_ACPI_Software_Programming_Model/ACPI_Software_Programming_Model.html#generic-address-structure-gas
        // ACPI addresses can be many different types. We will only handle system memory (MMIO)
        .filter(|base_address| base_address.address_space == AddressSpace::SystemMemory)
        .filter(|base_address| {
            base_address.bit_offset == 0 && base_address.bit_width.is_multiple_of(8)
        })
        .map(|base_address| {
            let stride_bytes = base_address.bit_width / 8;
            let memory = MEMORY.get().unwrap();
            let phys_start_address = base_address.address;
            let len = u64::from(stride_bytes) * 8;
            let start_frame = Frame::new(
                PhysAddr::new(phys_start_address).align_down(page_size.byte_len_u64()),
                page_size,
            )
            .unwrap();
            let n_pages = (phys_start_address + len).div_ceil(page_size.byte_len_u64())
                - phys_start_address / page_size.byte_len_u64();
            let mut physical_memory = memory.physical_memory.lock();
            let mut frame_allocator = physical_memory.get_kernel_frame_allocator();
            let mut virtual_memory = memory.virtual_memory.lock();
            let mut allocated_pages = virtual_memory
                .allocate_contiguous_pages(page_size, n_pages)
                .unwrap();
            let start_page = Page::new(allocated_pages.start_addr(), page_size).unwrap();
            for i in 0..n_pages {
                let page = start_page.offset(i).unwrap();
                let frame = start_frame.offset(i).unwrap();
                let flags = ConfigurableFlags {
                    writable: true,
                    executable: false,
                    pat_memory_type: PatMemoryType::StrongUncacheable,
                };
                // Safety: the memory we are going to access is defined to be valid
                unsafe { allocated_pages.map_to(page, frame, flags, &mut frame_allocator) }
                    .unwrap();
            }
            let base_pointer = (start_page.start_addr()
                + phys_start_address % page_size.byte_len_u64())
            .as_mut_ptr();
            unsafe { UartWriter::new(MmioAddress::new(base_pointer, stride_bytes as usize), false) }
        })
    {
        // TODO: Make logger output to this UART
        log::info!("Replaced COM1 with MMIO UART from the SPCR ACPI table");
    }
}
At this point, we should be able to use the Write trait to write to the serial port uart
Replacing the serial port used for logging
Currently, we are using a uart_16550::port::SerialPort. But if we use the SPCR, we will get a UartWriter<MmioAddress>. Both of these structs implement Write, but we need to somehow store either of them. That's where the either crate is useful:
either = { version = "1.15.0", default-features = false }
Then, we just need to make a few changes to logger.rs:
In Inner:
serial_port: Either<SerialPort, UartWriter<MmioAddress>>
And initialize it with:
Either::Left(unsafe { SerialPort::new(0x3F8) })
In the init function:
if let Either::Left(serial_port) = &mut inner.serial_port {
    serial_port.init();
}
Next, we will make a function to replace the serial port:
pub fn replace_serial_port(serial_port: UartWriter<MmioAddress>) {
    LOGGER.inner.lock().serial_port = Either::Right(serial_port);
}
Now back in spcr.rs, all we have to do is replace the comment with
logger::replace_serial_port(uart);
This will result in all future log messages no longer sending data to COM1, and instead sending them to the MMIO UART.
Putting it together
In init_bsp, replace the ACPI tables logging with:
let acpi_tables = acpi::parse(rsdp);
spcr::init(&acpi_tables);
Trying it out
Here are the steps to trying it on a Chromebook:
- Plug in your debug board / cable. It should show up as a USB device on the computer that you are debugging your Chromebook with.
- Use a command such as
tioto view output from/dev/ttyUSB1. If you are usingtio, just runtio /dev/ttyUSB1(to exit, doCtrl+Tand thenQ). - Boot the OS on your Chromebook
Note that you will not see "Hello from BSP" because that will be unconditionally sent to COM1. You should see "Replaced COM1 with MMIO UART from the SPCR ACPI table". You should also see all "Hello from AP" messages, because we start running entry_point_ap after parsing the SPCR.
Local APIC
Each CPU has its own local APIC (Advanced Programmable Interrupt Controller), which is a thing that sends interrupts the CPU. Local APICs can send interrupts to the Local APICs of other CPUs, which are called inter-processor interrupt, or IPIs. Local APICs themselves can receive interrupts from I/O APICs and then forward those interrupts to their CPU. A computer with APIC has to have at least 1 I/O APIC, and the I/O APIC can route interrupts to a local APIC. Most computers only have 1 I/O APIC, but technically, they can have more.
In this part, we will configure and receive interrupts from the local APIC.
APIC crate
We will use this crate:
x2apic = { git = "https://github.com/ChocolateLoverRaj/x2apic-rs", version = "0.5.0" }
You may be wondering why it has an "x2" before APIC. APIC has 3 "versions": APIC (super old, we will not bother supporting), xAPIC (which QEMU has by default), and x2APIC (which is what modern computers have and). The x2apic crate works with both xAPIC and x2APIC.
Mapping the Local APIC if needed
Create a file apic.rs:
#[derive(Debug)]
pub enum LocalApicAccess {
    /// No MMIO needed because x2apic uses register based configuration
    RegisterBased,
    /// The pointer to the mapped Local APIC
    Mmio(VirtAddr),
}

pub static LOCAL_APIC_ACCESS: Once<LocalApicAccess> = Once::new();

/// Maps the Local APIC memory if needed, and initializes LOCAL_APIC_ACCESS
pub fn init_bsp(acpi_tables: &AcpiTables<impl acpi::Handler>) {
    let apic = match InterruptModel::new(&acpi_tables).unwrap().0 {
        InterruptModel::Apic(apic) => apic,
        interrupt_model => panic!("Unknown interrupt model: {:#?}", interrupt_model),
    };
    LOCAL_APIC_ACCESS.call_once(|| {
        if cpu_has_x2apic() {
            LocalApicAccess::RegisterBased
        } else {
            let page_size = PageSize::_4KiB;
            let frame = Frame::new(PhysAddr::new(apic.local_apic_address), page_size).unwrap();
            // Local APIC is always exactly 4 KiB, aligned to 4 KiB
            let memory = MEMORY.get().unwrap();
            let mut physical_memory = memory.physical_memory.lock();
            let mut frame_allocator = physical_memory.get_kernel_frame_allocator();
            let mut virtual_memory = memory.virtual_memory.lock();
            let page = virtual_memory
                .allocate_contiguous_pages(page_size, NonZero::new(1).unwrap())
                .unwrap();
            let flags = ConfigurableFlags {
                writable: true,
                executable: false,
                // We use strong uncacheable memory type, because reads and writes have side effects
                pat_memory_type: PatMemoryType::StrongUncacheable,
            };
            // Safety: We map to the correct page for the Local APIC
            unsafe {
                virtual_memory
                    .l4_mut()
                    .map_page(page, frame, flags, &mut frame_allocator)
            }
            .unwrap();
            LocalApicAccess::Mmio(page.start_addr())
        }
    });
}
and then in main.rs, after spcr::init, add:
local_apic::map_if_needed(&acpi_tables);
Initializing the local APIC
We will be getting a LocalApic struct from the x2apic crate. We will store it in CPU local data. One issue is that LocalApic is !Send and !Sync, so Rust will not allow us to put LocalApic in CPU local data. The reason that LocalApic is !Send and !Sync is that it is not safe to send across CPUs. We are not sending it across CPUs, so we can safely ignore the !Send and !Sync. To ignore these, we will use the force-send-sync crate:
force-send-sync = { git = "https://github.com/ChocolateLoverRaj/force-send-sync", branch = "no_std", version = "1.1.0" }
Then, in CpuLocalData, add:
pub local_apic: Once<spin::Mutex<SendSync<LocalApic>>>,
Before we can build a LocalApic with LocalApicBuilder, we need to have a spurious, error, and timer interrupt vector. In x86_64, you can configure up to 256 different interrupts for the CPU to handle. Each interrupt index is called an interrupt vector (for some reason). Basically, we have to tell the local APIC, "if a spurious interrupt happens, trigger the CPUs interrupt at this interrupt index". Like the exception handlers, we configure the handler functions for the interrupt vectors in the IDT. The first 32 interrupts are for exceptions and reserved. After that, we can decide how we'll use the other interrupt vectors (up to index 255). To define which interrupt vectors are used for what, let's create an enum in a new file interrupt_vector.rs:
use num_enum::IntoPrimitive;

#[derive(Debug, IntoPrimitive)]
#[repr(u8)]
pub enum InterruptVector {
    LocalApicSpurious = 0x20,
    LocalApicTimer,
    LocalApicError,
}
Now, back in apic.rs, let's add a function that will get run on every CPU:
/// This function needs to be called on all CPUs.
/// [`init_bsp`] must be called first.
pub fn init_local_apic() {
    get_local().local_apic.call_once(|| {
        spin::Mutex::new({
            let local_apic = {
                let mut builder = LocalApicBuilder::new();
                // We only need to use `set_xapic_base` if x2APIC is not supported
                if let LocalApicAccess::Mmio(address) = LOCAL_APIC_ACCESS.get().unwrap() {
                    builder.set_xapic_base(address.as_u64());
                }
                builder.spurious_vector(u8::from(InterruptVector::LocalApicSpurious).into());
                builder.error_vector(u8::from(InterruptVector::LocalApicError).into());
                builder.timer_vector(u8::from(InterruptVector::LocalApicTimer).into());
                let mut local_apic = builder.build().unwrap();
                // Safety: We are ready to handle interrupts (and interrupts are disabled anyways)
                unsafe { local_apic.enable() };
                // Safety: We don't need the timer to be on
                unsafe { local_apic.disable_timer() };
                local_apic
            };
            // Safety: The only reason why LocalApic is marked as !Send and !Sync is because it cannot be accessed across CPUs. We are only accessing it from this CPU.
            unsafe { SendSync::new(local_apic) }
        })
    });
}
Then in main.rs add:
local_apic::init();
After apic::init_bsp in init_bsp, and after idt::init() in init_ap.
Testing timer interrupts
To test if our code successfully set up interrupt handlers, let's try receiving timer interrupts. In idt.rs, add:
extern "x86-interrupt" fn apic_timer_interrupt_handler(_stack_frame: InterruptStackFrame) {
    log::info!("Received APIC timer interrupt");
    // We must notify the local APIC that it's the end of interrupt, otherwise we won't receive any more interrupts from it
    let mut local_apic = get_local().local_apic.get().unwrap().try_lock().unwrap();
    // Safety: We are done with an interrupt triggered by the local APIC
    unsafe { local_apic.end_of_interrupt() };
}
And then in the init function, similar to how we define exception handlers, we'll define an interrupt handler, but using the interrupt index:
idt[u8::from(InterruptVector::LocalApicTimer)].set_handler_fn(apic_timer_interrupt_handler);
Note that we did not define handlers spurious and error interrupt vectors. So if one of those does happen, it will result in a double fault. But it shouldn't happen.
Then, to test out that the timer interrupt is working, temporarily add this to the BSP and AP code (after initializing the local APIC):
// Remember to not hold the lock to the local APIC before enabling interrupts
{
    let mut local_apic = get_local().local_apic.get().unwrap().lock();
    unsafe {
        local_apic.set_timer_divide(x2apic::lapic::TimerDivide::Div128);
        local_apic.enable_timer();
    };
}
x86_64::instructions::interrupts::enable();
You should see all of the CPUs receive a timer interrupt:
[CPU 0] INFO  Received APIC timer interrupt
[CPU 4] INFO  Received APIC timer interrupt
[CPU 5] INFO  Received APIC timer interrupt
[CPU 1] INFO  Received APIC timer interrupt
[CPU 6] INFO  Received APIC timer interrupt
[CPU 2] INFO  Received APIC timer interrupt
[CPU 3] INFO  Received APIC timer interrupt
[CPU 7] INFO  Received APIC timer interrupt
and then, after some time, all CPUs will receive another timer interrupt, and they will continue to periodically receive them. The time between timer interrupts varies between computers. In qemu, it is a very short duration. On Jinlon, it is very long. On the Lenovo Z560, it is more often than Jinlon, but much less often than qemu.
Learn More
- https://wiki.osdev.org/APIC
- https://wiki.osdev.org/APIC_Timer
- https://en.wikipedia.org/wiki/Advanced_Programmable_Interrupt_Controller
Sending IPIs
Now that we got a LocalApic, we can send interrupts between CPUs.
Improving the panic handler
Right now, in our panic handler, we stop the CPU from executing any code by calling hlt_loop. However, this only stops the current CPU. The other CPUs will continue running, which is not good. Let's send inter-processor interrupt to tell all the other CPUs to stop. Since it is very important that the other CPUs should stop, we'll send a non-maskable interrupt (NMI). An NMI interrupt the CPU even if it has interrupts disabled.
This should be simple. We can just tell the Local APIC on the CPU that the panic happened on to send an IPI to all other CPUs, right? Well, there is one thing we need to consider. The other CPUs might not have their IDT set up to handle NMIs. In this scenario, they will receive an NMI, but since the IDT is not set up, a triple fault will happen on the other CPU, causing a system reset (and then we can't see the panic message!). We'll make it so that in this scenario, we won't send an NMI to the CPU which hasn't set up its IDT yet. We will instead leave a note saying "The kernel panicked before you set up your IDT. You should stop now." We can do this with the power of atomics!
Atomically keep track of which CPUs loaded their IDT
Create a file nmi_handler_states.rs. We will create an enum to represent whether a CPU has set its NMI handler or not (which is effectively the same as whether the CPU has loaded its IDT or not).
pub enum NmiHandlerState {
    /// If this CPU receives an NMI, it will probably cause a triple fault
    NmiHandlerNotSet,
    /// If this CPU receives an NMI, the kernel's NMI handler function will be called
    NmiHandlerSet,
    /// If you see this while trying to set the NMI, just call the NMI handler now
    KernelPanicked,
}
But we want to access this state atomically. We can use the atomic_enum crate for this.
atomic_enum = "0.3.0"
What this crate does is internally use an atomic integer and handle the conversions for us.
So add
use atomic_enum::atomic_enum;
and above the enum, add
#[atomic_enum]
Then let's create a global variable that will store the states for all CPUs, similar to how we store CPU local data.
pub static NMI_HANDLER_STATES: Once<Box<[AtomicNmiHandlerState]>> = Once::new();

pub fn init() {
    NMI_HANDLER_STATES.call_once(|| {
        (0..cpus_count())
            .map(|_| AtomicNmiHandlerState::new(NmiHandlerState::NmiHandlerNotSet))
            .collect()
    });
}
And then in the top of init_bsp:
nmi_handler_states::init();
Updating the IDT code
In idt.rs, let's create an NMI handler:
fn handle_panic_originating_on_other_cpu() -> ! {
    hlt_loop()
}

extern "x86-interrupt" fn nmi_handler(_stack_frame: InterruptStackFrame) {
    handle_panic_originating_on_other_cpu()
}
and when creating the IDT:
idt.non_maskable_interrupt.set_handler_fn(nmi_handler);
After calling idt.load(), add
let local = get_local();
// Now that we loaded the IDT, we are ready to receive NMIs
// Let's update our state to indicate that we are ready to receive NMIs
if NMI_HANDLER_STATES.get().unwrap()[local.kernel_assigned_id as usize]
    .compare_exchange(
        NmiHandlerState::NmiHandlerNotSet,
        NmiHandlerState::NmiHandlerSet,
        Ordering::Relaxed,
        Ordering::Relaxed,
    )
    .is_err()
{
    // `compare_exchange` will "fail" if the value is currently not what we expected it to be.
    // In this case, the kernel already panicked and updated our state to `KernelPanicked` before we tried to indicate that we are ready to receive NMIs.
    handle_panic_originating_on_other_cpu()
};
Updating the panic handler
In the panic handler, before hlt_loop(), message, add
// Since the OS panicked, we need to tell the other CPUs to stop immediately
// However, if we send an NMI to a CPU that didn't load its IDT yet, the system will triple fault
if let Some(local) = try_get_local()
    && let Some(mut local_apic) = local
        .local_apic
        .get()
        .and_then(|local_apic| local_apic.try_lock())
    && let Some(nmi_handler_states) = NMI_HANDLER_STATES.get()
{
    for (cpu_id, nmi_handler_state) in nmi_handler_states
        .iter()
        .enumerate()
        // Make sure to not send an NMI to our own CPU
        .filter(|(cpu_id, _)| *cpu_id as u32 != local.kernel_assigned_id)
    {
        if let NmiHandlerState::NmiHandlerSet =
            nmi_handler_state.swap(NmiHandlerState::KernelPanicked, Ordering::Release)
        {
            // Safety: since the kernel is panicking, we need to tell the other CPUs to hlt
            unsafe { local_apic.send_nmi(local_apic_id_of(cpu_id as u32)) };
        }
    }
}
Let's create local_apic_id_of in cpu_local_data.rs:
 /// Get the Local APIC id of a CPU from the CPU's kernel assigned id
pub fn local_apic_id_of(kernel_assigned_id: u32) -> u32 {
    CPU_LOCAL_DATA[kernel_assigned_id as usize]
        .get()
        .unwrap()
        .local_apic_id
}
Trying it out
In the top of init_ap, add
if get_local().kernel_assigned_id == 2 {
    for _ in 0..20000000 {}
}
and after apic::init_local_apic();, add
if get_local().kernel_assigned_id == 1 {
    for _ in 0..10000000 {}
    panic!("test panic");
}
Then run QEMU with 4 CPUs. We would expected the following to happen:
- CPUs 0 (BSP), 1, and 3 load their IDT
- CPU 1 panics, sending an NMI to CPUs 0 and 3
- CPUs 0 and 3 receive the NMI and do
hlt_loop() - CPU 2 loads its IDT
- CPU 2 realizes that the kernel already panicked and does
hlt_loop()
And with our debugger, we can confirm that this is working as expected:
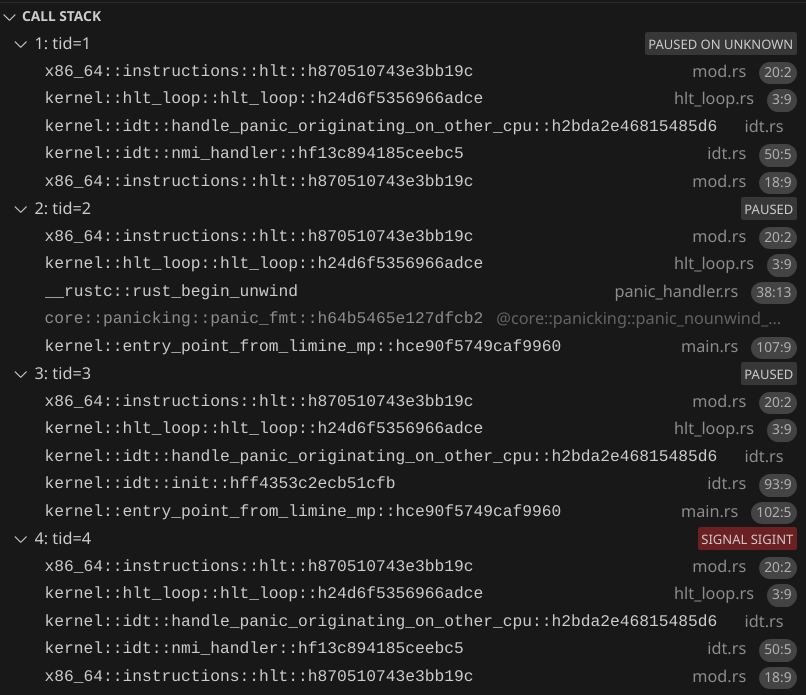
What is user mode?
So far, our operating system has been just a kernel. In an OS, the kernel is code that runs with full permissions. The kernel can modify page tables, access any memory, and access any I/O port.
Part of what an operating system is expected to do is run arbitrary, untrusted programs without letting those programs do bad things such as cause a kernel panic, triple fault, and access things it's not allowed to. To do this, CPUs have a thing called a privilege level. In x86_64, there are two privilege levels used in modern day operating systems. Ring 0, which is kernel mode, and Ring 3, which is user mode.
User mode is capable of running programs with restricted permissions, so that code running in user mode cannot mess up your computer, kernel, or other programs (as long as the kernel doesn't have security vulnerabilities that let user mode code bypass restrictions). User mode is essential for running code that you don't fully trust. User mode also helps contain the damage caused by buggy code, making it so that at worst, a program will just crash itself and not crash the kernel or other programs. Even if you're planning on only running your own code that you trust on your OS, you should still run as much of your code as you practically can in user mode.
Programs and executable file formats
You should be familiar with programs. Whether it's a graphical app, a command line tool, or a systemd service, all apps are made up of at least 1 executable file. Before we can start executing a program in user mode, we need to load it into memory. At minimum, we need to load the executable parts of a program (which contains CPU instructions), immutable global variables (const), mutable global variables (static), and memory for the stack.
There are many different file formats that store information about these memory regions. For our OS, we will be using the ELF format for our programs. This format is widely used in operating systems, including Linux, FreeBSD, and RedoxOS. It is also the format that Rust outputs when building code for the x86_64-unknown-none target.
Creating a program
In your workspace's Cargo.toml file, add a workspace member "user_mode_program_0". Then create a folder user_mode_program_0 with Cargo.toml:
[package]
name = "user_mode_program_0"
version = "0.1.0"
edition = "2024"
publish = false

[[bin]]
name = "user_mode_program_0"
test = false
bench = false
and src/main.rs:
#![no_std]
#![no_main]

#[panic_handler]
fn rust_panic(_info: &core::panic::PanicInfo) -> ! {
    loop {
        core::hint::spin_loop();
    }
}

#[unsafe(no_mangle)]
unsafe extern "sysv64" fn entry_point() -> ! {
    loop {
        core::hint::spin_loop();
    }
}
Similar to our original kernel program, we'll start with a very minimal Rust program (which needs a panic handler to compile). To indicate that the entry_point function is the entry point in our program, create build.rs:
fn main() {
    // Tell cargo to specify in the output ELF what the entry function is
    let entry_function = "entry_point";
    println!("cargo:rustc-link-arg=-e{entry_function}");
}
Let's build it:
cargo build --package user_mode_program_0 --target x86_64-unknown-none
Now we can look at the generated code:
objdump -d target/x86_64-unknown-none/debug/user_mode_program_0
target/x86_64-unknown-none/debug/user_mode_program_0:     file format elf64-x86-64


Disassembly of section .text:

0000000000201120 <entry_point>:
  201120:       eb 00                   jmp    201122 <entry_point+0x2>
  201122:       f3 90                   pause
  201124:       eb fc                   jmp    201122 <entry_point+0x2>
We can see that our entry_point got compiled into 3 instructions, which make the forever loop.
Now let's look at the ELF file info needed by our kernel to load and run the program:
readelf --file-header --segments target/x86_64-unknown-none/debug/user_mode_program_0
ELF Header:
  Magic:   7f 45 4c 46 02 01 01 00 00 00 00 00 00 00 00 00
  Class:                             ELF64
  Data:                              2's complement, little endian
  Version:                           1 (current)
  OS/ABI:                            UNIX - System V
  ABI Version:                       0
  Type:                              EXEC (Executable file)
  Machine:                           Advanced Micro Devices X86-64
  Version:                           0x1
  Entry point address:               0x201120
  Start of program headers:          64 (bytes into file)
  Start of section headers:          4504 (bytes into file)
  Flags:                             0x0
  Size of this header:               64 (bytes)
  Size of program headers:           56 (bytes)
  Number of program headers:         4
  Size of section headers:           64 (bytes)
  Number of section headers:         13
  Section header string table index: 11

Program Headers:
  Type           Offset             VirtAddr           PhysAddr
                 FileSiz            MemSiz              Flags  Align
  PHDR           0x0000000000000040 0x0000000000200040 0x0000000000200040
                 0x00000000000000e0 0x00000000000000e0  R      0x8
  LOAD           0x0000000000000000 0x0000000000200000 0x0000000000200000
                 0x0000000000000120 0x0000000000000120  R      0x1000
  LOAD           0x0000000000000120 0x0000000000201120 0x0000000000201120
                 0x0000000000000006 0x0000000000000006  R E    0x1000
  GNU_STACK      0x0000000000000000 0x0000000000000000 0x0000000000000000
                 0x0000000000000000 0x0000000000000000  RW     0x0

 Section to Segment mapping:
  Segment Sections...
   00
   01
   02     .text
   03
In our kernel, we'll need
Entry point address: 0x201120
because that's the address to the instruction that we will tell the CPU to start executing code in user mode.
Now let's look at the program headers, aka segments. Our kernel will only need to process the segments that are type LOAD. Looking at the flags, we can see that our ELF has two segments. One that is read-only and one that is read and execute. Once we use static global variables in our program, there will be another LOAD segment with read-write flags. Let's force there to be a RW LOAD segment:
#![no_std]
#![no_main]

use core::{hint::black_box, sync::atomic::AtomicU8};

#[panic_handler]
fn rust_panic(_info: &core::panic::PanicInfo) -> ! {
    loop {
        core::hint::spin_loop();
    }
}

static TEST_VAR: AtomicU8 = AtomicU8::new(0);

#[unsafe(no_mangle)]
unsafe extern "sysv64" fn entry_point() -> ! {
    black_box(&TEST_VAR);
    loop {
        core::hint::spin_loop();
    }
}
Now our segments look like this:
Program Headers:
  Type           Offset             VirtAddr           PhysAddr
                 FileSiz            MemSiz              Flags  Align
  PHDR           0x0000000000000040 0x0000000000200040 0x0000000000200040
                 0x0000000000000118 0x0000000000000118  R      0x8
  LOAD           0x0000000000000000 0x0000000000200000 0x0000000000200000
                 0x0000000000000158 0x0000000000000158  R      0x1000
  LOAD           0x0000000000000160 0x0000000000201160 0x0000000000201160
                 0x0000000000000014 0x0000000000000014  R E    0x1000
  LOAD           0x0000000000000174 0x0000000000202174 0x0000000000202174
                 0x0000000000000000 0x0000000000000001  RW     0x1000
  GNU_STACK      0x0000000000000000 0x0000000000000000 0x0000000000000000
                 0x0000000000000000 0x0000000000000000  RW     0x0
Putting the user mode program in our ISO
In runner/Cargo.toml, add this to [build-dependencies]:
user_mode_program_0 = { path = "../user_mode_program_0", artifact = "bin", target = "x86_64-unknown-none" }
In runner/build.rs, add:
let user_mode_program_0_executable_file = env::var("CARGO_BIN_FILE_USER_MODE_PROGRAM_0").unwrap();
ensure_symlink(
    user_mode_program_0_executable_file,
    iso_dir.join("user_mode_program_0"),
)
.unwrap();
Accessing the user mode ELF from our kernel
Limine's module request let's us ask Limine to load additional files into memory before booting our kernel. In limine_requests.rs, add:
pub const USER_MODE_PROGRAM_0_PATH: &CStr = c"/user_mode_program_0";
#[used]
#[unsafe(link_section = ".requests")]
pub static MODULE_REQUEST: ModuleRequest = ModuleRequest::new()
    .with_internal_modules(&[&InternalModule::new().with_path(USER_MODE_PROGRAM_0_PATH)]);
Loading the ELF
Create a file run_program_0.rs:
pub fn run_program_0() { }
And in init_bsp, add
run_program_0();
before hlt_loop();.
In run_program_0, the first thing we need to do is get a &File from Limine:
// Parse the ELF
let module = MODULE_REQUEST
    .get_response()
    .unwrap()
    .modules()
    .iter()
    .find(|module| module.path() == USER_MODE_PROGRAM_0_PATH)
Next, we need to get a &[u8] to the file so we can parse it.
let ptr = NonNull::new(slice_from_raw_parts_mut(
    module.addr(),
    module.size() as usize,
))
.unwrap();
// Safety: Limine gives us a valid pointer and len
let elf_bytes = unsafe { ptr.as_ref() };
Next, we need to parse these bytes as an ELF. Conveniently, the elf crate exists to do this:
elf = { version = "0.8.0", default-features = false }
So let's parse the ELF, panicking if there is an error:
let elf = ElfBytes::<AnyEndian>::minimal_parse(elf_bytes).expect("ELF should be valid");
Before we can start mapping the ELF, we need to create a new address space for the user mode program. We are keeping all kernel memory in the higher half of virtual memory. We will use the lower half of virtual memory for user space. This way, we can transition from kernel mode to user mode without changing address spaces. Since all processes will have their own address space, they can all use the same lower half addresses without conflicts. We will just have to switch address spaces when switching programs.
Warning: we are making the kernel memory in the higher half accessible to all user address spaces. On CPUs affected by the Meltdown vulnerability, user programs could in theory read memory that they are not supposed to be able to read. For example, if you type a password on a "Web Browser" app, a "Video Game" app could access that password in memory. To focus effort on writing fun code, this tutorial will not include mitigation for the Meltdown vulnerability. Just keep in mind that this tutorial's OS is not the most secure OS. If you are confident in your OS dev abilities, feel free to add a mitigation to your own OS.
To allocate physical frames for the user program, let's modify physical_memory.rs. Add a MemoryType::UsedByUserMode enum variant, and
impl PhysicalMemory {
    pub fn get_user_mode_program_frame_allocator(&mut self) -> PhysicalMemoryFrameAllocator<'_> {
        PhysicalMemoryFrameAllocator {
            physical_memory: self,
            memory_type: MemoryType::UsedByUserMode,
        }
    }
}
Now back in run_program_0, we can create the address space:
// Create a new address space for the user mode program
let memory = MEMORY.get().unwrap();
let mut physical_memory = memory.physical_memory.lock();
let mut user_l4 = memory.virtual_memory.lock().l4_mut().new_user(
    physical_memory
        .get_user_mode_program_frame_allocator()
        .allocate_4kib_frame()
        .unwrap(),
);
We will need to get the flags of each segment. The elf crate let's us get these through the p_flags field, which is a u32. If bit 0 is 1, the R flags is present. If bit 1 is 1, the W flag is present. If bit 2 is 1, the E flag is present. Let's create a nice struct to parse these bits in a readable way using the bitflags crate:
bitflags = "2.9.4"
Create elf_segment_flags.rs:
use bitflags::bitflags;
use elf::segment::ProgramHeader;

bitflags! {
    #[derive(Debug, Clone, Copy)]
    pub struct ElfSegmentFlags: u32 {
        const EXECUTABLE = 1 << 0;
        const WRITABLE = 1 << 1;
        const READABLE = 1 << 2;

        // The source may set any bits
        const _ = !0;
    }
}

impl From<ProgramHeader> for ElfSegmentFlags {
    fn from(value: ProgramHeader) -> Self {
        Self::from_bits_retain(value.p_flags)
    }
}
Next we will need to actually load the segment. That is, we need to "place" the segment into requested space in the user program's virtual address space.
The cool thing about ELF files is that they minimize the amount of physical frames we have to allocate towards a program, and minimizes the amount of memory that we need to copy or zero. Consider the LOAD segments above, after we forced there to be a RW LOAD segment.
The first segment (R) starts at 0x0000000000000000 in the ELF file and at 0x0000000000200000 in the program memory. Both addresses have the 0x0 offset from a 4 KiB page.
The next segment (R E) starts at 0x0000000000000160 in the ELF file and at 0x0000000000201160 in the program memory. Both addresses have a 0x160 offset from a 4 KiB page.
The last segment (RW) starts at 0x0000000000000174 in the ELF file and at 0x0000000000202174 in the program memory. Both addresses have a 0x174 offset from a 4 KiB page.
The data inside the ELF (code and static variables) is compactly arranged. At the same time, all segments are spaced out from each other enough so that each segment will have its own 4 KiB pages, letting us assign write and execute permissions on each segment.
We can think of each segment in the ELF as [u8]. The program needs a & ref to R and R E segments, and a &mut ref to RW segments.
If we wanted to only run 1 instance of the program, we could transfer ownership of the ELF memory to the user mode program. We can crate pages that point to the existing frames that Limine put the module in. Then we would not have to copy any memory. But remember, we would be transferring ownership of the Limine module, and letting the user mode program to modify it.
If we want to run multiple instances of the program, we can create pages that point to the read-only segments of the ELF, while creating new frames for RW segments and copying the data from the ELF to the new frames. This way, all read-only segments can be shared between all instances of the program, while still isolating each instance so it cannot corrupt the ELF for the other instances.
The program that we are going to spawn is similar to PID 1 on Linux. We won't need to create multiple instances of it, so we can consume the Limine module instead of copying it. To make sure that we don't try to use the module after consuming it, we can store a global variable in the kernel:
static CONSUMED_USER_MODE_PROGRAM_0: AtomicBool = AtomicBool::new(false);
and then first thing inside the run_program_0 fn:
let previously_consumed = CONSUMED_USER_MODE_PROGRAM_0.swap(false, Ordering::Relaxed);
assert!(!previously_consumed);
Now let's start loading! Quick instructions on how we are supposed to load a segment:
- Copy (or move)
p_fileszbytes to virtual memory starting atp_vaddr - Set following (
p_memsz-p_filesz) bytes to0 - Use memory protection features to enforce the flags
An important thing to note is that p_memsz can be > p_filesz. This is so that the ELF doesn't need to include a bunch of contiguous 0s. The ELF loader (that's the code we will write) must fill in 0s there. And technically p_memsz can be so much greater than p_filesz that we have to allocate new pages in addition to the pages occupied by the ELF file.
To make things easier, we will only load "good" ELFs:
- All read-only sections must have
p_memsz=p_filesz - If there is a section with
p_filesz>0andp_memsz>p_filesz, and zeroing the additional memory region should not mess up other segments
This way we can simplify our ELF consuming and loading logic:
- Map all pages (based on
p_vaddrandp_filesz) in each segment to the physical frames of the ELF. - If the last segment has
p_memsz>p_filesz, we zero the memory afterp_fileszup to the page boundary. If we still need more zero-initialized memory, we allocate new physical frames and completely zero them, and mark them as used by the user mode program. - Mark all of the ELF's physical frames used by segments (which we can calculate based on
p_offsetandp_filesz) as owned by the user mode program. - Mark all of the ELF's physical frames not used by segments as available.
- If the ELF's last frame is referenced, zero any remaining bytes in that frame.
We will only be using ELFs generated by Rust, so the ELFs will be valid. However, our loading code needs to be able to handle invalid and malicious ELFs as well.
Here is code that does the steps above
// Remove the module from physical memory map
// We will only be using 4 KiB pages because most ELFs will have segments only aligned to 4 KiB, and Limine only aligns the ELF to 4 KiB
let page_size = PageSize::_4KiB;
let module_physical_interval = {
    let start = VirtAddr::from_ptr(module.addr()).offset_mapped().as_u64();
    ie(
        start,
        (start + module.size()).next_multiple_of(page_size.byte_len_u64()),
    )
};
let _ = physical_memory.map_mut().cut(module_physical_interval);

// Map ELF segments
let mut range_to_zero: Option<Range<PhysAddr>> = None;
for segment in elf.segments().unwrap() {
    if ElfSegmentType::try_from(segment.p_type) != Ok(ElfSegmentType::Load) {
        continue;
    }

    // Make sure the segment is only referencing file memory contained within the ELF
    assert!(segment.p_offset + segment.p_filesz <= module.size());

    let start_page = Page::new(
        VirtAddr::new(segment.p_vaddr).align_down(page_size.byte_len_u64()),
        page_size,
    )
    .unwrap();
    let file_pages_len = if segment.p_filesz > 0 {
        (segment.p_vaddr + segment.p_filesz).div_ceil(page_size.byte_len_u64())
            - segment.p_vaddr / page_size.byte_len_u64()
    } else {
        0
    };
    let start_frame = Frame::new(
        (VirtAddr::from_ptr(module.addr()).offset_mapped() + segment.p_offset)
            .align_down(page_size.byte_len_u64()),
        page_size,
    )
    .unwrap();

    // Map the virtual memory to the ELF's frames
    let flags = ElfSegmentFlags::from(segment);
    let mut frame_allocator = physical_memory.get_user_mode_program_frame_allocator();
    let flags = ConfigurableFlags {
        pat_memory_type: PatMemoryType::WriteBack,
        writable: flags.contains(ElfSegmentFlags::WRITABLE),
        executable: flags.contains(ElfSegmentFlags::EXECUTABLE),
    };
    for i in 0..file_pages_len {
        let page = start_page.offset(i).unwrap();
        let frame = start_frame.offset(i).unwrap();
        unsafe { user_l4.map_page(page, frame, flags, &mut frame_allocator) }.unwrap();
    }

    // Mark the ELF's frames as used by user mode
    if file_pages_len > 0 {
        let interval = {
            let start = start_frame.start_addr().as_u64();
            ie(start, start + file_pages_len * page_size.byte_len_u64())
        };
        let _ = physical_memory.map_mut().cut(interval);
        physical_memory
            .map_mut()
            .insert_merge_touching_if_values_equal(interval, MemoryType::UsedByUserMode)
            .unwrap();
    }

    if segment.p_memsz > segment.p_filesz {
        if segment.p_filesz > 0 {
            // We need to zero any remaining bytes from that frame
            assert_eq!(
                range_to_zero, None,
                "there can only be up to 1 segment with p_memsz > p_filesz"
            );
            range_to_zero = Some({
                let start = VirtAddr::from_ptr(module.addr()).offset_mapped()
                    + segment.p_offset
                    + segment.p_filesz;
                start..start.align_up(page_size.byte_len_u64())
            });
        }

        // We need to allocate, zero, and map additional frames
        let extra_pages_len = (segment.p_vaddr + segment.p_memsz)
            .div_ceil(page_size.byte_len_u64())
            - (segment.p_vaddr + segment.p_filesz).div_ceil(page_size.byte_len_u64());
        let start_page = start_page.offset(file_pages_len).unwrap();
        for i in 0..extra_pages_len {
            let page = start_page.offset(i).unwrap();
            let frame = physical_memory
                .allocate_frame_with_type(page_size, MemoryType::UsedByUserMode)
                .unwrap();
            let frame_ptr =
                NonNull::new(frame.offset_mapped().start_addr().as_mut_ptr::<u8>()).unwrap();
            // Safety: we own the frame
            unsafe { frame_ptr.write_bytes(0, page_size.byte_len()) };
            let mut frame_allocator = physical_memory.get_user_mode_program_frame_allocator();
            unsafe { user_l4.map_page(page, frame, flags, &mut frame_allocator) }.unwrap();
        }
    }
}

// Map all non-referenced frames in the ELF as usable
// Currently all non-referenced frames are gaps in the map
// We just need to "fill the gaps" with usable
loop {
    let gap = physical_memory
        .map_mut()
        .gaps_trimmed(module_physical_interval)
        .next();
    if let Some(gap) = gap {
        physical_memory
            .map_mut()
            .insert_merge_touching_if_values_equal(gap, MemoryType::Usable)
            .unwrap();
    } else {
        break;
    }
}

// Zero the range we need to zero, if needed
if let Some(range_to_zero) = range_to_zero {
    let count = (range_to_zero.end - range_to_zero.start) as usize;
    let ptr = NonNull::new(range_to_zero.start.offset_mapped().as_mut_ptr::<u8>()).unwrap();
    // Safety: we now have exclusive access to the ELF bytes
    unsafe { ptr.write_bytes(0, count) };
}

// Zero the unused bytes of the last frame of the ELF module, if it's used
// For simplicity we will just uncoditionally zero it
{
    let start = module.addr().addr() + module.size() as usize;
    let ptr = NonNull::new(start as *mut u8).unwrap();
    let end = start.next_multiple_of(page_size.byte_len());
    let count = end - start;
    // Safety: we have exclusive accces to this memory
    unsafe { ptr.write_bytes(0, count) };
}
And in physical_memory.rs, add a way of getting the map:
impl PhysicalMemory {
    pub fn map_mut(&mut self) -> &mut NoditMap<u64, Interval<u64>, MemoryType> {
        &mut self.map
    }
}
Allocating a stack
Similar to how Limine allocates a stack for our kernel, we need to allocate a stack for the user mode program.
// Allocate a stack
// Technically this stack placement could overlap with our ELF, but we will assume it won't
let rsp = LOWER_HALF_END;
{
    let stack_size: u64 = 64 * 0x400;
    // We are using 4 KiB pages because we need <2 MiB, but we could use any page size for the stack, as long as the stack size is a multiple of it
    let page_size = PageSize::_4KiB;
    let pages_len = stack_size.div_ceil(page_size.byte_len_u64());
    let start_page = Page::new(
        VirtAddr::new(rsp - pages_len * page_size.byte_len_u64()),
        page_size,
    )
    .unwrap();
    for i in 0..pages_len {
        let page = start_page.offset(i).unwrap();
        let frame = physical_memory
            .allocate_frame_with_type(page_size, MemoryType::UsedByUserMode)
            .unwrap();
        let flags = ConfigurableFlags {
            pat_memory_type: PatMemoryType::WriteBack,
            writable: true,
            executable: false,
        };
        let mut frame_allocator = physical_memory.get_user_mode_program_frame_allocator();
        unsafe { user_l4.map_page(page, frame, flags, &mut frame_allocator) }.unwrap()
    }
};
Entering user mode
Enabling sysretq
There are two ways we can enter user mode, iret and sysretq. There is no dedicated method to entering user mode for the first time. iretq is used to return from an interrupt. sysretq is used to return from a system call. Both methods require using an instruction as if we were just returning back to user mode, even though we are actually entering it for the first time. Because it's simpler, we will use sysretq to enter user mode. To enable it, we need to update the Efer register. In run_program_0, add:
// Enable syscall in IA32_EFER
// https://shell-storm.org/x86doc/SYSCALL.html
// https://wiki.osdev.org/CPU_Registers_x86-64#IA32_EFER
unsafe {
    Efer::update(|flags| {
        *flags = flags.union(EferFlags::SYSTEM_CALL_EXTENSIONS);
    })
};
Doing sysretq
Create enter_user_mode.rs:
use core::arch::asm;

use x86_64::registers::rflags::RFlags;

pub struct EnterUserModeInput {
    pub rip: u64,
    pub rsp: u64,
    pub rflags: RFlags,
}

/// # Safety
/// Does `sysretq`.
/// Make sure that you are not letting the user space program do things you don't want it to do.
/// You must enable system call extensions first.
pub unsafe fn enter_user_mode(EnterUserModeInput { rip, rsp, rflags }: EnterUserModeInput) -> ! {
    let rflags = rflags.bits();
    unsafe {
        // Note that we do `sysretq` and not `sysret` because if we just do `sysret` that could be compiled into a `sysretl`, which is for 32-bit compatibility mode and can mess things up.
        asm!("\
            mov rsp, {}
            sysretq",
            in(reg) rsp,
            in("rcx") rip,
            in("r11") rflags,
            // The user space program can only "return" with a `syscall`, which will jump to the syscall handler
            options(noreturn)
        );
    }
}
Calling enter_user_mode
In run_program_0, before the if block that does drop(elf);, add
// Parse the entry point before we drop `elf`
let entry_point = NonZero::new(elf.ehdr.e_entry).expect("entry point should be defined in ELF");
Next we need to switch to the user mode program's address space:
// Switch to the user address space
// Safety: we can still reference kernel memory
unsafe { user_l4.switch_to(memory.new_kernel_cr3_flags) };
And finally, we use the entry point and the top of the stack we mapped to call enter_user_mode:
let input = EnterUserModeInput {
    rflags: RFlags::empty(),
    rip: entry_point.get(),
    rsp: rsp,
};
unsafe { enter_user_mode(input) };
Checking if it worked
Our user mode program does not log any messages to confirm that it's running (yet). Currently, it does a spin loop. We have two signs that it's working as expected:
- The kernel did not panic, or have an exception, or triple fault
- The CPU usage should show 1 CPU as using 100% usage
For now, to be more sure that it's working, let's make the user mode program cause a page fault:
unsafe {
    (0xABCDEF as *mut u8).read_volatile();
}
Now we should see
Page fault! Stack frame: InterruptStackFrame {
    instruction_pointer: VirtAddr(
        0x201600,
    ),
    code_segment: SegmentSelector {
        index: 2,
        rpl: Ring3,
    },
    cpu_flags: RFlags(
        RESUME_FLAG | AUXILIARY_CARRY_FLAG | PARITY_FLAG | 0x2,
    ),
    stack_pointer: VirtAddr(
        0x7fffffffffc8,
    ),
    stack_segment: SegmentSelector {
        index: 1,
        rpl: Ring0,
    },
}. Error code: PageFaultErrorCode(
    USER_MODE,
). Accessed address: VirtAddr(0xabcdef).
And this time, the error code contains the USER_MODE flag! This confirms it. We successfully loaded a user mode program and executed it.
Learn More
- https://en.wikipedia.org/wiki/Kernel_(operating_system)
- https://en.wikipedia.org/wiki/Executable
- https://en.wikipedia.org/wiki/Executable_and_Linkable_Format
- https://offlinemark.com/kpti-the-virtual-memory-101-fact-thats-no-longer-true/
- https://en.wikipedia.org/wiki/Kernel_page-table_isolation
- https://medium.com/@boutnaru/the-linux-process-journey-pid-1-init-60765a069f17
- https://nfil.dev/kernel/rust/coding/rust-kernel-to-userspace-and-back/. Warning: syscall handler implementation is unsound.
- https://wiki.osdev.org/Getting_to_Ring_3
- https://en.wikipedia.org/wiki/Protection_ring
- https://www.felixcloutier.com/x86/iret:iretd:iretq
- https://www.felixcloutier.com/x86/sysret
- https://wiki.osdev.org/CPU_Registers_x86-64#IA32_EFER
We need something
Currently, our user mode program can't do anything useful. It can't log messages to the serial port. It can't draw to the screen. It cannot handle interrupts. This is good, because the kernel can restrict what a user mode program can and can't do. We need a way of allowing the user mode program do do certain things, such as log messages. We can have the user mode program ask the kernel so that the kernel can do stuff that only the kernel has permission to do, such as accessing the serial port. But how can the user mode program communicate with the kernel? With syscalls!
What is a syscall?
A syscall is similar to calling a function, except that the user mode program calls the kernel's function. The CPU switches from user mode to kernel mode, while sending data from the user program. Then the kernel processes the program's message, and can "return" back to the program, switching from kernel mode to user mode, while sending data from the kernel.
How it works is the user mode program uses the syscall instruction, which switches execution to the kernel's syscall handler function. The rdi, rsi, rdx, r10, r8, r9, and rax registers are free to be used when doing syscall, so a program can send data by writing to those registers before the syscall instruction. Then, the kernel can read those registers. The kernel can return back to the user program using the sysretq instruction. Again, the kernel can write to those registers before the instruction and the user program can read those registers after its syscall instruction.
In most operating systems, each syscall instruction is like a request from the user program, and the kernel responds to every request, sending a response back with a sysretq. In Linux, the rdi, rsi, rdx, r10, r8, r9, and rax registers are used for the request. rax specifies a syscall number, which specifies what type of request this is. rdi, rsi, rdx, r10, r8, and r9 are used for up to 6 arguments, and each argument can be up to a u64 in size. Then the kernel processes the request and sets rax to the response, which is up to a u64 in size. However, operating systems can decide how they want to use syscall and sysretq. They can define their own use of the 7 registers, or even choose to not use registers to pass data!
Tryout out the syscall and sysretq instructions
In the user mode program, add
fn syscall(inputs_and_ouputs: &mut [u64; 7]) {
unsafe {
asm!("\
syscall
",
inlateout("rdi") inputs_and_ouputs[0],
inlateout("rsi") inputs_and_ouputs[1],
inlateout("rdx") inputs_and_ouputs[2],
inlateout("r10") inputs_and_ouputs[3],
inlateout("r8") inputs_and_ouputs[4],
inlateout("r9") inputs_and_ouputs[5],
inlateout("rax") inputs_and_ouputs[6],
);
}
}
This let's us write to the 7 registers before the syscall instruction, and see what the kernel set their values to before doing sysretq.
And then in entry_point, before our loop, let's try doing a syscall:
let mut inputs_and_outputs = [10, 20, 30, 40, 50, 60, 70];
syscall(&mut inputs_and_outputs);
syscall(&mut inputs_and_outputs);
This should let us view the inputs in the kernel, and then view the outputs in the kernel because they will be inputs the 2nd time.
Processing the syscall
We have to have a syscall handler function, and then tell the CPU the address of the function.
Assembly function
We can't directly use a Rust function for the syscall handler. First, we need to switch the stack pointer to a known good stack that only our kernel can access. This way, the kernel will always run the syscall handler with a valid rsp, and the user program cannot inspect the kernel's stack after the syscall.
We'll have to write our syscall handler in assembly up to the point where we can safely call a Rust function.
We'll use a naked function to write the syscall handler in assembly while still integrating with Rust. Create syscall_handler.rs:
use core::arch::naked_asm;
#[unsafe(naked)]
unsafe extern "sysv64" fn raw_syscall_handler() -> ! {
naked_asm!(
"
// assembly goes here
"
)
}
Before we do anything instruction involving the stack, such as push, pop, or call, we need to switch stacks. We can load the syscall handler's stack pointer from the CPU local data, and reference GsBase in our assembly code. But we also need to keep our current rsp value somewhere. In CpuLocalData, add:
pub syscall_handler_stack_pointer: AtomicU64,
pub syscall_handler_scratch: AtomicU64,
And we can initialize both to Default::default().
Next let's create an init function to initialize the syscall handler:
pub fn init() {
let local = get_local();
let syscall_handler_stack = GuardedStack::new(
64 * 0x400,
StackId {
_type: StackType::SyscallHandler,
cpu_id: local.kernel_assigned_id,
},
);
local
.syscall_handler_stack_pointer
.store(syscall_handler_stack.top().as_u64(), Ordering::Relaxed);
// Enable syscall in IA32_EFER
// https://shell-storm.org/x86doc/SYSCALL.html
// https://wiki.osdev.org/CPU_Registers_x86-64#IA32_EFER
unsafe {
Efer::update(|flags| {
*flags = flags.union(EferFlags::SYSTEM_CALL_EXTENSIONS);
})
};
// This tells the CPU the address of our syscall handler
LStar::write(VirtAddr::from_ptr(raw_syscall_handler as *const ()));
}
This function also creates a guarded stack for the syscall handler.
Now let's update the assembly function:
#[unsafe(naked)]
unsafe extern "sysv64" fn raw_syscall_handler() -> ! {
naked_asm!(
"
// Save the user mode stack pointer
mov gs:[{syscall_handler_scratch_offset}], rsp
// Switch to the kernel stack pointer
mov rsp, gs:[{syscall_handler_stack_pointer_offset}]
",
syscall_handler_scratch_offset = const offset_of!(CpuLocalData, syscall_handler_scratch),
syscall_handler_stack_pointer_offset = const offset_of!(CpuLocalData, syscall_handler_stack_pointer),
)
}
Here are writing to a memory location specified by the value of GsBase + an offset, and we use the offset_of! macro to get the offset.
We are almost ready to call a Rust function. We must pass some input to the Rust function. The Rust function needs:
- The 7 input registers (
rdi,rsi,rdx,r10,r8,r9,rax) - The pointer to the instruction that we should return to when returning from the syscall (currently stored in
rcx) - The value of the RFLAGS (currently stored in
r11) - The stack pointer to restore when returning from the syscall
| Calling convention | input[0] | input[1] | input[2] | input[3] | input[4] | input[5] | input[6] | Additional inputs |
|---|---|---|---|---|---|---|---|---|
Our syscall (we decide the order and usage) | rdi | rsi | rdx | r10 | r8 | r9 | rax | N/A |
sysv64 | rdi | rsi | rdx | rcx | r8 | r9 | N/A | On the stack, in reverse order |
As you can see, we can directly pass rdi, rsi, rdx, r8, and r9 to our Rust function without modifying those registers. For input[4], we can set rcx to the value of r10. We can pass rax as an additional input on the stack. We can also pass rcx r11, and the previous stack pointer as additional inputs on the stack. This is how to do it in assembly, keeping in mind that additional arguments go on the stack in reverse order:
// This is input[9]
push gs:[{syscall_handler_scratch_offset}]
// This is input[8]
// Make sure to save `rcx` before modifying it
push rcx
// This is input[7]
push r11
// This is input[6]
push rax
// Convert `syscall`s `r10` input to `sysv64`s `rcx` input
mov rcx, r10
And we can specify our Rust function to match what the assembly calls it with:
unsafe extern "sysv64" fn syscall_handler(
input0: u64,
input1: u64,
input2: u64,
input3: u64,
input4: u64,
input5: u64,
input6: u64,
rflags: u64,
return_instruction_pointer: u64,
return_stack_pointer: u64,
) -> ! {
let mut inputs = [input0, input1, input2, input3, input4, input5, input6];
log::debug!("Inputs: {inputs:?}");
for input in &mut inputs {
*input = input.wrapping_add(1);
}
todo!()
}
Note that we use wrapping_add because it doesn't panic, unlike normal add which panics on overflow. We need to not let user mode programs cause a kernel panic no matter what they do.
Now, from our assembly function, we can call our Rust function:
call {syscall_handler}
and we can do syscall_handler = sym syscall_handler to make our assembly function reference the pointer to our Rust function.
Returning from the syscall
We just need to load the values in our 7 "output registers", and also restore rsp to the previous stack pointer, rcx to the previous instruction pointer, and r11 to the previous rflags register value.
unsafe {
asm!(
"
mov rsp, {}
sysretq
",
in(reg) return_stack_pointer,
in("rcx") return_instruction_pointer,
in("r11") rflags,
in("rdi") inputs[0],
in("rsi") inputs[1],
in("rdx") inputs[2],
in("r10") inputs[3],
in("r8") inputs[4],
in("r9") inputs[5],
in("rax") inputs[6],
options(noreturn)
);
}
Checking if it worked
We should now see
[0] DEBUG Inputs: [10, 20, 30, 40, 50, 60, 70]
[0] DEBUG Inputs: [11, 21, 31, 41, 51, 61, 71]
The first time, we receive all of the expected numbers in the correct order, and the 2nd time, they are also in the correct order, and incremented by 1.
Next steps
This part demonstrates that we can pass up to 7 registers as inputs and up to 7 registers as outputs. As part of the process of designing an OS, we have to choose how we are going to use those registers, and how many out of the 7 we are going to use. Are we going to have 1 register to indicate the "syscall number"? What if our input cannot fit in the 7 registers? These are things to consider.
Learn more
- https://nfil.dev/kernel/rust/coding/rust-kernel-to-userspace-and-back/. Warning: syscall handler implementation is unsound.
- https://en.wikipedia.org/wiki/X86_calling_conventions#System_V_AMD64_ABI
- https://wiki.osdev.org/System_Calls
- https://en.wikipedia.org/wiki/System_call
- https://www.felixcloutier.com/x86/syscall
- https://www.felixcloutier.com/x86/sysret